Lab 3 - Event Subscriptions and Search API
In this lab, you will create a WxCC event subscription for task:ended and deliver the event notifications to a Webex Connect webhook flow.
When a contact ends, WxCC sends a webhook notification to Webex Connect. Webex Connect parses the event payload, extracts data.taskId, and uses that interaction ID to query the Search API for post-call details.
API Docs
The WxCC Subscriptions API is documented here: Subscriptions API. The webhook behavior is described here: Using Webhooks.
Warning
Bruno client is installed on the laptop. Do not use any web versions.
Lab Objectives
In Lab 1, you learned how to call WxCC APIs manually from Bruno and directly from a WxCC flow. In Lab 2, you used Webex Connect as an API orchestration layer for an AI Agent fulfillment action.
In Lab 3, you will configure an event-driven integration. Instead of polling WxCC to check whether an interaction has ended, you will create a subscription that sends task:ended notifications to Webex Connect, then use the resulting taskId to query WxCC Search.
By the end of this lab, you will have:
- Opened the imported Webex Connect flow with an inbound webhook trigger.
- Copied the public webhook URL generated by Webex Connect.
- Created a WxCC subscription for the
task:endedevent. - Placed and ended a test call.
- Verified that Webex Connect received the event payload and exposed
data.taskId. - Queried the WxCC Search API in Bruno.
- Added and tested a Search method in the Webex Connect WxCC Integration node.
- Wired the Search call into the imported event-processing flow.
Why task:ended?
Use task:ended because the Search API runs after the interaction has ended. The event payload provides the taskId needed by the downstream API call.
Lab Overview
You will perform the following tasks:
- Open the imported Webex Connect service and webhook receiver script.
- Capture the Webex Connect webhook URL.
- Create a WxCC
task:endedsubscription in Bruno. - Validate the subscription.
- Place a test call and verify the event in Webex Connect transaction logs.
- Query the Search API for that interaction.
- Add the Search method to the Webex Connect integration node.
- Wire the Search method into the imported event-processing flow.
Lab 3.1 - Open the Imported Webex Connect Webhook Receiver
Before you create the WxCC subscription, Webex Connect needs a URL that can receive webhook events. The lab admins have already imported the receiver flow into your Webex Connect tenant.
Imported Flow
Do not create a new Webex Connect flow for this lab. Use the imported flow provided by the lab admins so the event subscription and Search API steps connect to the same event-processing flow.
Open the Imported Webex Connect Script
- Go to Control Hub > Contact Center > Overview.
- Under Digital Channels, launch Webex Connect.
- Open the imported service named
Event Subscription - Click Flows.
- Open the imported script named
Process Events with Search and Campaign -
Confirm the script is Live.
If the script is not live, stop and ask your instructor before making changes.
Note
This script has already been configured with the subscription_EndTask webhook, a debug log, and placeholder logic that you will update later in this lab.
Lab 3.2 - Copy the Webex Connect Webhook URL
Now that you have opened the imported flow, copy the URL that WxCC will call when a task:ended event occurs.
Copy the Webhook URL
- Open the live Process Events with Search and Campaign flow.
- Click the Configure Webhook node.
- Locate the Webhook URL.
- Copy the full URL and save it temporarily.
Checkpoint
You have the Webex Connect webhook URL required for the WxCC subscription.
Lab 3.3 - Create the WxCC task:ended Subscription
In this section, you will use Bruno to tell WxCC to send task:ended events to the Webex Connect webhook URL.
Create the Subscription in Bruno
- Open Bruno on the lab laptop.
- Use the WxCC API collection you configured in Lab 1.
- Open the collection Vars tab.
- Update the
webexConnectWebhookUrlvariable with the webhook URL you copied from Webex Connect. - Open the API request WxCC - Event Subscribe.
-
Confirm the request body uses the webhook variable:
{ "name": "task:ended", "eventTypes": [ "task:ended" ], "destinationUrl": "{{webexConnectWebhookUrl}}", "orgId": "{{org_id}}", "resourceVersion": "task:1.0.0" } -
Click Send.
- Confirm you receive a successful response and copy the returned subscription
id. - Optional: paste the returned
idinto the collectionsubscriptionIdvariable so you can use the get/delete subscription requests later.
Avoid duplicate subscriptions
If you send the create request multiple times, you may create multiple subscriptions pointing to the same webhook. If your instructor asks you to clean up duplicates, use the list/delete subscription requests in Bruno.
Verify the Subscription Exists
- In Bruno, use the GET request WxCC - Event List Subscriptions.
- Locate and confirm your
task:endedsubscription.
Checkpoint
WxCC is now configured to publish task:ended events to Webex Connect.
Lab 3.4 - Trigger a task:ended Event
Now you will place a real call into the contact center, end it, and confirm that the subscription fires.
Place and End a Test Call
- Sign in to the Agent Desktop using the User1 credentials provided for your POD.
- Set the agent to Available.
- From your phone, dial the Entry Point number provided in your POD credentials.
- Answer the call on the Agent Desktop.
- Speak for 15-30 seconds.
- End the call.
- Submit any wrap-up code on the Agent Desktop.
- Wait 10-30 seconds for the webhook event to arrive in Webex Connect.
Lab 3.5 - Verify the Webhook Payload in Webex Connect
The final validation is to confirm that Webex Connect received the event and can read the taskId.
Inspect Transaction Logs
- In Webex Connect, open the Event Subscription service.
- Open the Process Events with Search and Campaign script.
- Click the Debug icon on the right hand side of the screen, this opens the Transaction Logs.
- Locate the most recent transaction for your webhook script.
- Open the transaction and inspect the inbound webhook payload.
-
Confirm the payload includes:
Field Why It Matters typeShould be task:endeddata.taskIdInteraction ID used by the Search API data.orgIdOrganization that generated the event data.channelTypeUsed later to identify voice interactions
Checkpoint
Webex Connect is now receiving WxCC task:ended events. The taskId in the payload is available as the interaction ID for the Search API query.
Troubleshooting
- No transaction appears in Webex Connect: Confirm the script is Live, the subscription is active, and the
destinationUrlexactly matches the webhook URL. - 401 or 403 when creating the subscription: Refresh your Bruno token and confirm your Webex Integration includes
cjp:config,cjp:config_read,cjp:config_write, andcjp:user. - Subscription exists but no events arrive: Confirm you ended a real contact and completed wrap-up. Some event delivery can take a few seconds.
- Debug log cannot find
taskId: Confirm you opened the imported script assigned to your POD. If thesubscription_EndTaskwebhook does not exposeinboundWebhook.data.taskId, stop and ask your instructor to verify the imported script. - Duplicate events arrive: Check for duplicate active subscriptions pointing to the same webhook URL.
Lab 3.6 - Search API Overview
The WxCC Search API is a GraphQL API that gives you direct, flexible access to the interaction data recorded by Webex Contact Center. Unlike fixed REST endpoints that return a predefined set of fields, GraphQL lets you describe exactly what you want — request only the fields you need, filter by time range, interaction ID, agent, queue, channel type, and more, all in a single call.
The API exposes three core query types:
taskDetails— Customer Session Records (CSRs) and Customer Activity Records (CARs): the full lifecycle of a contact interaction, including agent, queue, duration, sentiment, CSAT, wrap-up codes and global variablesagentSession— Agent Session Records (ASRs) and Agent Activity Records (AARs): agent login/logout, channel activity and idle state datataskLegDetails— Call Leg Records (CLRs): per-queue leg data for queue-based reporting
In this lab, we use taskDetails to retrieve rich post-call data for a specific interaction — including AI-generated sentiment, auto-CSAT score, wrap-up code and survey response global variable — immediately after a call ends. This gives the event-processing flow the data it needs for downstream decisions and optional bonus automation.
Beyond this lab, the same API can power real-time wallboards, custom CRM enrichment, supervisor dashboards, interaction search tools, compliance reporting and any downstream system that needs structured interaction data on demand.
API Docs
You can find the full Search API documentation here
Warning
Bruno client is installed on the laptop, do not use any web versions.
Lab 3.7 - Time Utilities
Use these helpers to generate timestamps for API queries. Click Refresh to get the latest epoch values.
Current epoch (milliseconds): 0
Current epoch - 24h (milliseconds): 0
Note
Values populate when the page loads. Click Refresh to update with the current time for copying into your API client.
Lab 3.8 - Test Search API in Bruno
In this section you will place a test call, have an agent answer it, and then query the Search API in Bruno to retrieve the full interaction record.
Step 1: Place a Test Call
Place and Answer a Test Call
- Sign in to the Agent Desktop at https://desktop.wxcc-us1.cisco.com/ using the User1 credentials provided for your POD.
- Set the agent to Available.
- From your phone, dial the Entry Point number provided in your POD credentials.
- Answer the call on the Agent Desktop.
- Have a short conversation (15–30 seconds), then end the call.
- Submit a wrap-up code on the Agent Desktop.
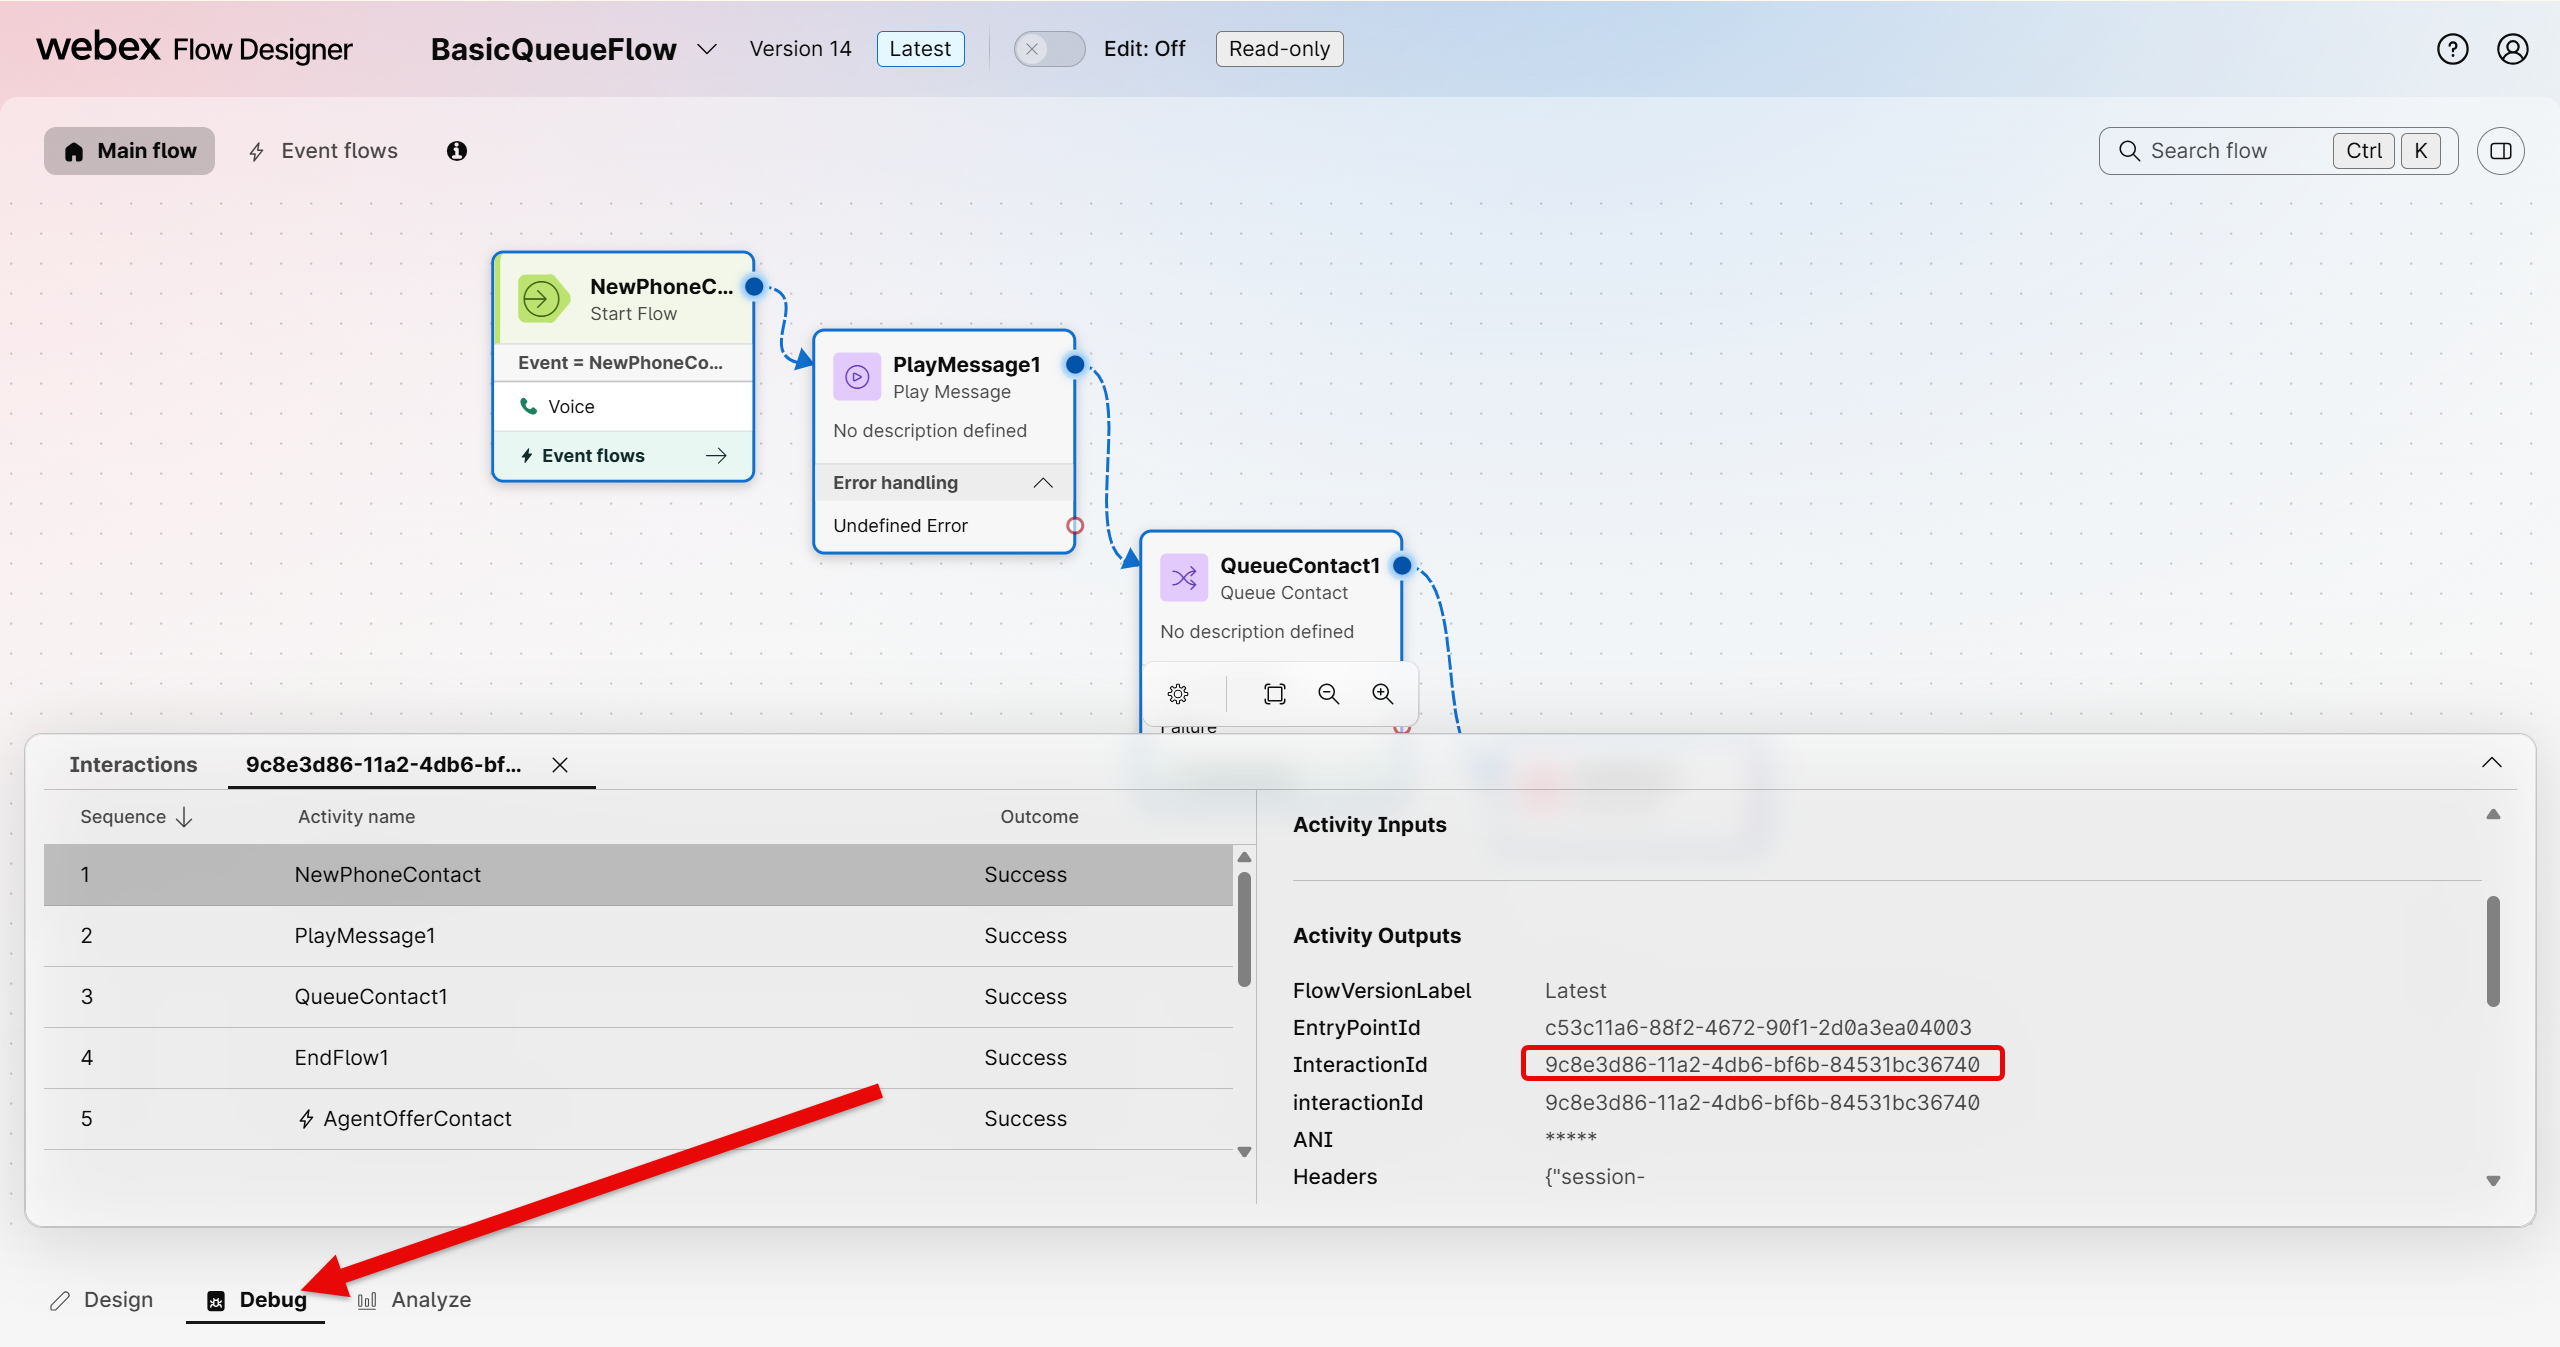
- Note the Interaction ID (also referred to as
taskId) — you will need it in the next step. Easiest way is to go to your inbound flow, click on debug, pick your last entry, click on NewPhoneContact and copy the InteractionId from the Activity Outputs.
Tip
The Interaction ID is a UUID in the format xxxxxxxx-xxxx-xxxx-xxxx-xxxxxxxxxxxx. Copy it somewhere handy before proceeding.
Step 2: Query the Search API
Run taskDetails Query in Bruno
- Open Bruno on your lab laptop.
- In the WxCC API collection, locate the POST request named
Search Task Details. -
Click on the Body tab and confirm the payload matches the following. Replace the three placeholder values with your own:
fromDate— use the Current epoch - 24h value from Lab 3.7toDate— use the Current epoch value from Lab 3.7transId— the Interaction ID from your test call aboveglobalFeedbackSurveyVariableName— leave asSurveyResult
{ "query": "query TaskDetails($fromDate: Long!, $toDate: Long!, $transId: String!, $globalFeedbackSurveyVariableName: String!) { taskDetails( from: $fromDate, to: $toDate, timeComparator: createdTime, filter: { and: [ { id: { equals: $transId } } ] }, pagination: {} ) { tasks { abandonedType agentToAgentTransferCount autoCsat blindTransferCount conferenceCount connectedDuration consultToQueueCount csatScore GV_SurveyResponse: stringGlobalVariables(name: $globalFeedbackSurveyVariableName) { name value } holdDuration id isContactEscalatedToQueue lastQueue { name id } lastWrapupCodeName overflowCount owner { name id } sentiment terminatingEnd terminationType totalDuration } pageInfo { endCursor hasNextPage } intervalInfo { interval timezone } } }", "variables": { "fromDate": "REPLACE_WITH_EPOCH_MINUS_24H", "toDate": "REPLACE_WITH_EPOCH_NOW", "transId": "REPLACE_WITH_YOUR_INTERACTION_ID", "globalFeedbackSurveyVariableName": "SurveyResult" } } -
Click Send.
- Confirm you receive a
200 OKresponse with atasksarray containing your interaction record.
Understanding the Query
This query uses the taskDetails GraphQL operation to fetch a single interaction by ID within a 24-hour window. The filter narrows results to the exact transId. The stringGlobalVariables field — aliased as GV_SurveyResponse — retrieves the value of the SurveyResult global variable set during the call, which carries the customer's post-call survey score.
Sample Response
A successful response will look similar to this:
{
"data": {
    "taskDetails": {
    "tasks": [
        {
        "abandonedType": null,
        "agentToAgentTransferCount": null,
        "autoCsat": null,
        "blindTransferCount": 0,
        "conferenceCount": 0,
        "connectedDuration": 6663,
        "consultToQueueCount": 0,
        "csatScore": 0,
        "GV_SurveyResponse": {
            "name": "SurveyResult",
            "value": ""
        },
        "holdDuration": 13242,
        "id": "9c8e3d86-11a2-4db6-bf6b-84531bc36740",
        "isContactEscalatedToQueue": true,
        "lastQueue": {
            "name": "Queue-1",
            "id": "99fd0d26-f828-401d-a3a5-6cbc9b29ab34"
        },
        "lastWrapupCodeName": "Sale",
        "overflowCount": 0,
        "owner": {
            "name": "User1 Agent1",
            "id": "e75cad8e-8770-4654-8ea9-b63f358d7234"
        },
        "sentiment": null,
        "terminatingEnd": "Customer",
        "terminationType": "sudden_disconnect",
        "totalDuration": 30489
        }
    ],
    "pageInfo": {
        "endCursor": null,
        "hasNextPage": false
    },
    "intervalInfo": null
    }
}
}
Checkpoint
If you receive a 200 OK with a populated tasks array, the Search API is reachable and returning interaction data correctly. Proceed to Lab 3.9.
Troubleshooting
- Empty
tasksarray: ConfirmfromDateandtoDatebracket the time of your call, and thattransIdmatches exactly (case-sensitive UUID). 401 Unauthorized: Return to Lab 1.2 and refresh your Bruno access token.400 Bad Request: Check thevariablesblock — all four fields are required andfromDate/toDatemust be string-quoted Long values.
Lab 3.9 - Create the WxCC Integration Custom Node
Before adding the Search method, you need to create the WxCC Integration custom node in Webex Connect. This node is the foundation for WxCC API calls made from within flows, including optional Campaign Manager calls if you continue into the bonus lab.
This Step May Already Be Completed
If you completed Lab 2, the WxCC Integration custom node may already exist in your Webex Connect tenant. Navigate to Assets → Integrations and check for an existing node named WxCC Integration. If it is there, skip to Lab 3.10.
Step 1: Download the Node Icon
Download the SVG Icon
-
Click the link below to download the node icon:
-
Save the file somewhere accessible on your laptop — you will upload it in the next step.
Step 2: Create the Custom Node
Create WxCC Integration Node
- In Webex Connect, navigate to Assets → Integrations.
-
Click Add Integration and select Custom Node from the menu.
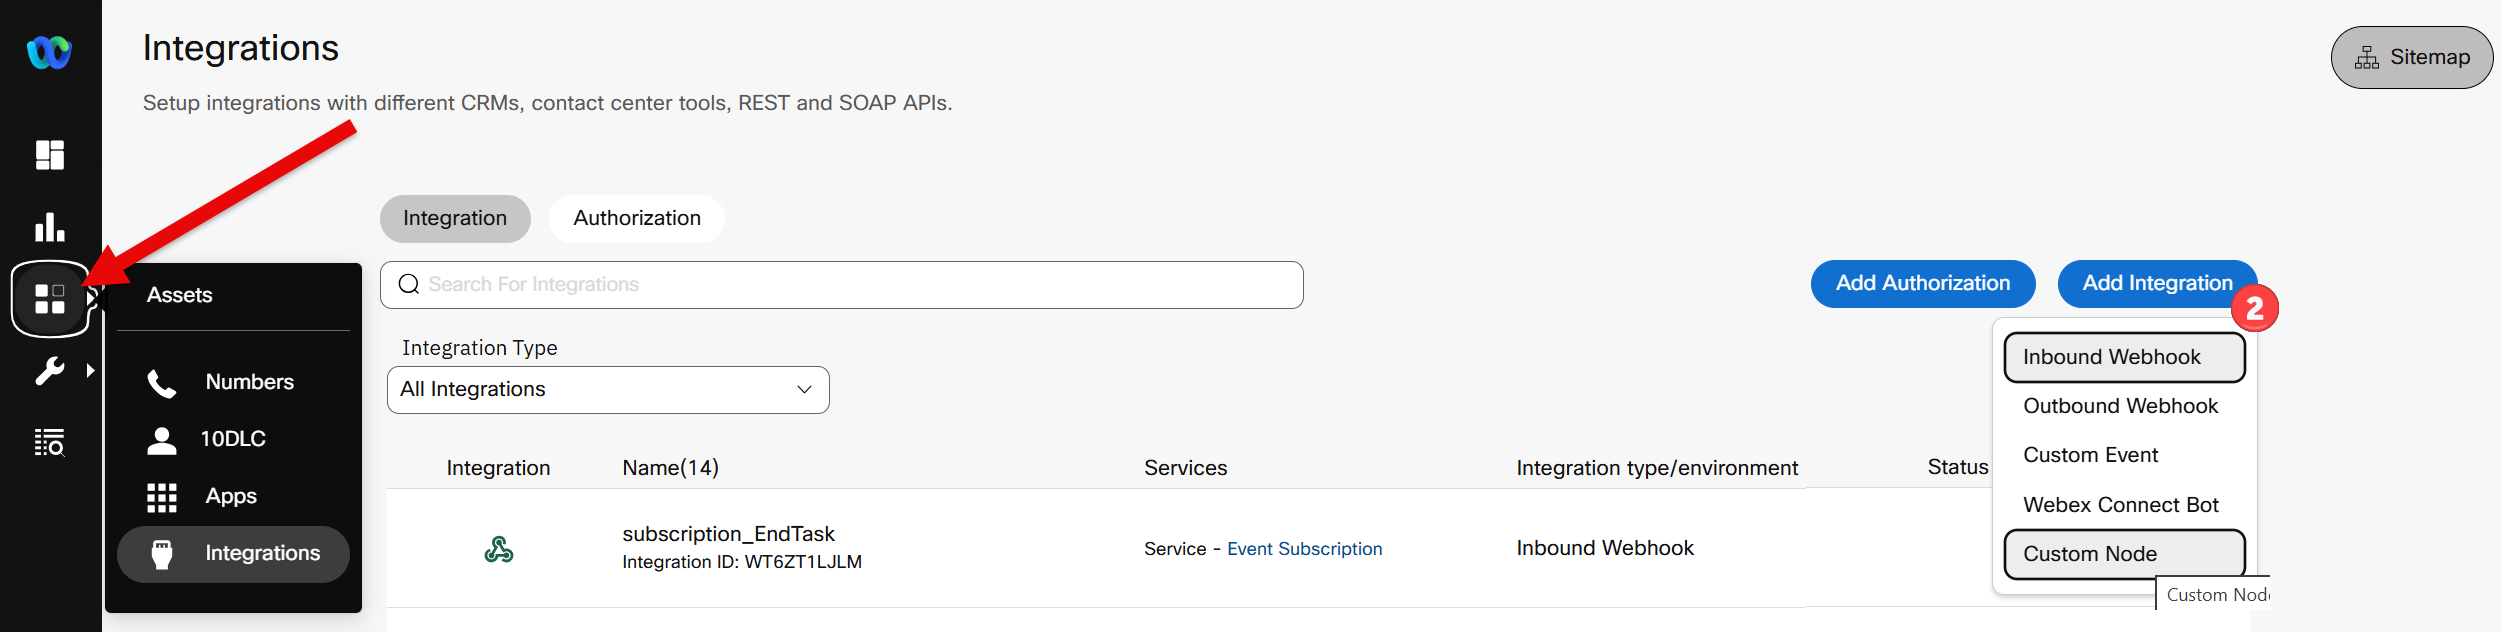
Assets → Integrations page showing the Add Integration option -
In the Create new custom node dialog, configure the following:
- Node Icon — drag
wxcc_custom.svginto the Upload Node Icon (SVG) box or click the box and locate your SVG image. - Node Name —
WxCC Integration - Description —
WxCC REST API Integration - Node Category — click Custom Category and type
WxCCand select Create custom category: WxCC when it appears - Creation Type —
Create a blank integration
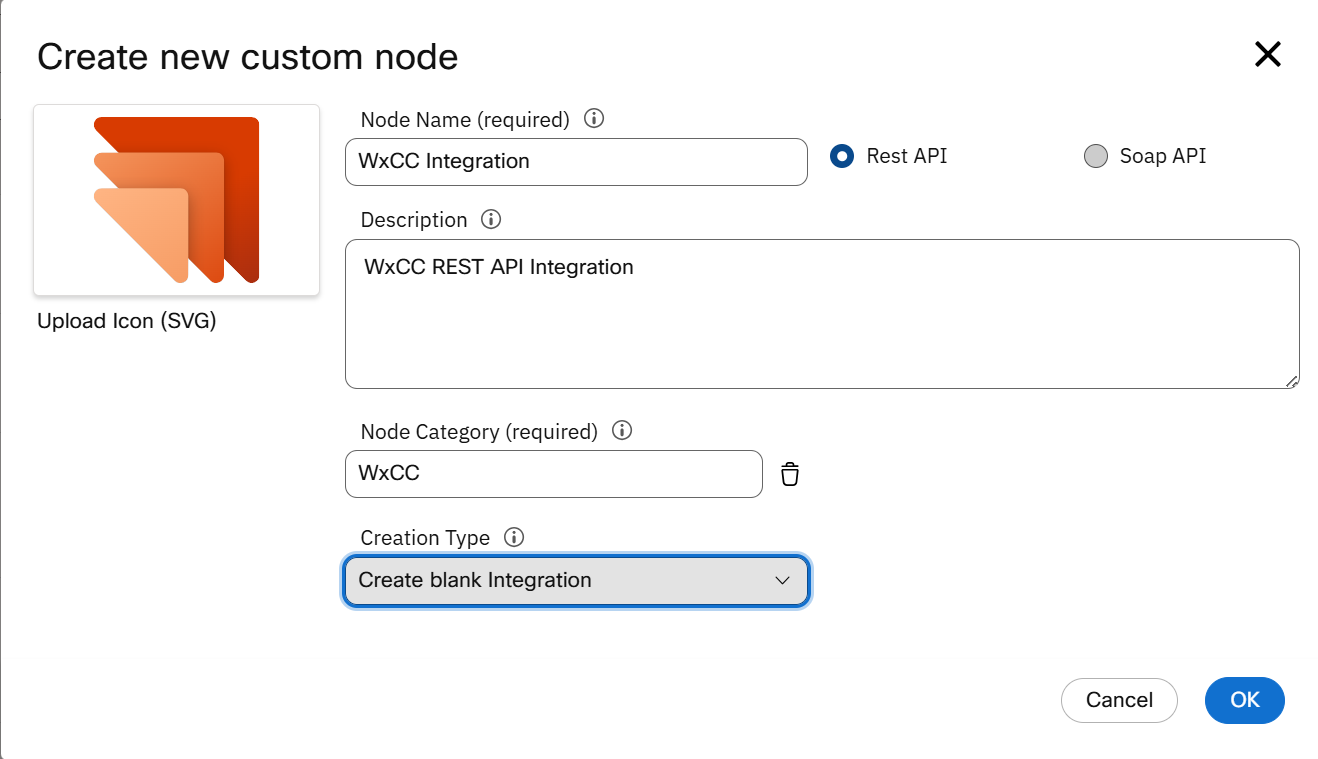
Assets → Integrations page showing the Add Integration option - Node Icon — drag
-
Click OK.
Note
The node will open immediately after creation. You will add methods to it in the next steps.
Lab 3.10 - Add Search Method to WxCC Integration Node
With the node created, you will now add the Search method. This is the method the flow will call to retrieve post-call interaction data from the WxCC Search API.
Add Search Method
- Inside the WxCC Integration node, click Add Method (or click the ⋮ menu on any existing method and choose Clone if methods already exist — then update the clone).
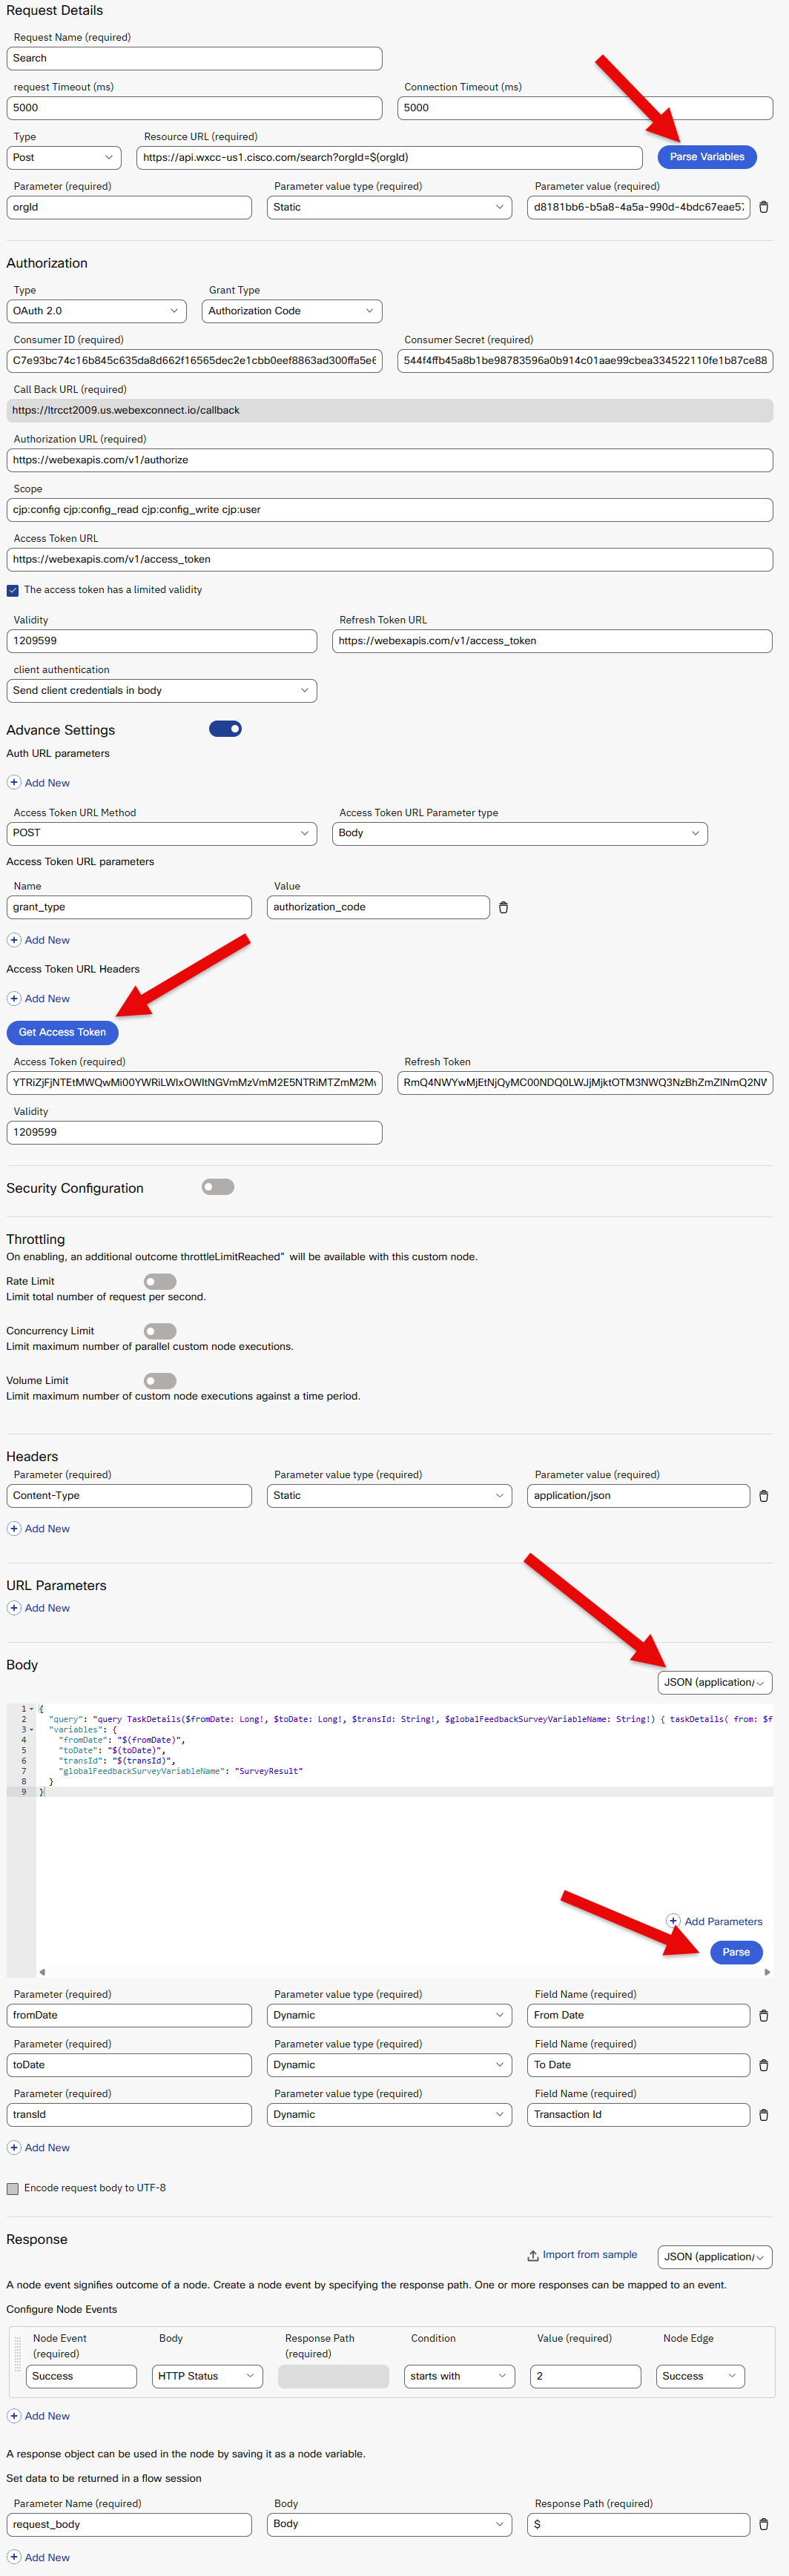
-
Configure the Request Details section:
Field Value Request Name SearchRequest Timeout (ms) 5000Connection Timeout (ms) 5000Type PostResource URL https://api.wxcc-us1.cisco.com/search?orgId=$(orgId) -
Click Parse Variables (next to the Resource URL field). Add the following parameter:
Parameter Parameter Value Type Parameter Value orgIdStatic(paste your Organization ID from your POD credentials) -
Configure the Authorization section:
Field Value Type OAuth 2.0Grant Type Authorization CodeConsumer ID (Client ID from the Webex Integration you created in Lab 1.1) Consumer Secret (Client Secret from the Webex Integration you created in Lab 1.1) Authorization URL https://webexapis.com/v1/authorizeScope cjp:config cjp:config_read cjp:config_write cjp:userAccess Token URL https://webexapis.com/v1/access_tokenValidity 1209599Refresh Token URL https://webexapis.com/v1/access_tokenClient Authentication Send client credentials in body -
Under Advance Settings, confirm the following are set:
Field Value Access Token URL Method POSTAccess Token URL Parameter type BodyAccess Token URL Parameters — Name grant_typeAccess Token URL Parameters — Value authorization_code -
Click Get Access Token. A Webex login window will appear — sign in using your POD admin credentials. Accept the requested permissions. Your Access Token and Refresh Token will populate automatically.
-
Configure the Headers section:
Parameter Parameter Value Type Parameter Value Content-TypeStaticapplication/json -
Configure the Body section. Set the content type to
JSON (application/json)and paste in the following:{ "query": "query TaskDetails($fromDate: Long!, $toDate: Long!, $transId: String!, $globalFeedbackSurveyVariableName: String!) { taskDetails( from: $fromDate, to: $toDate, timeComparator: createdTime, filter: { and: [ { id: { equals: $transId } } ] }, pagination: {} ) { tasks { abandonedType agentToAgentTransferCount autoCsat blindTransferCount conferenceCount connectedDuration consultToQueueCount csatScore GV_SurveyResponse: stringGlobalVariables(name: $globalFeedbackSurveyVariableName) { name value } holdDuration id isContactEscalatedToQueue lastQueue { name id } lastWrapupCodeName overflowCount owner { name id } sentiment terminatingEnd terminationType totalDuration } pageInfo { endCursor hasNextPage } intervalInfo { interval timezone } } }", "variables": { "fromDate": "$(fromDate)", "toDate": "$(toDate)", "transId": "$(transId)", "globalFeedbackSurveyVariableName": "SurveyResult" } }Note
globalFeedbackSurveyVariableNameis hardcoded toSurveyResulthere. If your environment uses a different global variable name for the survey response, you could convert this to a dynamic parameter using the same pattern asfromDateandtransId. -
Click Parse (inside the Body section). Configure the three dynamic input parameters:
Parameter Parameter Value Type Field Name fromDateDynamicFrom DatetoDateDynamicTo DatetransIdDynamicTransaction ID -
Configure the Response section. Under Configure Node Events, confirm the following is set:
Node Event Body Response Path Condition Value Node Edge SuccessHTTP Status(leave blank) starts with2Success -
Under Set data to be returned in a flow session, add the following response parameter:
Parameter Name Body Response Path request_bodyBody$ -
Click Save.
Create Method using OAUTH
Lab 3.11 - Test in Webex Connect
Before wiring the Search method into the live flow, confirm it works correctly from the Webex Connect test console.
Test the Search Method
- Inside the WxCC Integration node, click Test.
- Select the Search method from the dropdown.
-
Enter the following test values:
Field Value fromDateCurrent epoch - 24h (from Lab 3.7) toDateCurrent epoch (from Lab 3.7) transIdYour Interaction ID from Lab 3.8 -
Click Test and confirm you receive a valid response with the interaction data in
request_body.
Checkpoint
A successful test confirms the WxCC Integration node can reach the Search API with the correct authentication and payload structure. Proceed to Lab 3.12.
Troubleshooting
401 Unauthorized: Re-authorize the WxCC Integration node in Webex Connect.- Empty response / no tasks: Confirm the epoch timestamps bracket your test call and the
transIdis correct. 400 Bad Request: Verify the request body JSON is valid — pay close attention to the escaped quotes inside thequerystring.
Lab 3.12 - Update the Process Events Flow
Now you will wire the Search method into the Process Events with Search and Campaign Complete event flow in Webex Connect. This is the same event-processing flow you opened earlier; you will add the Search API call as a new node so interaction data is retrieved automatically after contact-ended events.
Open the Flow
- In Webex Connect, navigate to Services.
- Locate the service containing the Process Events with Search and Campaign Complete event subscription and open it.
- Open the flow in Edit mode.
Add the Search Node
- From the node palette, drag a new WxCC Integration node onto the canvas at the appropriate point in the flow — after the interaction data is available and before any optional downstream decision logic runs.
- From the node palette, drag a new WxCC Integration node onto the canvas where the Evaluate Node called Search* was located. Connect Green Success branch from the Get Start/End Time node.
- Open the node and rename it to:
Search(click the pencil icon near the title, then click the checkmark when done). - Click the Method Name dropdown and select Search.
-
Complete the input fields as follows:
Field Value fromDate(epoch - 24h — use the appropriate flow variable or expression for the current time minus 24 hours) toDate(current epoch — use the appropriate flow variable or expression) transId$(n2.inboundWebhook.data.taskId) -
On the right panel, click Transition Actions and add the following:
Time Action Log ID Value On-leave[Debug] Log a value to transaction log2001Search response: $(Search.request_body) -
Connect the success (green) branch of the Search node to the next node in the flow.
- Update the Check for records found with the new node number of the WxCC Integration Node, then do the same for the Get Call Detail Data (data) node.
- Red invalid branch nodes do not need to be connected — you can drag those branch lines and assign them to the Error handler if one exists in the flow.
Save and Publish
- Click Save on the Search node.
- Enable the Validation slider at the bottom of the canvas and confirm there are no errors.
- Click Save on the flow, then Make Live to deploy the updated flow.
Warning
Publishing replaces the live version immediately. Confirm the flow validates cleanly before publishing.
Lab 3.13 - Testing
With the flow live, you will now perform an end-to-end test to confirm the Search API call is firing correctly and returning data into the flow.
Step 1: Enable Debug Logging
Turn On Debug Logs
- In Webex Connect, open the Event Subscription service.
- Open the Process Events with Search and Campaign Complete flow.
- Open the flow and confirm the [Debug] Log transition action you added in Lab 3.12 is in place on the Search node.
- Navigate to Transaction Logs so you are ready to inspect logs in real time.
Step 2: Send a Test Call
Place a Call to Trigger the Flow
- Sign in to the Agent Desktop and set the agent to Available.
- Dial the Entry Point number for your POD.
- Answer the call, hold a brief conversation, then end the call.
- Submit the
badExperiencewrap-up code on the Agent Desktop.
Tip
Using the badExperience wrap-up code sends your test call through the same path used by the optional recovery workflow, ensuring the flow reaches the Search API call.
Step 3: Verify Results
Inspect the Transaction Logs
- In Webex Connect, open Transaction Logs for the Process Events with Search and Campaign Complete service.
- Locate the most recent transaction triggered by your test call.
- Find the log entry with Log ID
2001and confirm therequest_bodyvalue contains a valid Search API response with your interaction data. -
Confirm the
tasksarray in the response includes the expected fields:Field What to Check idMatches your test call Interaction ID autoCsatA score between 1 and 5 sentimentA decimal value between -1.0 and 1.0 lastWrapupCodeNamebadExperienceGV_SurveyResponse.valueSurvey score if submitted, or nullowner.nameYour test agent's name
Checkpoint
If the log entry shows a populated request_body with interaction data matching your test call, the Search API is fully integrated into the event-processing flow.
Troubleshooting
- No transaction appears in logs: Confirm the flow is published with the Latest version label and the event subscription is active.
- Search node shows error branch: A
401means re-authorization is needed on the WxCC Integration node. A400points to a malformed payload — verify thetransIdvariable path$(n2.inboundWebhook.data.taskId)resolves correctly in your flow. tasksarray is empty: The call may have occurred outside the 24-hour window used forfromDate/toDate. Verify the epoch expressions resolve to values that bracket the call time.- Log ID
2001not visible: Confirm the Transition Action was saved correctly on the Search node and the flow was republished after the change.
Lab Completion
In this lab, you have:
- Opened the imported Webex Connect webhook receiver script.
- Copied the generated webhook URL.
- Created a WxCC event subscription for
task:ended. - Triggered a real contact-ended event.
- Verified the inbound payload and confirmed
data.taskIdis available. - Queried the WxCC Search API in Bruno.
- Added and tested the Search method in Webex Connect.
- Wired Search into the event-processing flow and confirmed the response in transaction logs.
This completes the required lab path. If time allows, continue to the optional bonus lab.