Bonus Lab 4 - Proactive Outbound Reach 📞
Lab Purpose
Optional Bonus Lab
This lab is optional bonus material. The required three-hour-and-a-half workshop path is complete after Lab 3; continue here only if time allows or if you want to explore the full proactive outbound recovery workflow.
When a customer has a bad experience — whether from excessive hold time, poor sentiment, an unresolved issue, or a low survey score — waiting for them to call back is not an option. Every minute of delay increases churn risk. Proactive outbound communication is how modern contact centers close that loop before the customer walks away.
In this bonus lab, you will configure an end-to-end outbound IVR campaign using Webex Contact Center Campaign Manager. Rather than manually uploading contact lists, this lab is designed to support API-driven contact injection — where the Bad Experience detection system automatically inserts a customer record into an active campaign the moment a bad experience is detected, triggering a proactive callback at scale, in real time, and in full compliance with regulatory requirements.
You will build the complete WxCC infrastructure required to support this — teams, queues, flows, and entry points — and then configure all Campaign Manager prerequisites before launching a live Progressive IVR campaign to validate the end-to-end flow.
Bonus Lab Objectives
- WxCC Infrastructure Setup: Configure teams, outdial queues, global variables, and entry points on Control Hub.
- Flow Design: Build an outbound campaign flow with CPA-based routing and event flows, including Answer Machine Detection (AMD) and Live Voice handling.
- Campaign Manager Configuration: Complete all prerequisite campaign administration settings including contact modes, field mappings, suppression rules, telephony outcomes, and wrap-up codes.
- API Integration: Use the Campaign Manager REST API to check for an active contact list, create one if required, and inject a customer record — simulating what the Bad Experience system does automatically in production.
- Campaign Activation: Create a campaign group, configure and activate the campaign, and trigger a live call via API-injected contact.
Bonus Lab Outcome
- Receives customer records injected via the Campaign Manager REST API, triggered by a Bad Experience detection event.
- Dials contacts using Progressive IVR mode.
- Detects call outcomes (AMD, Abandoned, Live Voice) and routes them appropriately.
- Plays a congratulatory message ("Congratulations, you have completed Lab 5") to live voice contacts — confirming the end-to-end campaign flow is working.
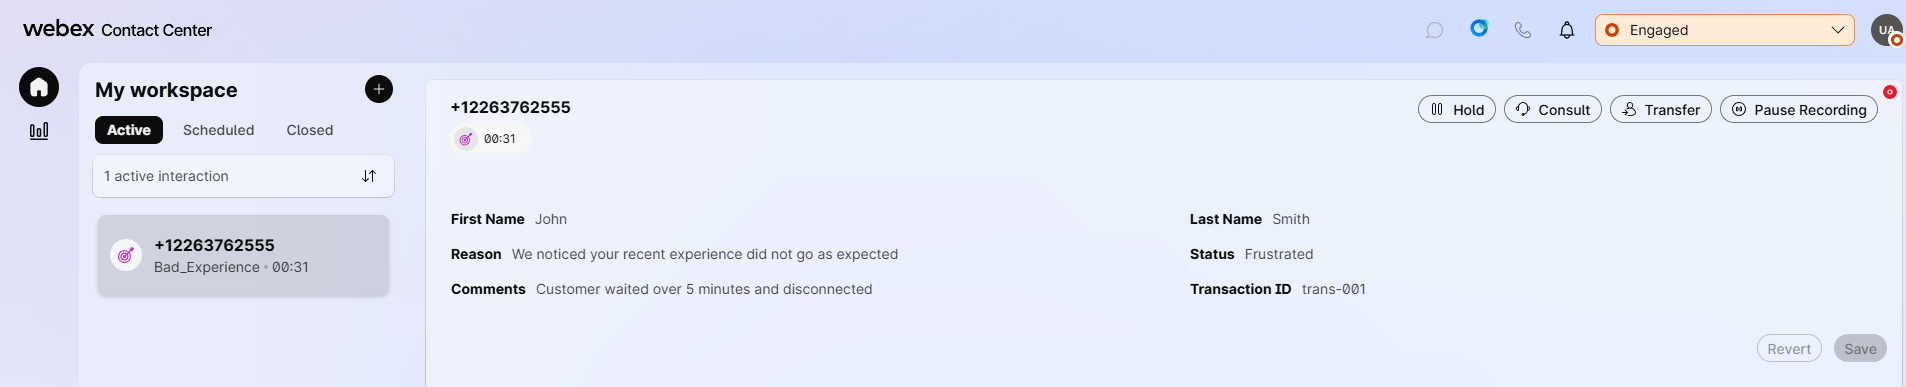
- Passes customer context (first name, last name, bad experience reason, status, comments, and transaction ID) as global variables to the destination flow, ready for Lab 2's AI Agent integration.
Some steps in this section are already completed for you — read each step fully before proceeding.
Pre-requisites
In order to complete this bonus lab, you must have:
- [x] Access to Webex Control Hub with Full Admin permissions
- [x] A Webex Contact Center tenant provisioned and licensed
- [x] Access to the Webex Campaign Management portal
- [x] A REST API client (e.g. Postman or Bruno) for the API injection steps
Lab Overview 📌
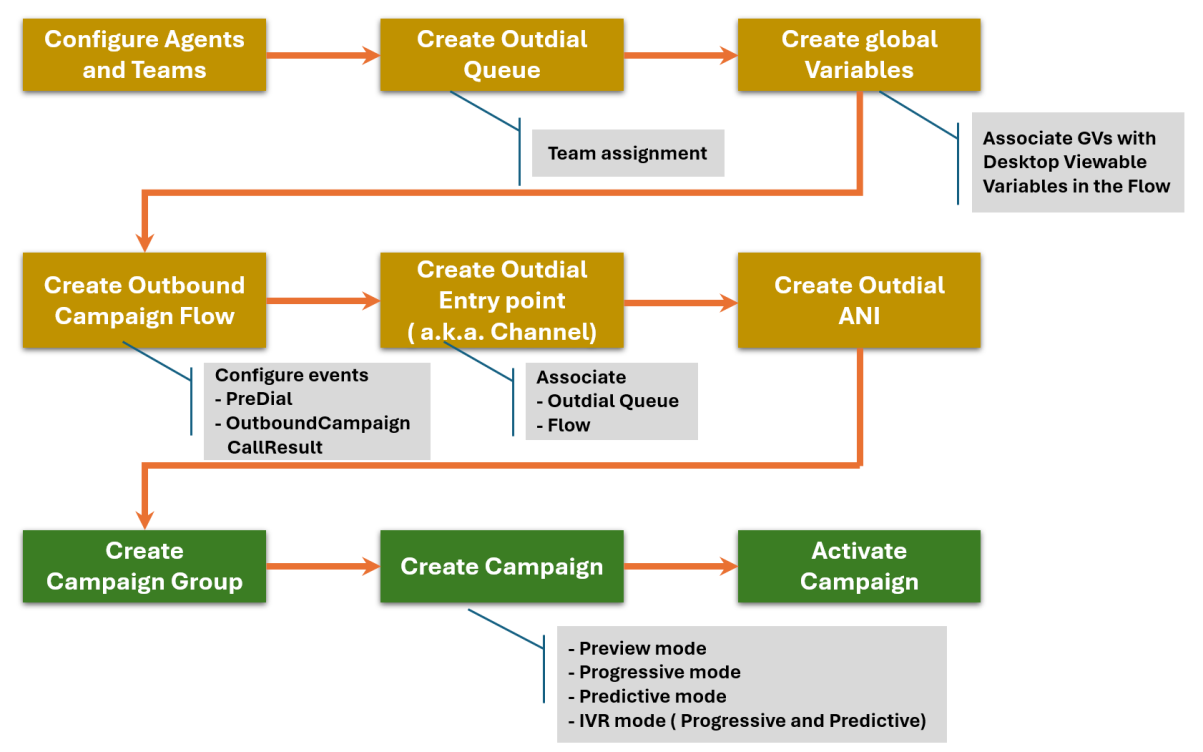
The diagram below illustrates the high-level architecture and the sequence of configuration steps you will follow throughout this lab:
How the API trigger fits in
In production, the Bad Experience detection system monitors every interaction in real time. When any of the four detection rings fire and the interaction is confirmed as a voice call, the system automatically calls the Campaign Manager API to inject the customer's record into the active campaign. The campaign dialler picks up the record and places the outbound call — no manual intervention required. In this lab, you will simulate that API call manually using a REST client, so you understand exactly what the system does under the hood.
In this bonus lab you will perform the following tasks:
- Configure a team
- Create an Outdial Queue
- Configure Global Variables and Wrap-up Codes
- Build the Outbound Campaign Flow (Main + Event flows)
- Create the Outdial Entry Point (Channel) and Outdial ANI
- Complete Campaign Manager prerequisites
- Create, configure, and activate the Campaign
- Inject a contact via API and validate the end-to-end flow
Lab 5.1 - Configure a Team
Create a Team
Even though no agent will be handling calls during the IVR campaign, creating a team and assigning it to the outdial queue is mandatory. The Entry Point requires an associated queue, and a queue requires a team.
Create Team
Sandbox — Team Already Provisioned
In this sandbox environment, the team has already been created for you. Navigate to Contact Center → Teams and locate your pre-provisioned team (i.e. Sandbox Team AgentType - xxx). You do not need to create a new team. Note this team name — you will need it when configuring the Outdial Queue in the next step.
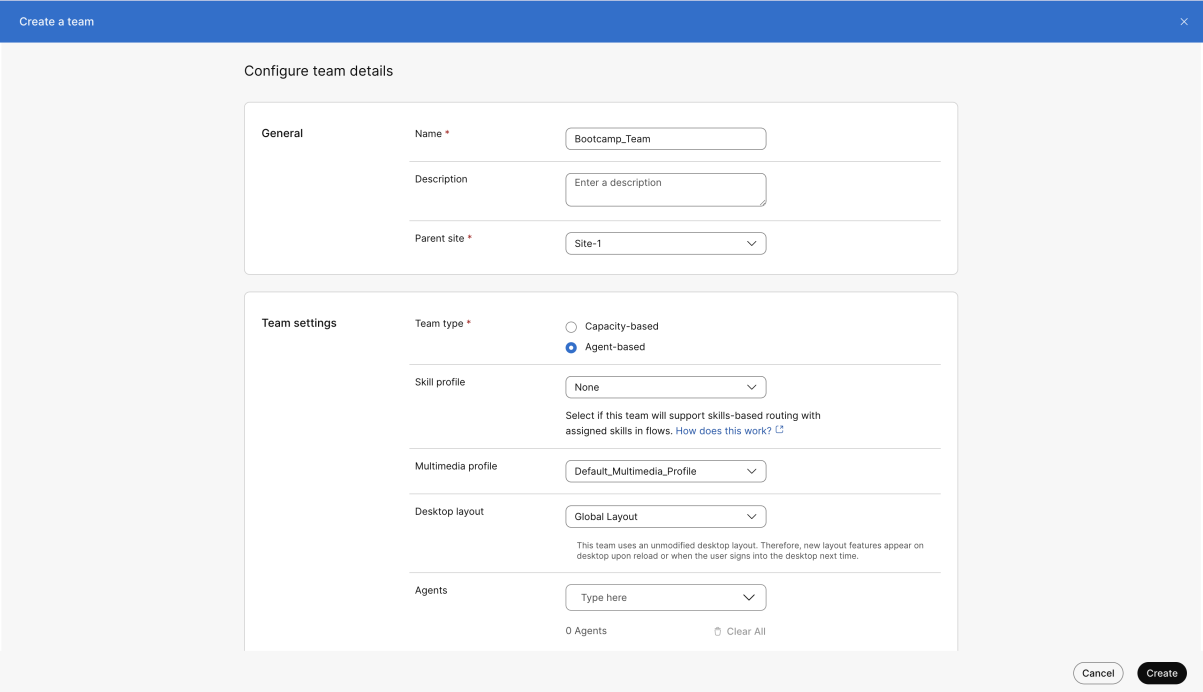
If you are running this lab outside of the sandbox environment, click Create a team and fill in the following:
| Field | Value |
|---|---|
| Name | Bootcamp_Team |
| Parent site | Site-1 |
| Team type | Agent-based |
| Multimedia profile | Default_Multimedia_Profile |
| Desktop layout | Global Layout |
Click Create.
Lab 5.2 - Create an Outdial Queue
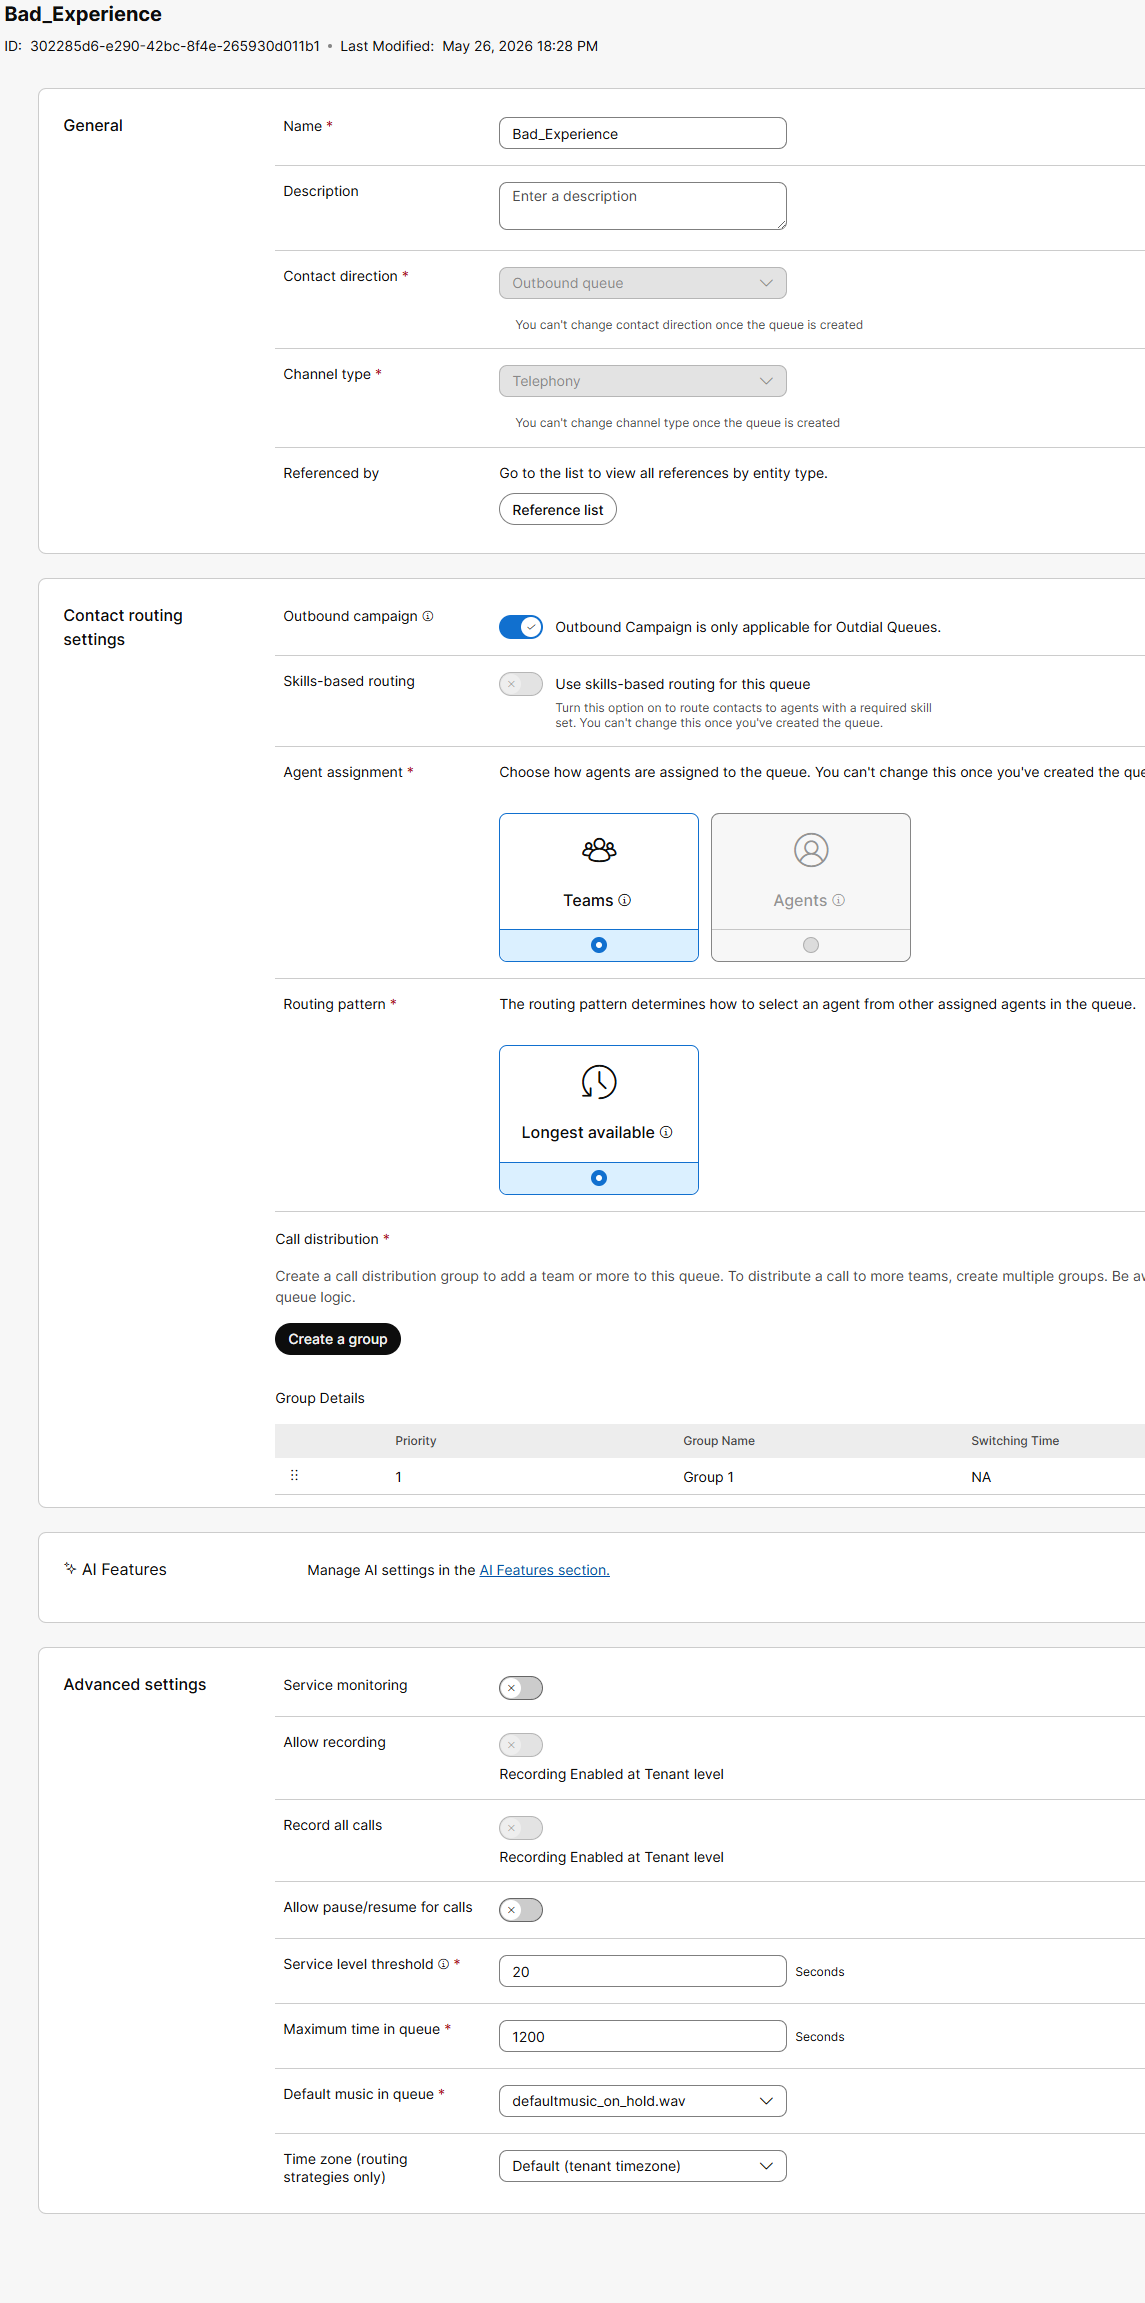
The outdial queue connects your outbound campaign to the agent pool. It must be set to Outbound queue type and have the Outbound campaign toggle enabled.
Create Outdial Queue
If you are running this lab outside of the sandbox environment, click Create a queue and configure the following:
| Field | Value |
|---|---|
| Name | Bad_Experience |
| Contact direction | Outbound queue |
| Channel type | Telephony |
| Outbound campaign | Enabled (toggle ON) |
| Agent assignment | Teams → select Longest Available |
Under Call distribution, click Create a group, expand it, and select Sandbox Team AgentType.
Fill in the mandatory Advanced settings:
- Service level threshold:
200 - Maximum time in queue:
1200 - Default music in queue:
defaultmusic_on_hold.wav
Click Create.
Note
The Contact direction and Channel type fields cannot be changed after the queue is created. Double-check these values before clicking Create.
Lab 5.3 - Configure Global Variables
Create Global Variables
Global Variables carry customer data from the contact list through the campaign flow and display it on the Agent Desktop. These variables are populated by the Bad Experience detection system when it injects a contact record via API.
Create Global Variables
- In Control Hub, navigate to Contact Center → Flows → Global Variables.
-
Click Create a global variable and configure the firstName variable:
Field Value Name firstNameDescription firstNameVariable type StringMake reportable Enabled Make agent viewable Enabled Desktop label First NameEdit on desktop Disabled -
Click Create.
-
Repeat the process for each of the following variables:
Name Desktop Label Reportable Agent Viewable lastNameLast NameYes Yes ReasonReasonYes Yes StatusStatusYes Yes IDTransaction IDYes No CommentsCommentsYes Yes
Important
All six variables must be added to every flow in this lab under Global Flow Properties → Global Variables.

Lab 5.4 - Build the Flows
Create the Outbound Campaign Flow
Before building the outbound campaign flow, you need a destination flow.
Now create the main outbound campaign flow. This flow handles the outbound dialling logic and routes calls based on the CPA (Call Progress Analysis) result.
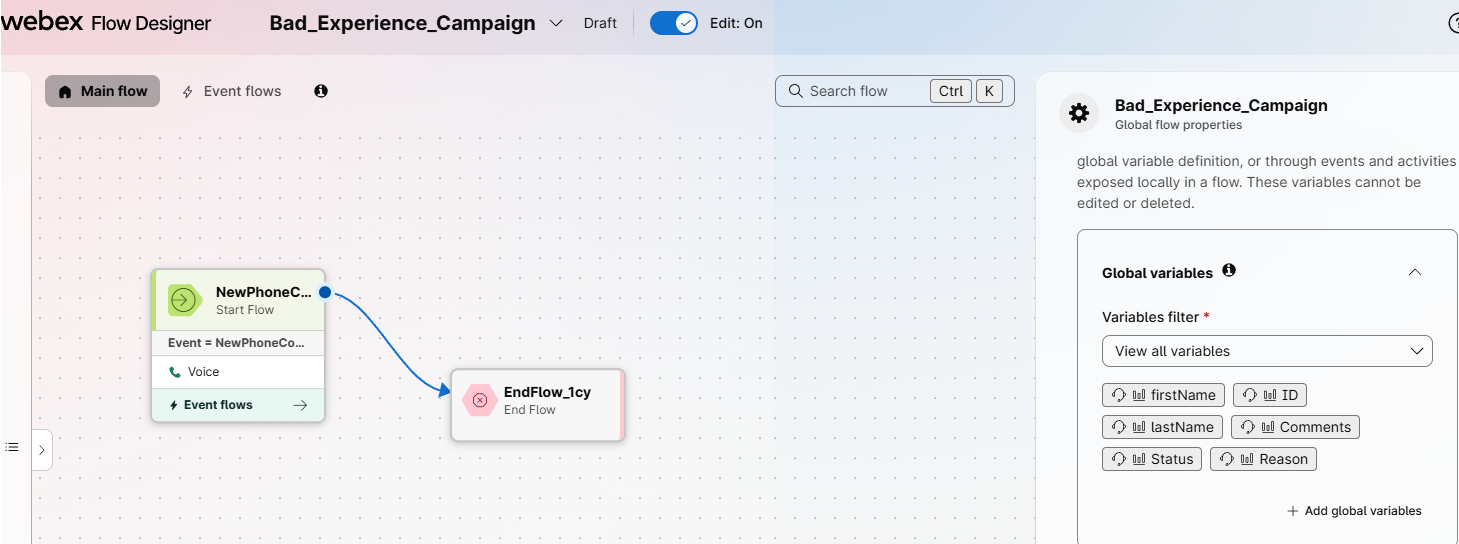
Create Bad_Experience_Campaign Flow
- In Control Hub, navigate to Contact Center → Flows.
- Click Manage Flows -> Create Flows and select Flow and Start from scratch in the next window. Click Next
- Name it
Bad_Experience_Campaign -
In the Global Flow Properties panel, click Add global variables and add all six variables:
firstNamelastNameReasonStatusIDComments
-
The Main flow canvas starts with a NewPhoneContact Start node.
Note the Start node might be NewContact instead.
Connect it to an End Flow node as a placeholder — the actual logic is handled in Event flows.
Configure Event Flows
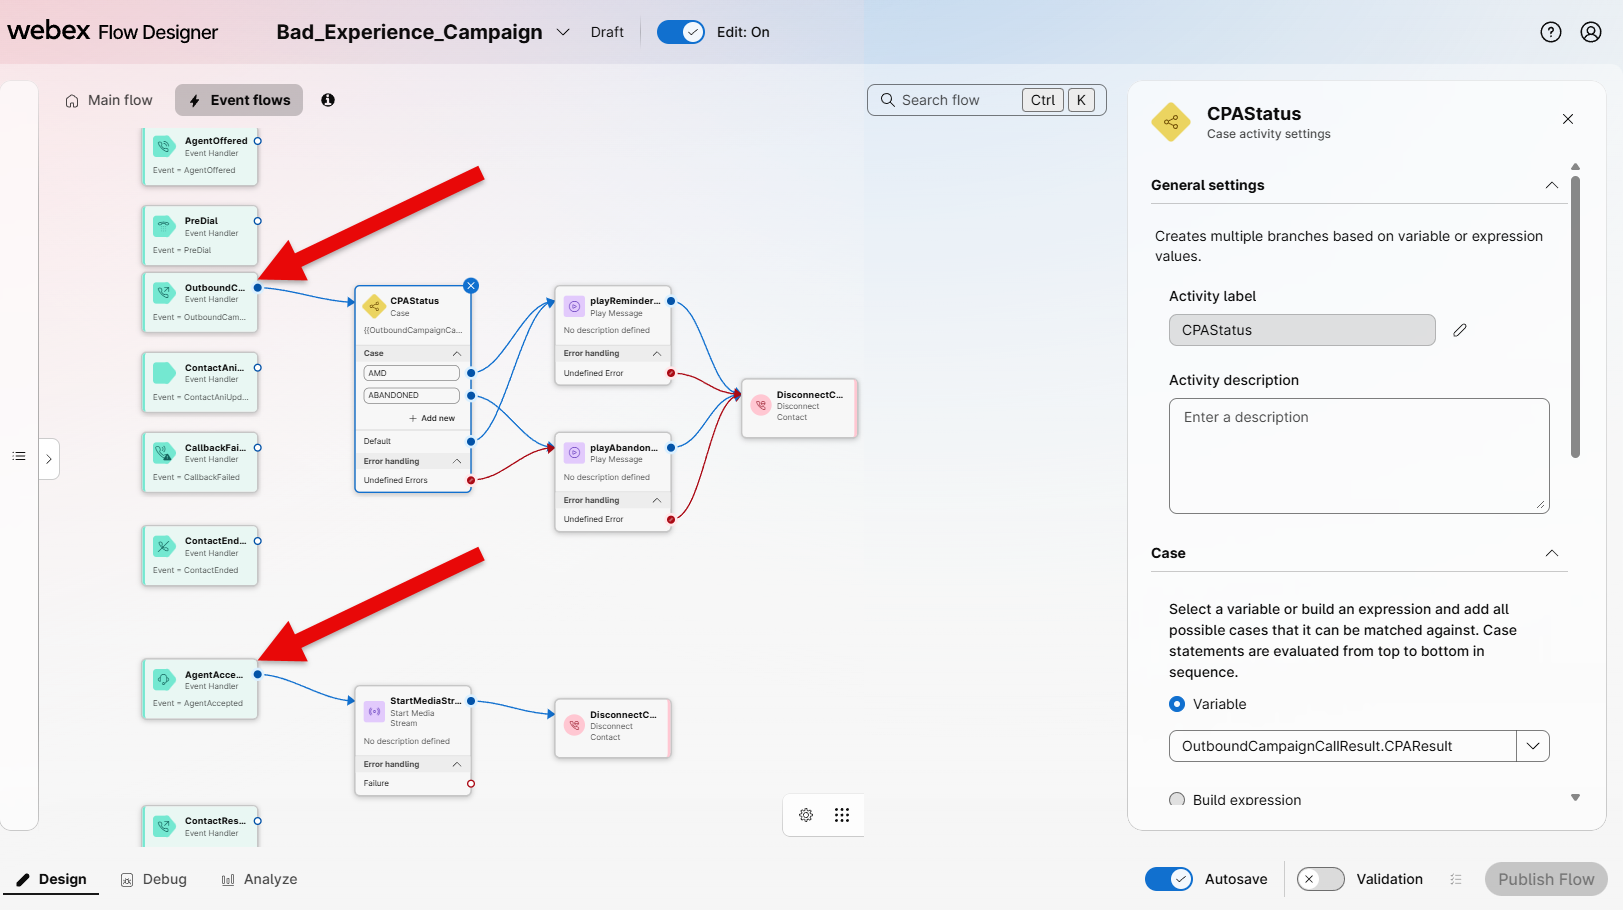
The campaign logic is driven by Event flows. Click on Event flows at the top of the flow builder to switch to the event flow canvas. You will configure one key event:
OutboundCampaignCallResult
This event fires when the dialler receives a CPA result for an outbound call attempt. It determines whether the call reached an answering machine, was abandoned, or reached a live conversation.
Configure OutboundCampaignCallResult Event
- On the Event flows canvas, locate the OutboundCampaignCallResult event handler node.
- Drag a Case node onto the canvas and connect the OutboundCampaignCallResult event handler to it.
-
Configure the Case node:
- Activity Label:
Campaign_Results - Case variable:
OutboundCampaignCallResult.CPAResult(this comes from the OutboundCampaignCallResult node) -
Add the following case outputs:
Case Value AMD AMDABANDONED ABANDONEDDefault (default fallthrough)
- Activity Label:
-
Drag the StartMediaStream Node onto the canvas and connect the AgentAccepted to it.
- Drag the DisconnectCall Node onto the canvas and connect the StartMediaStream to it.
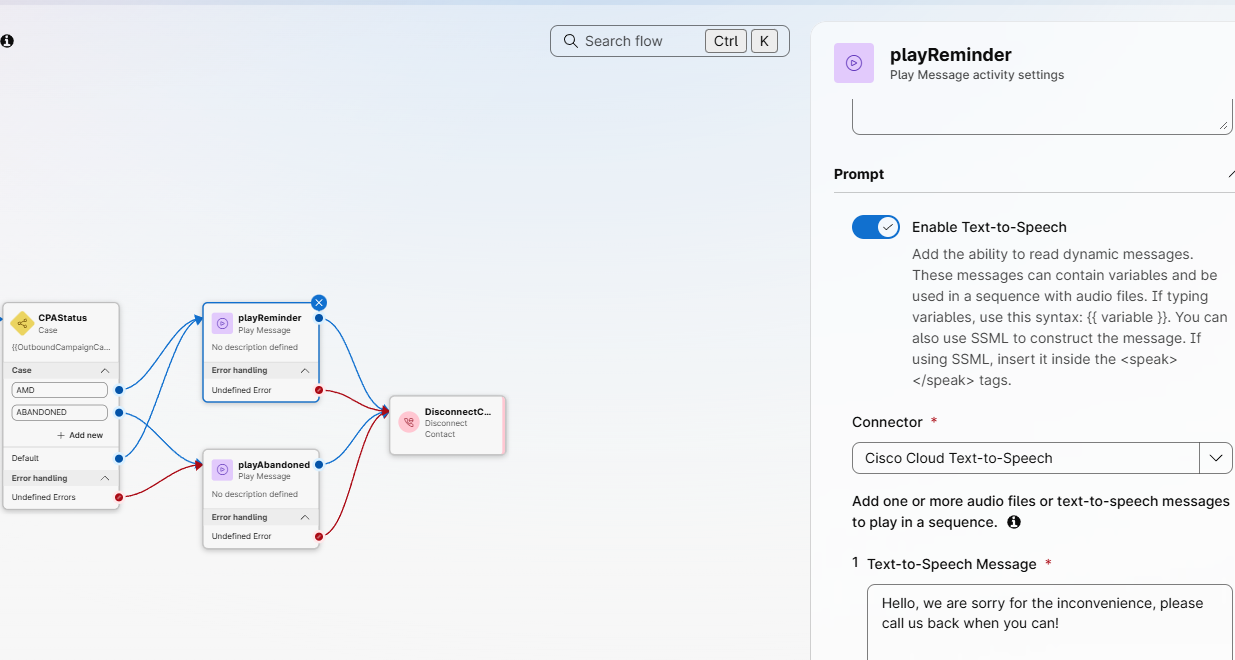
Handling AMD and Abandoned outcomes:
Configure AMD and Abandoned Routing
- Drag a Play Message node onto the canvas.
- Connect both the AMD output of the Case node to this Play Message node.
- Configure the Play Message node:
- Enable Text-to-Speech
- Connector:
Cisco Cloud Text-to-Speech - Text-to-Speech Message:
Hello, we are sorry for the inconvenience, please call us back when you can!
- Drag and End Flow message to the canvas and connect the Play Message node to an End Flow node.
- Drag a Play Message node onto the canvas.
- Connect both the ABANDONED output of the Case node to this Play Message node.
- Configure the Play Message node:
- Enable Text-to-Speech
- Connector:
Cisco Cloud Text-to-Speech - Text-to-Speech Message:
Sorry, we couldn't connect you to our agent right now. We will give you a callback later.
-
Drag and End Flow message to the canvas and connect both Play Message nodes to an End Flow node.
-
Connect the Undefined Errors output of the Case node to the End Flow node.
-
Enable the Validation slider to validate the flow and once validated, click Publish Flow to publish it.
Your Outbound Bad_Experience_Campaign flow is ready.
Lab 5.5 - Create the Outdial Entry Point (Channel) and Outdial ANI
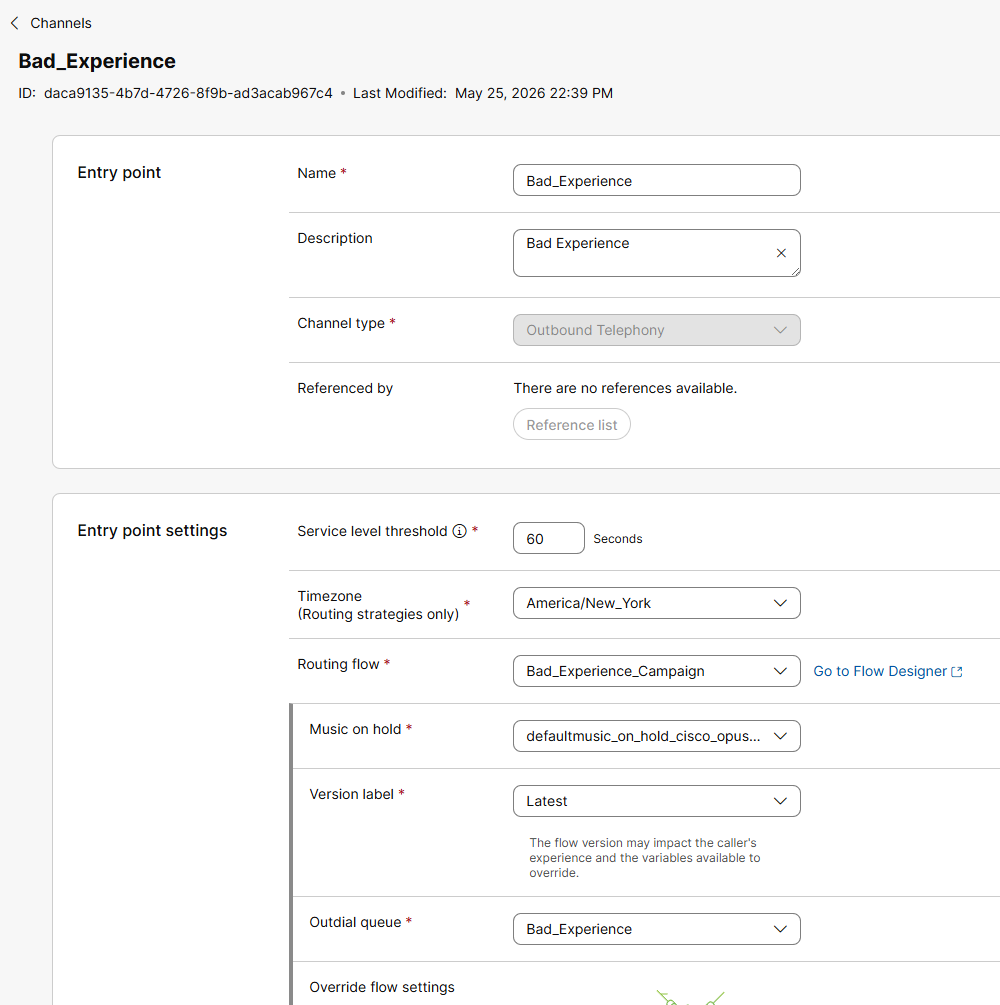
Create the Outdial Entry Point
The Channel Entry Point is the outbound telephony channel that ties together the flow, the outdial queue, and the dialling configuration.
Create Outdial Entry Point
Click Create a channel and configure the following:
| Field | Value |
|---|---|
| Name | Bad_Experience |
| Channel type | Outbound telephony |
| Service level threshold | 30 seconds |
| Timezone | America/New_York (use your local timezone) |
| Routing flow | Bad_Experience_Campaign |
| Music on hold | defaultmusic_on_hold.wav |
| Version label | Latest |
| Outdial queue | Bad_Experience |
Click Create.
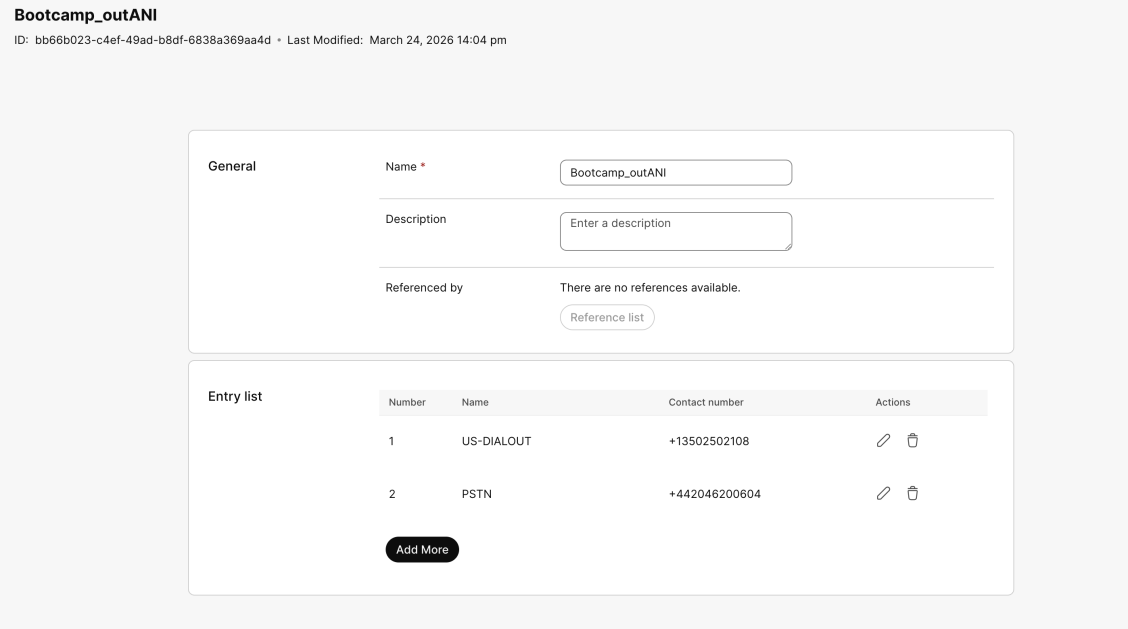
Configure Outdial ANI
The Outdial ANI is the caller ID displayed to customers when they receive the outbound call.
Configure Outdial ANI
Sandbox — Outdial ANI Already Provisioned
In this sandbox environment, the Outdial ANI has already been created for you. Navigate to Contact Center → Outdial ANI and locate your pre-provisioned ANI. Note the contact number — you will need to know it when configuring the Campaign dialler in Lab 5.6.
If you are running this lab outside of the sandbox environment, click Create and configure the following:
| Field | Value |
|---|---|
| Name | Bootcamp_outANI |
Under Entry list, click Add More and add your PSTN numbers already configured in your environment:
i.e.
| Entry | Name | Contact number |
|---|---|---|
| 1 | US-DIALOUT | +1350250xxxx |
| 2 | PSTN | +44204620xxxx |
Click Save.
Lab 5.6 - Campaign Manager Configuration
Open the Webex Campaign Management portal. On first login you will see the welcome screen outlining all the administration areas to configure before launching campaigns.

Complete each section in order as described below.
Business Days
Business days are used solely for the purpose of contact list expiry calculation and have no association with Business Hours in Control Hub. We will not be configuring this section as part of this lab.
Contact Modes
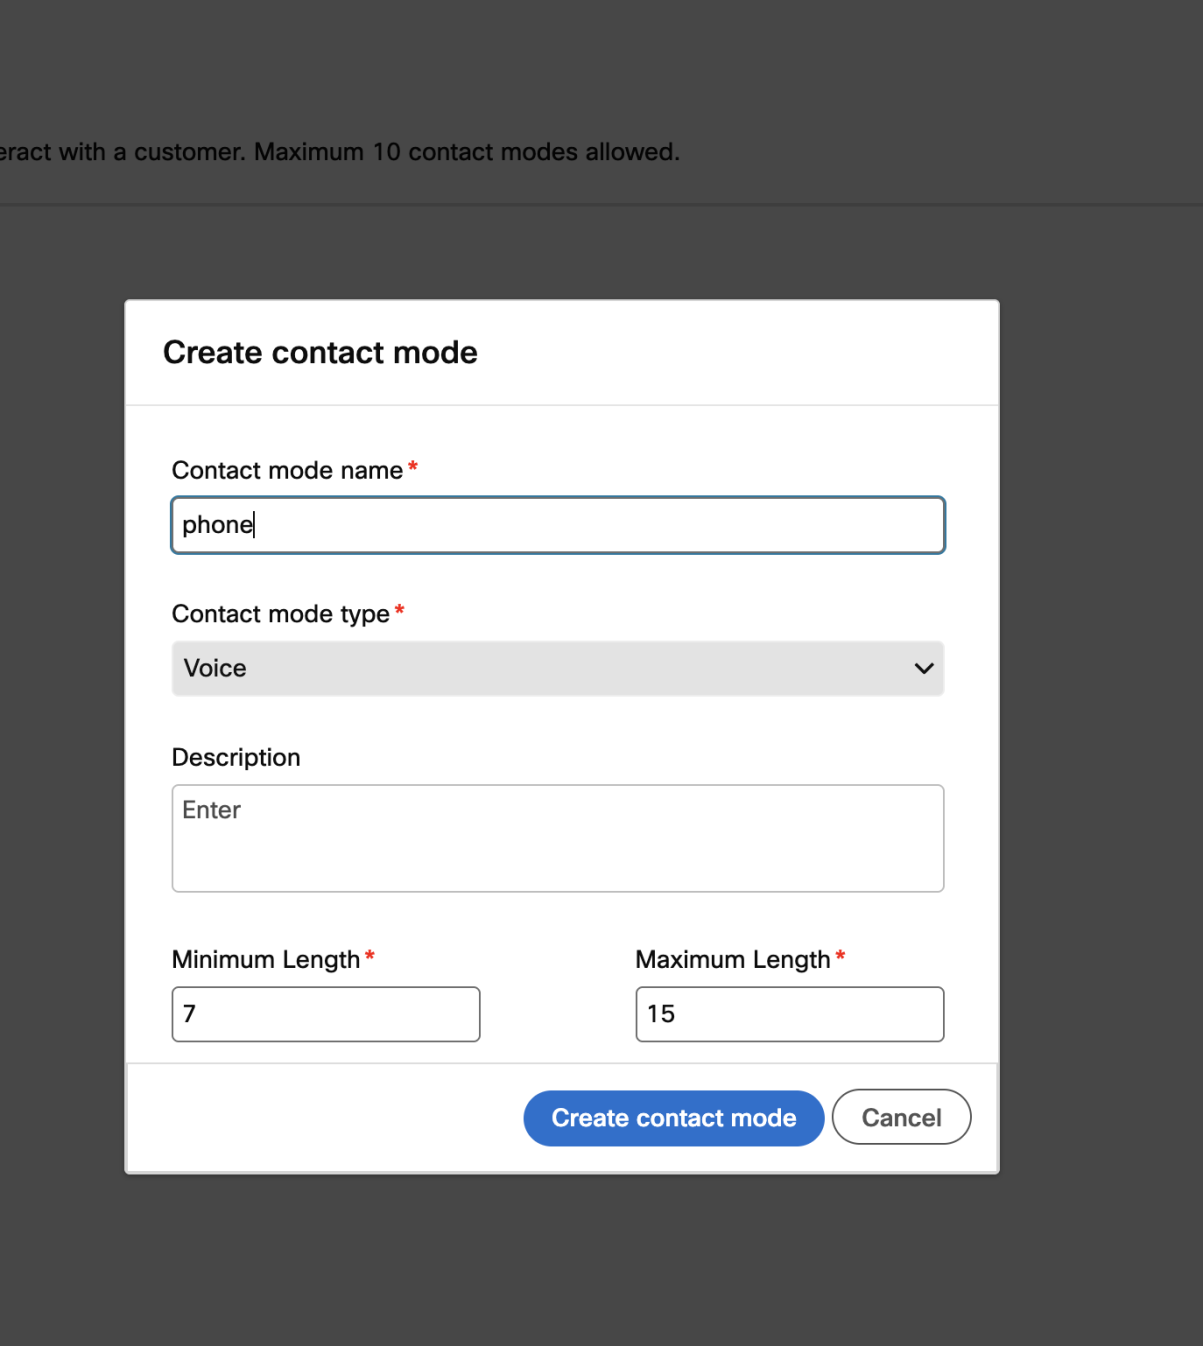
Contact modes define the type of phone number in your contact list (e.g. Home, Office, Mobile). For this lab we use a single contact mode mapped to the phoneNumber column in the contact list.
Create Contact Mode
- Navigate to Voice campaigns administration → Contact modes.
-
Click Create contact mode and fill in:
Field Value Contact mode name phoneContact mode type VoiceMinimum length 7Maximum length 15 -
Click Create contact mode.
DNC Lists
Do Not Contact (DNC) lists prevent the campaign from calling restricted numbers. For this lab no DNC list will be configured.
Info
In production environments you would upload DNC lists here to comply with regulatory requirements (e.g. national DNC registries). The campaign engine automatically suppresses any contacts matched against active DNC lists.
Global Variables
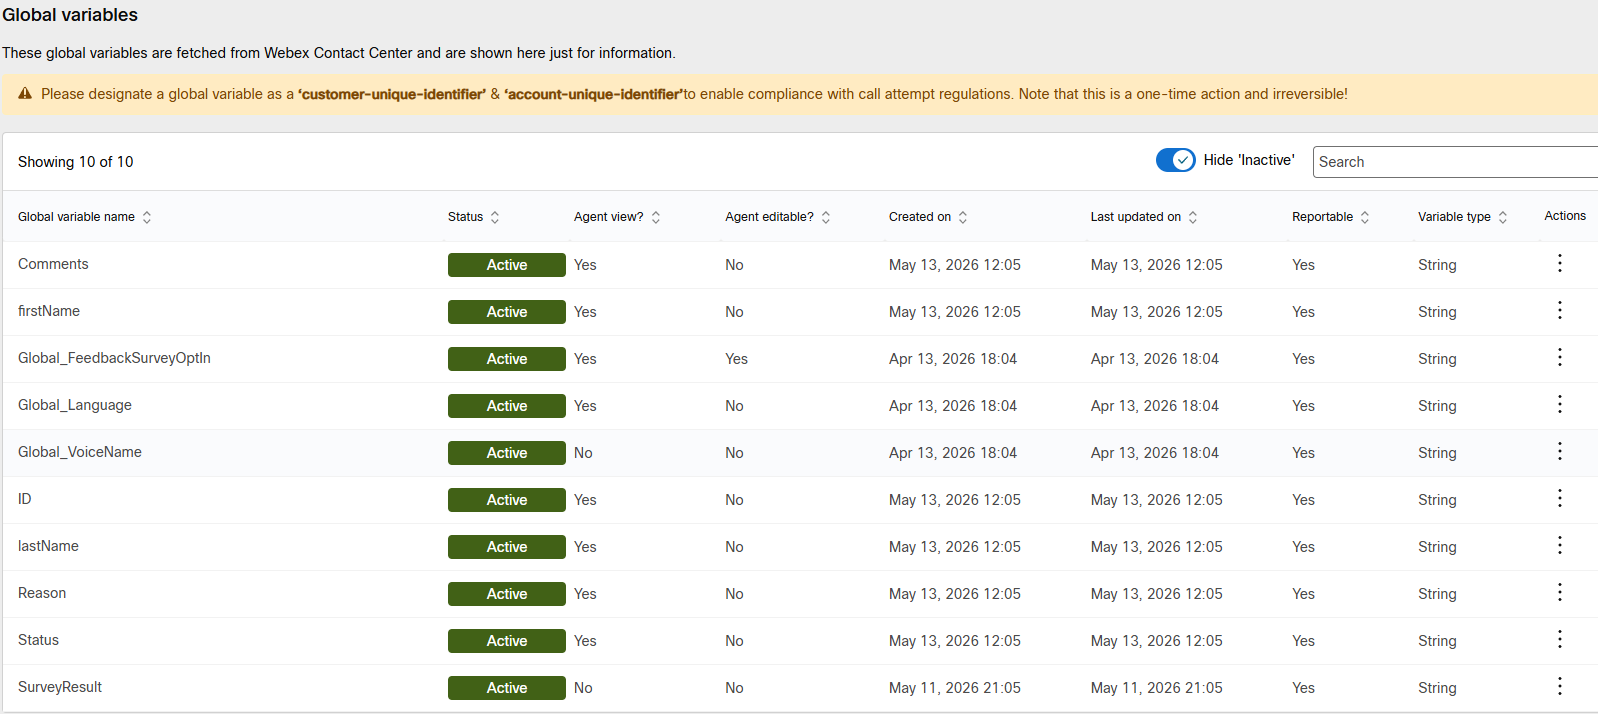
Global variables are synced from Control Hub. They appear here for informational purposes — you cannot create or modify them in Campaign Manager.
Verify Global Variables
- Navigate to Voice campaigns administration → Global variables.
-
Verify that all six variables are listed with Status: Active and Agent view: Yes:
firstNamelastNameReasonStatusIDComments
Note
If you don't see the variables, click Refresh from Control Hub at the top-right of the page.
Important
Before you can use Global Variables in Campaign Manager, you must designate a customer-unique-identifier and account-unique-identifier for compliance with call attempt regulations. For this lab, since we are not configuring unique identifiers, this step is skipped.
Field Mappings
Field mappings define how the columns in your contact list map to the Campaign Manager dialler system — including which column contains the phone number, which global variables carry the customer context, and the data types.
Prepare the Contact List CSV
Before creating the field mapping, prepare your contact list file. This file defines the schema that the Bad Experience system will use when injecting contacts via API.
Create Contact List CSV
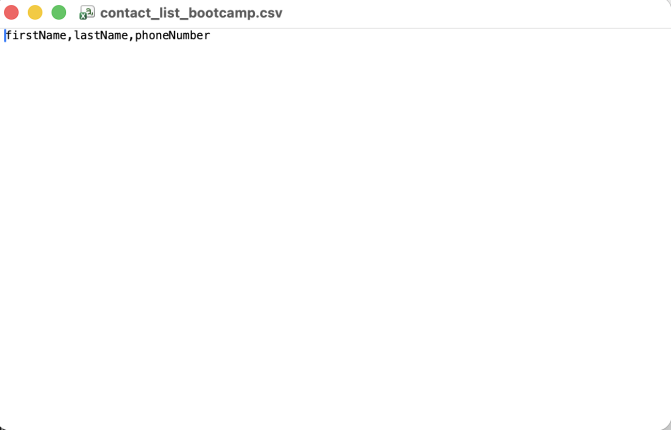
Create a CSV file named contact_list_bad_experience.csv with the following structure:
firstName,lastName,phoneNumber,Reason,Status,ID,Comments
John,Smith,+12263762555,We noticed your recent experience did not go as expected,Frustrated,trans-001,Customer waited over 5 minutes and disconnected
Note
- All phone numbers must use E.164 format with the
+prefix (e.g.+12263762555). - All rows within a single file must use numbers from the same country.
- No spaces, hyphens, or special characters are permitted in the phone number field.
- The CSV schema here mirrors exactly what the Bad Experience API injection sends — the field names must match precisely.
Create the Field Mapping
Create Field Mapping
- Navigate to Voice campaigns administration → Field mappings.
- Click Create field mapping.
- Enter a Field mapping name:
BadExperience
Step 1 — Upload sample file:
Click Choose file and select your contact_list_badexperience.csv. Once uploaded, the system displays the detected headers: firstName, lastName, phoneNumber, Reason, Status, ID, Comments.

Step 2 — Map contact modes:
Map the phoneNumber column to the phone contact mode created earlier. Leave all other columns as Unmapped at this stage.
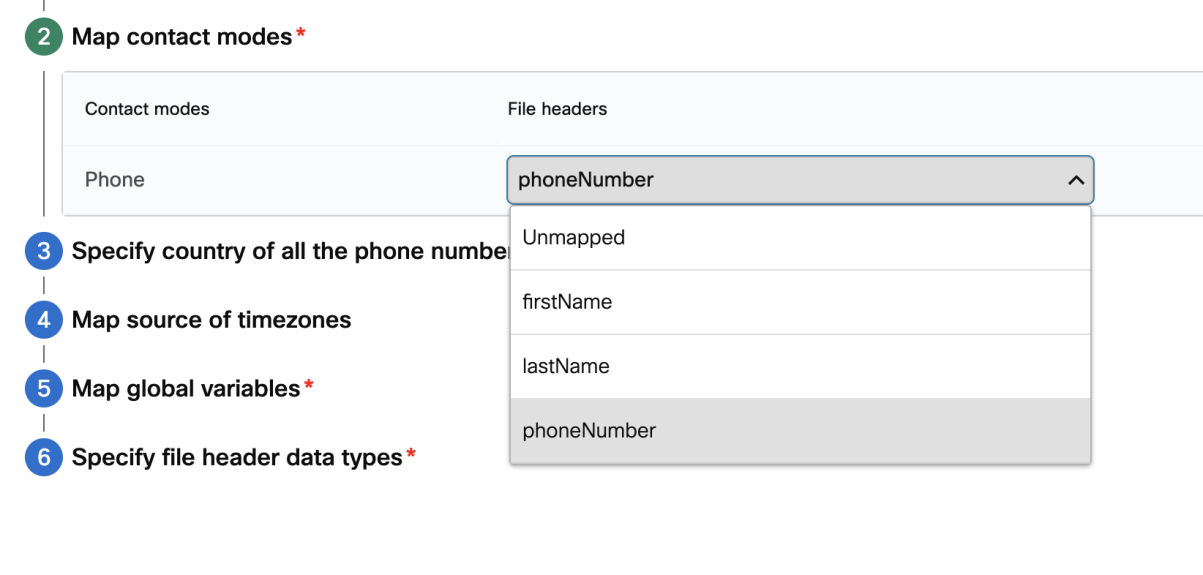
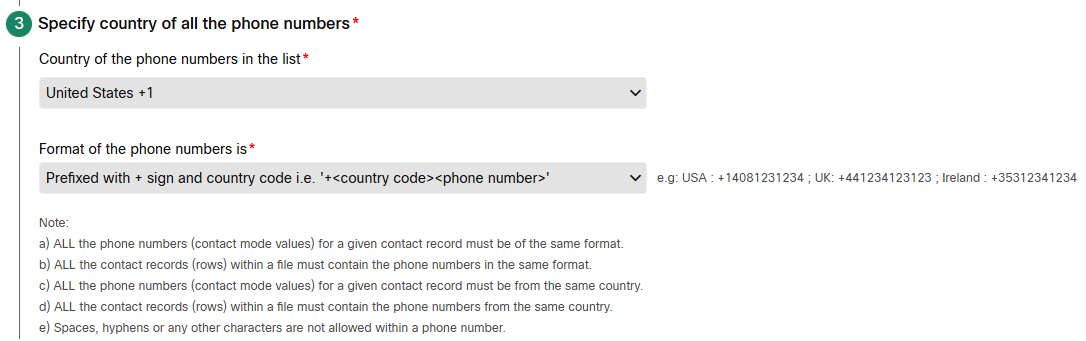
Step 3 — Specify country of all phone numbers:
Select the appropriate country for your numbers and set the format to:
Prefixed with + sign and country code i.e. '+<country code><phone number>'
Step 4 — Map source of timezones:
Keep the default configuration.
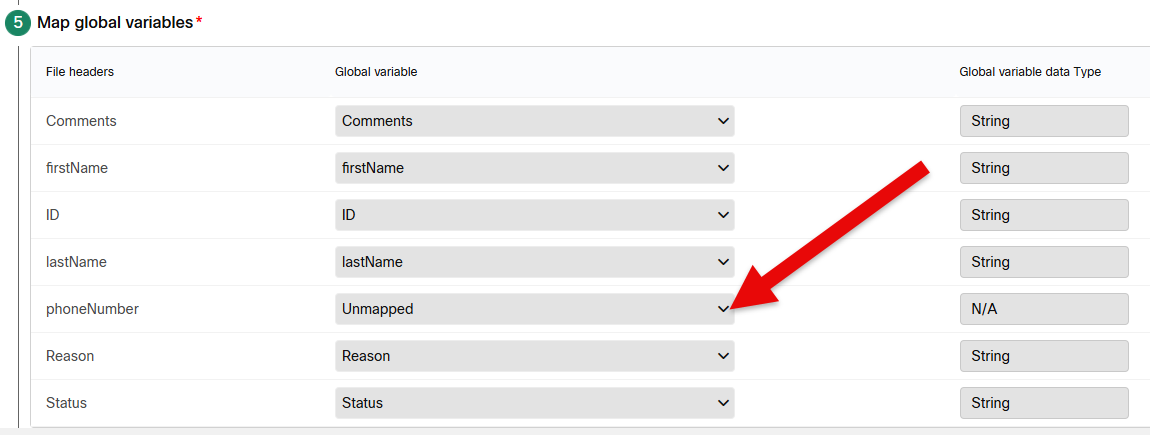
Step 5 — Map global variables:
Map each column to its corresponding Global Variable:
| File header | Global variable | Data type |
|---|---|---|
firstName |
firstName |
String |
lastName |
lastName |
String |
Reason |
Reason |
String |
Status |
Status |
String |
ID |
ID |
String |
Comments |
Comments |
String |
phoneNumber |
Unmapped | N/A |
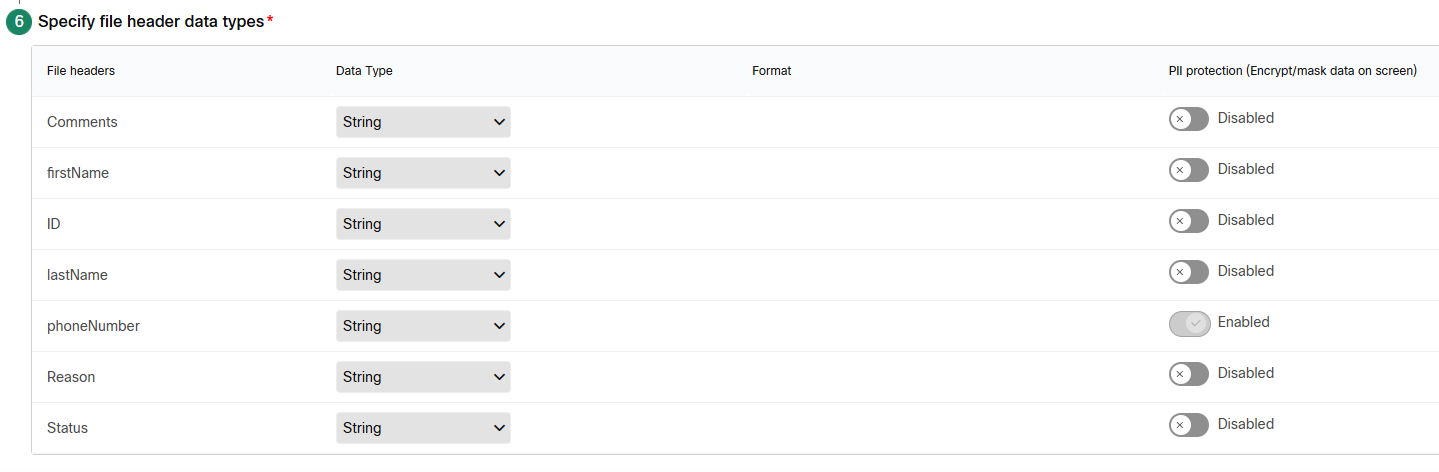
Step 6 — Specify file header data types:
Leave all columns as String data type. Enable PII protection for phoneNumber if required by your organization's data handling policies.
Click Save to finalize the field mapping.
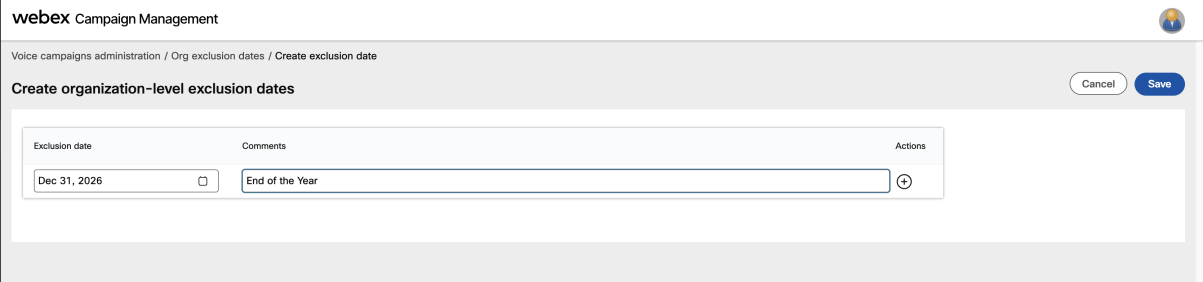
Org Exclusion Dates
Organization-level exclusion dates prevent campaigns from running on specific dates such as national holidays. These exclusions apply to all campaigns in the organization.
Create Org Exclusion Date
- Navigate to Voice campaigns administration → Org exclusion dates.
-
Click Create exclusion date and add:
Exclusion date Comment Dec 31, 2026End of the Year -
Click Save.
Info
When a campaign is running and an exclusion date is reached, the campaign status automatically changes to Pending and calling stops. Once the exclusion date passes, the campaign automatically resumes with Running status.
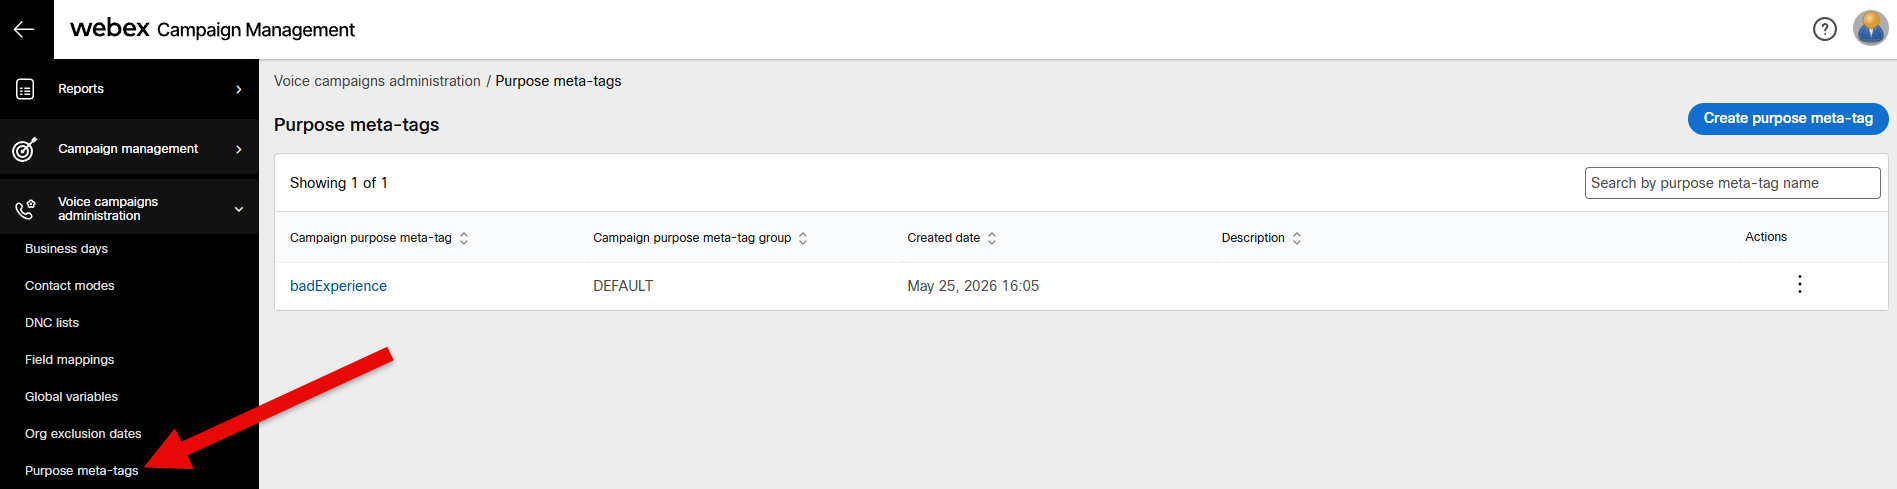
Purpose Meta-tags
Purpose meta-tags allow you to categorize campaigns by business function and are mandatory for campaign activation.
Create Purpose Meta-tag
- Navigate to Voice campaigns administration → Purpose meta-tags.
-
Click Create purpose meta-tag and configure:
Field Value Purpose meta-tag badExperiencePurpose meta-tag group DEFAULT -
Click Update purpose meta-tag.
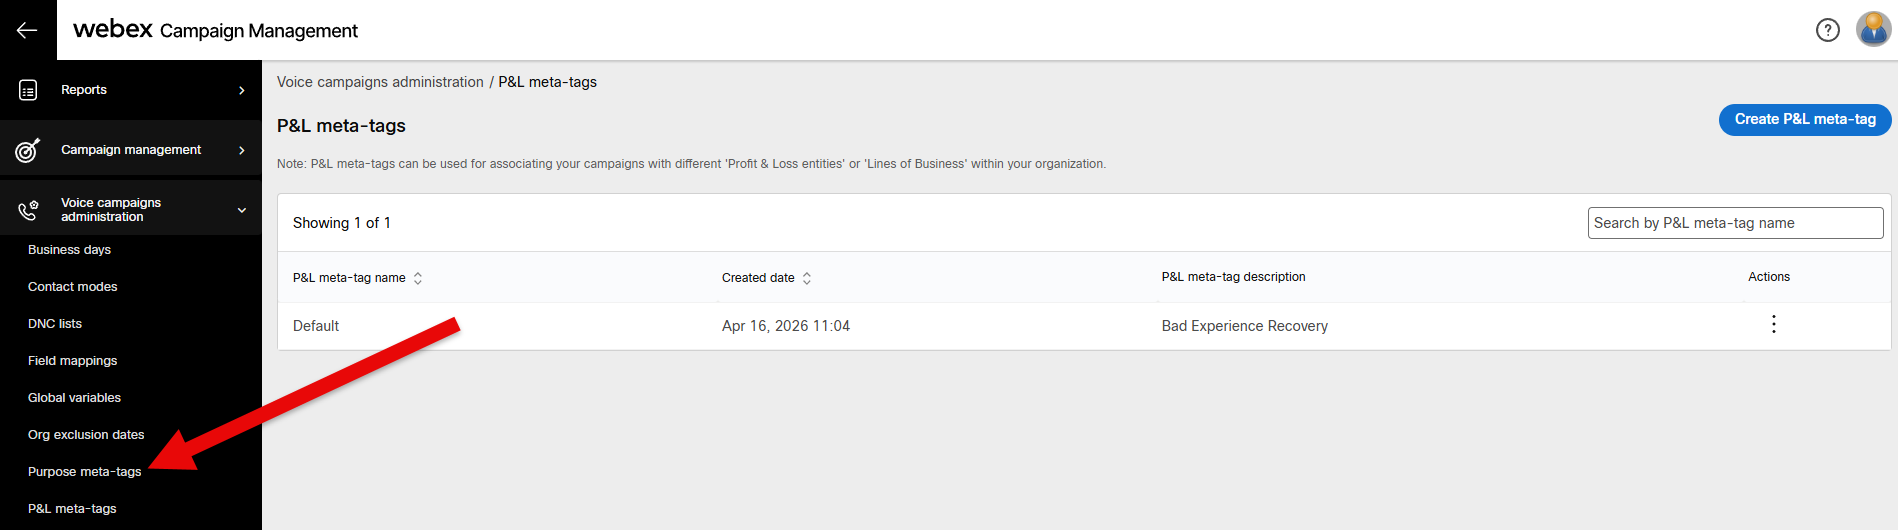
P&L Meta-tags
P&L (Profit and Loss) meta-tags assign campaigns to business divisions or cost centres and are mandatory for campaign activation.
Create P&L Meta-tag
- Navigate to Voice campaigns administration → P&L meta-tags.
-
Click Create P&L meta-tag and configure:
Field Value P&L meta-tag name badExperienceP&L meta-tag description Bad Experience Recovery -
Click Save P&L meta-tag.
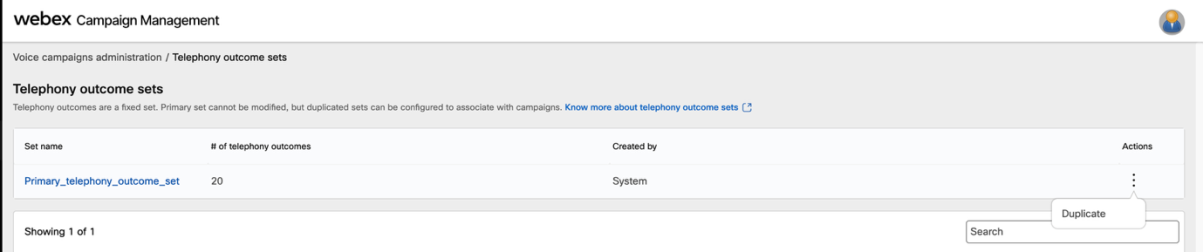
Telephony Outcomes
A telephony outcome set defines how each possible call result (Busy, No Answer, AMD, etc.) is treated by the campaign — including whether it counts as a contact attempt and how long to wait before retrying.
The system provides a primary read-only outcome set. You must duplicate it to create a configurable version for your campaign.
Duplicate Telephony Outcome Set
- Navigate to Voice campaigns administration → Telephony outcome sets.
- On the
Primary_telephony_outcome_setrow, click the ⋮ Actions menu and select Duplicate. - Enter the new name:
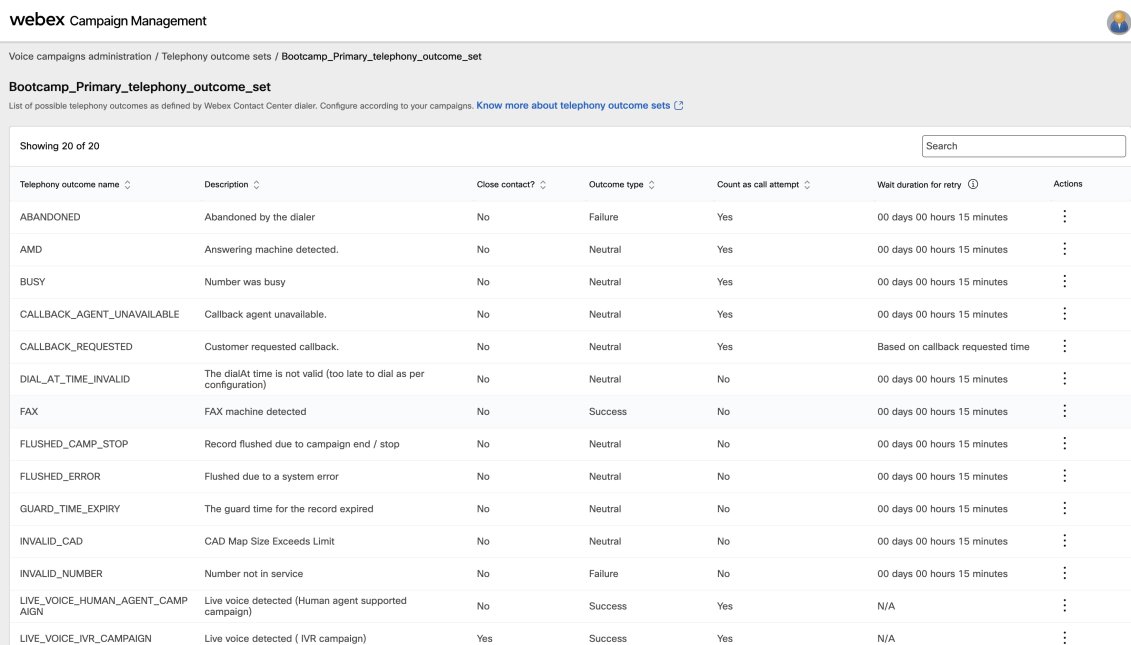
Bootcamp_Primary_telephony_outcome_set - Click Duplicate.
The duplicated set will appear in your list. You can click on it to view all 20 telephony outcomes. For this lab, leave all outcome values at their defaults.
Wrap-up Code Sets
Wrap-up codes defined in Control Hub are synced to Campaign Manager. You can configure how each code affects future campaign contact attempts.
Configure Wrap-up Code Set
- Navigate to Voice campaigns administration → Wrap-up code sets.
- Click Create wrap-up code set and enter the name:
BadExperience_wrapup_set - Click Save.
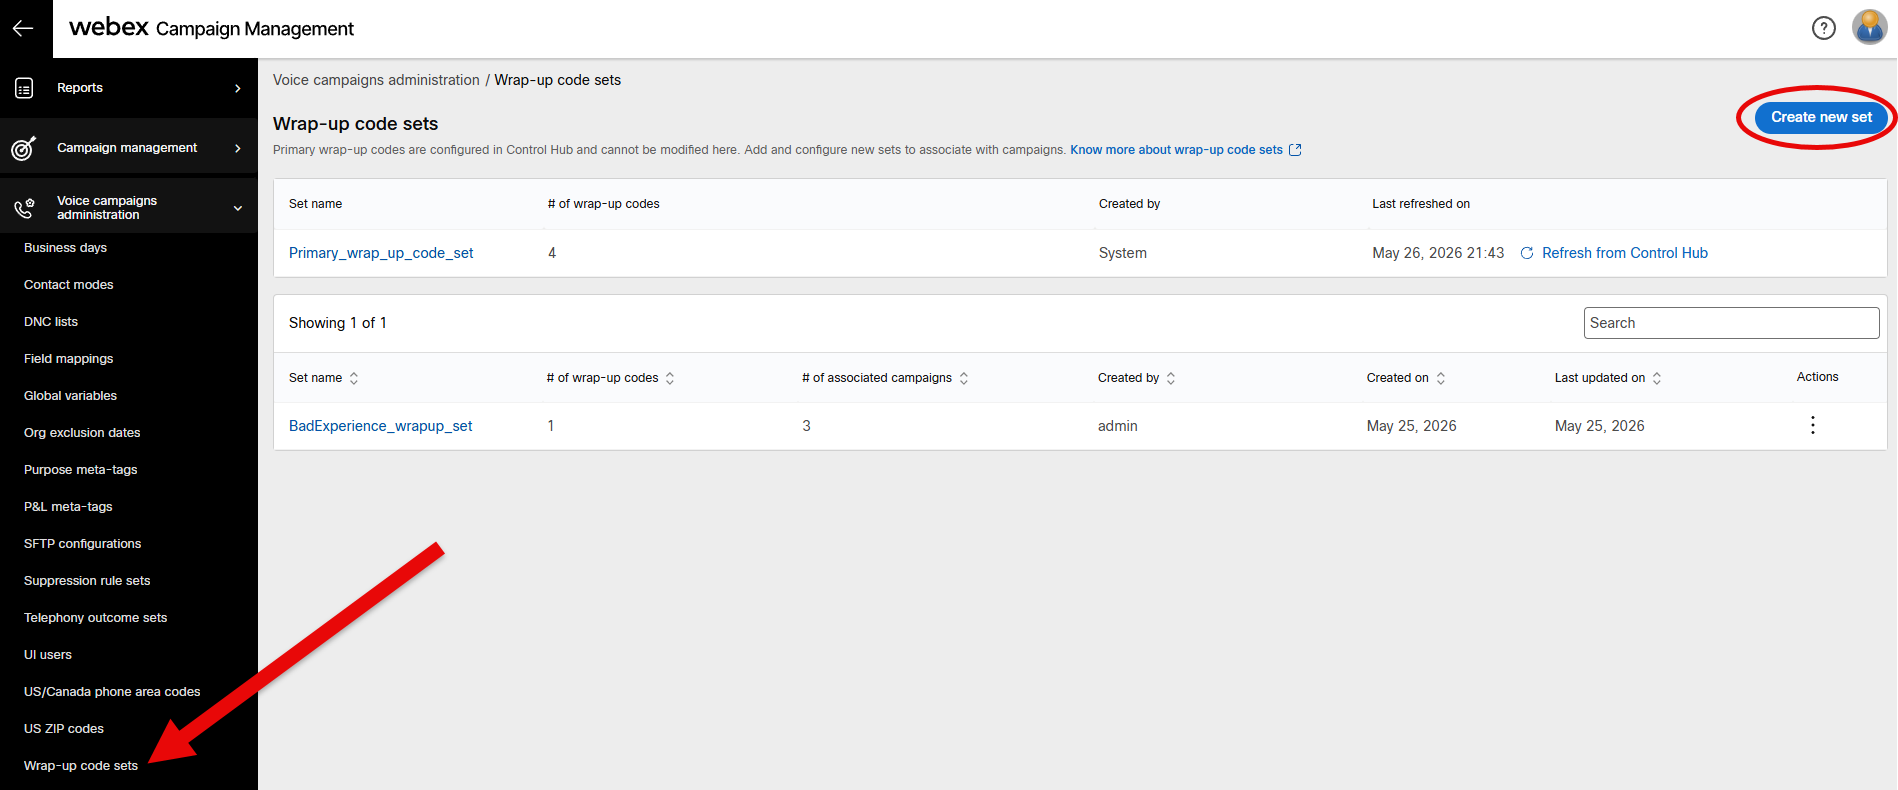
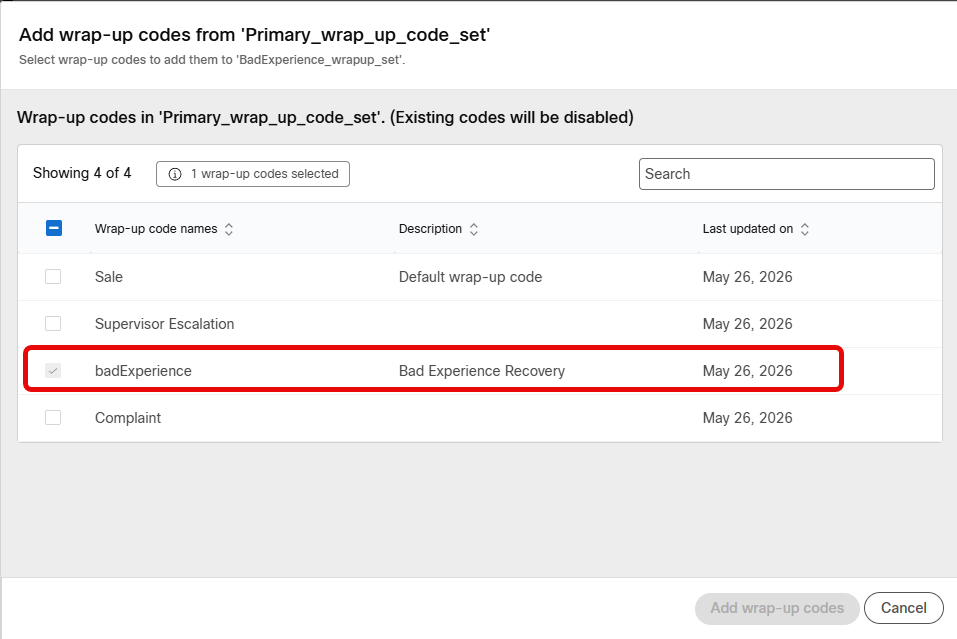
- Click on the new set and then Add wrap-up codes.
-
Locate the
badExperiencewrap-up code synced from Control Hub and select it.Wrap-up Code Creation
This badExperience wrap-up code was created in lab 1 using Bruno.
-
Click Save.
For more information refer to the Wrap-up code sets documentation.
Lab 5.7 - Campaign Management
With all prerequisites in place, you are ready to create the campaign group, configure the campaign, and activate it.
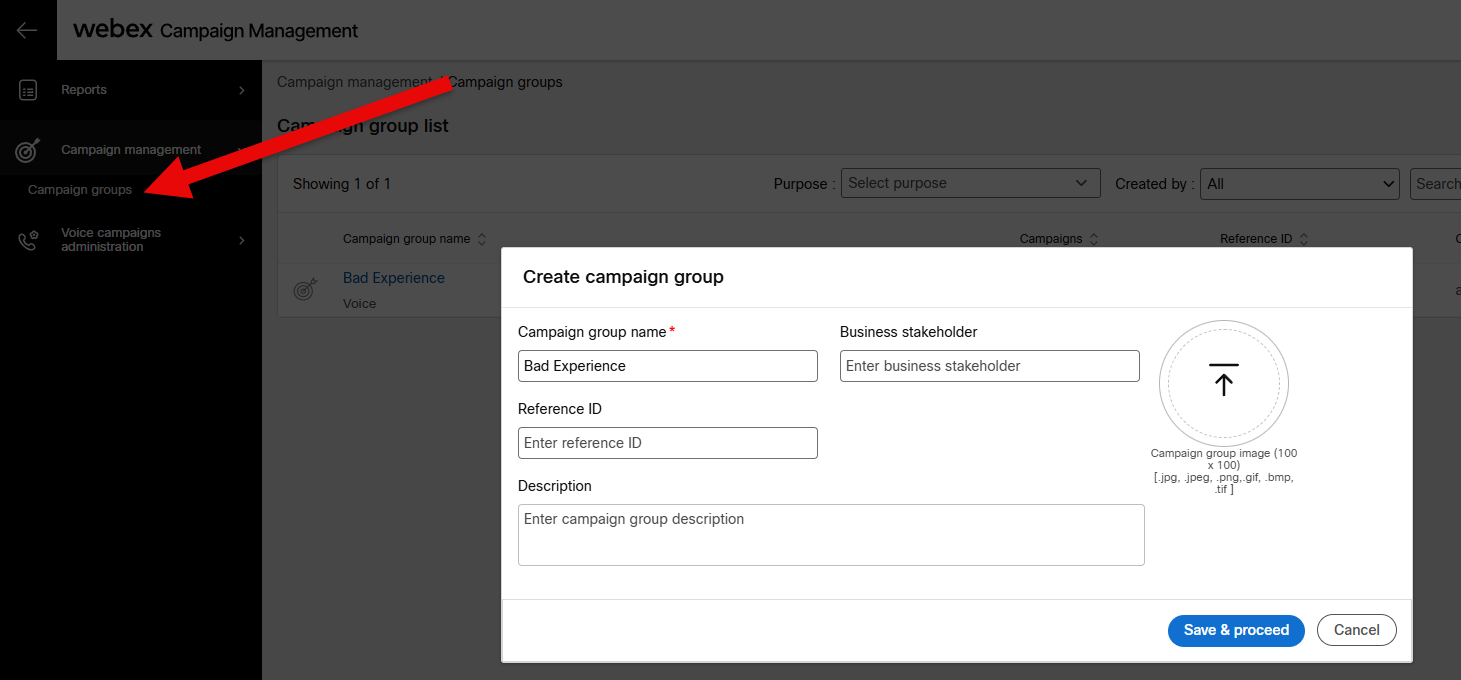
Create a Campaign Group
A campaign group is a container for one or more campaigns. You must create the group before creating any campaigns inside it.
Create Campaign Group
- In Campaign Manager's left navigation panel, navigate to Campaign management → Campaign groups.
-
Click Create campaign group and enter:
Field Value Campaign group name Bad Experience -
Click Save & proceed.

Create and Configure the Campaign
Create Campaign
- Click on the Bad Experience campaign group.
- Click Create campaign in the top-right corner.
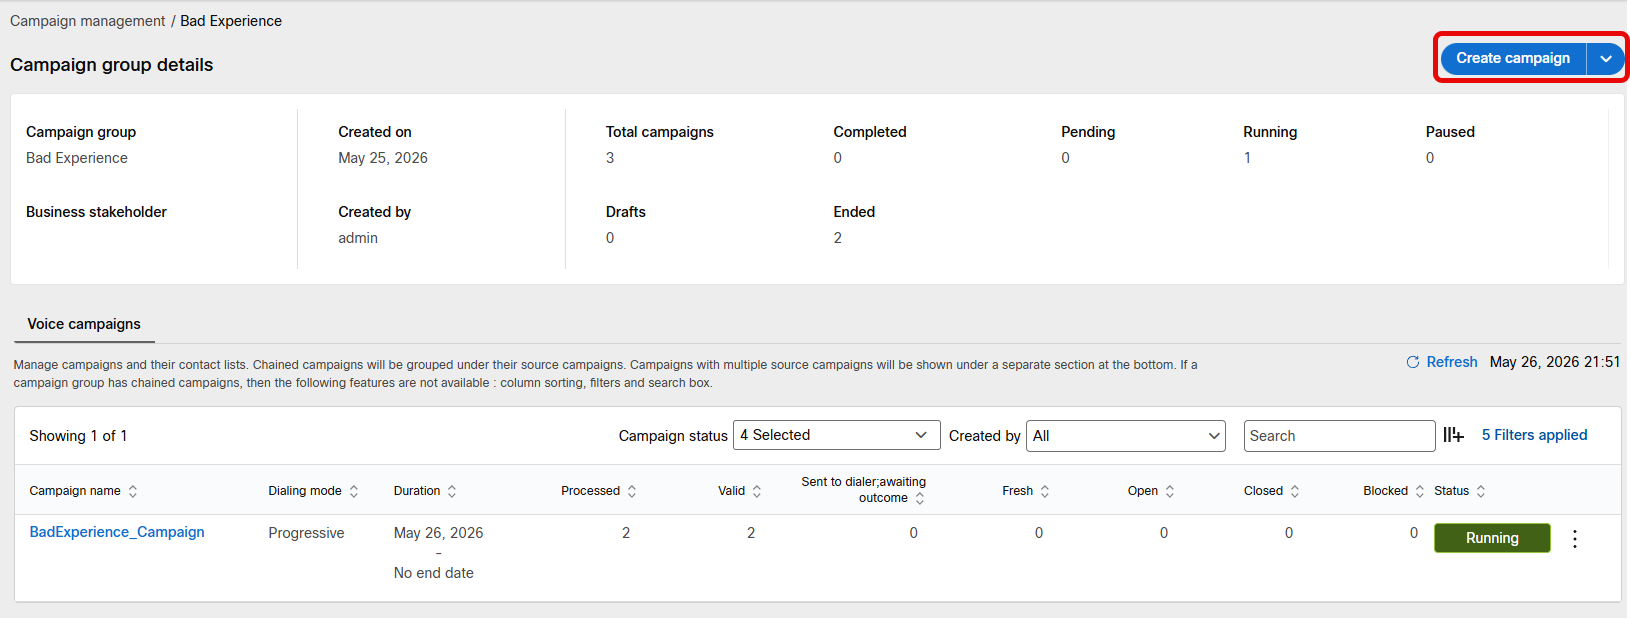
An untitled campaign opens with a visual node-based configuration canvas. Work through each node from left to right.
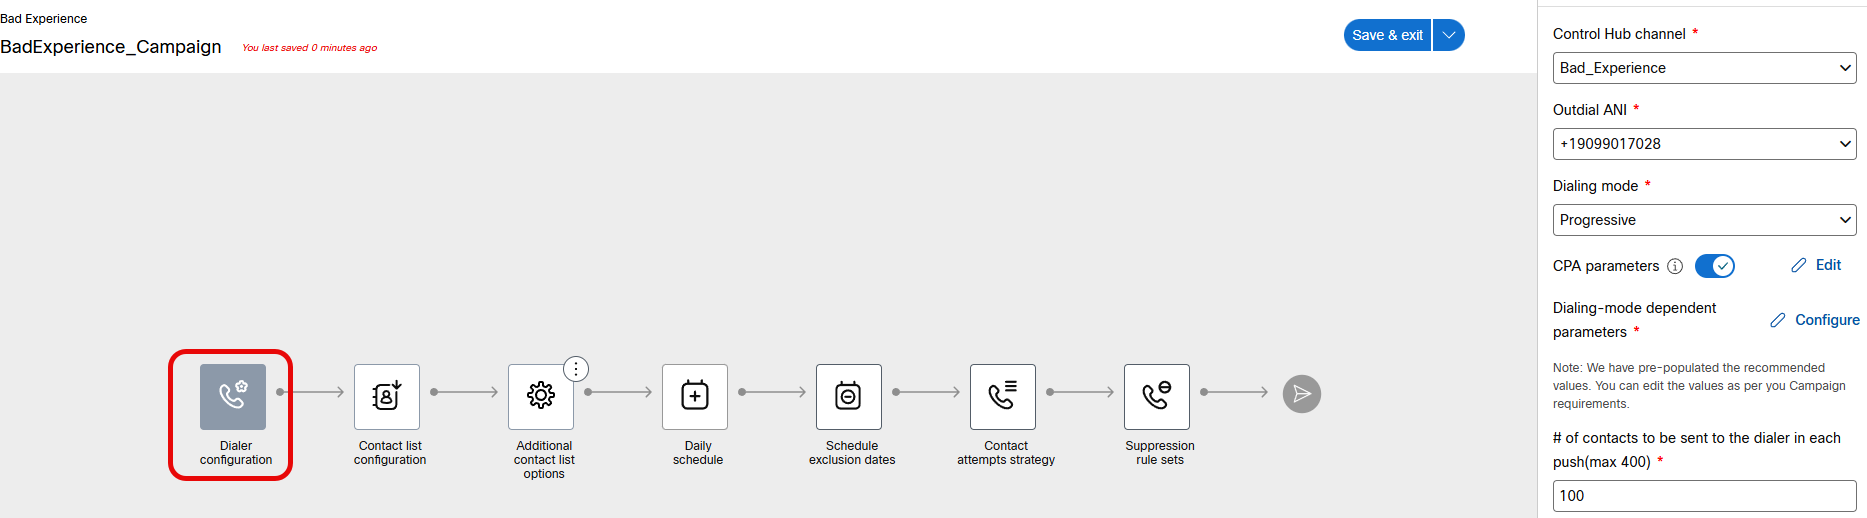
Node 1 — Dialer configuration:
Configure Dialer
In the Dialer configuration panel on the right side:
| Field | Value |
|---|---|
| Control Hub channel | Bad_Experience |
| Outdial ANI | (select your pre-provisioned ANI) |
| Dialing mode | Progressive |
| CPA parameters | Enabled (leave defaults) |
| # of contacts to be sent to the dialer in each push | 100 |
Click Save changes.
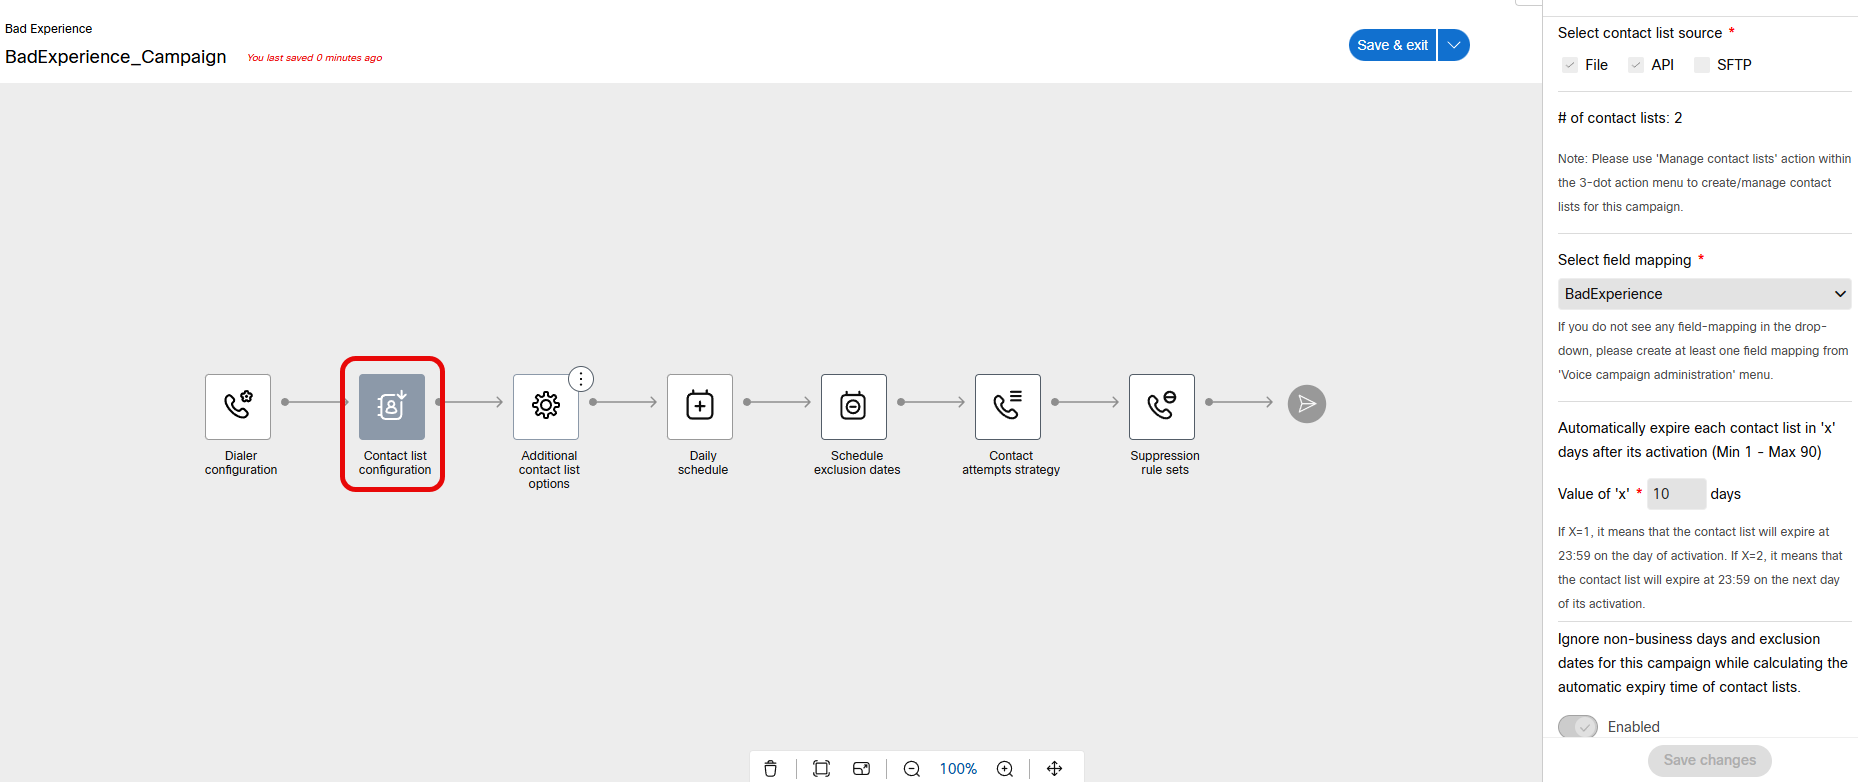
Node 2 — Contact list source:
Configure Contact List Source
- Click the Contact list source node.
-
Configure the following:
Field Value Select contact list source Manual file uploadSelect field mapping BadExperienceContact expiration 10 days -
Click Save changes.
Note
The actual contact list file will be uploaded after the campaign is activated. For now, just associate the field mapping.
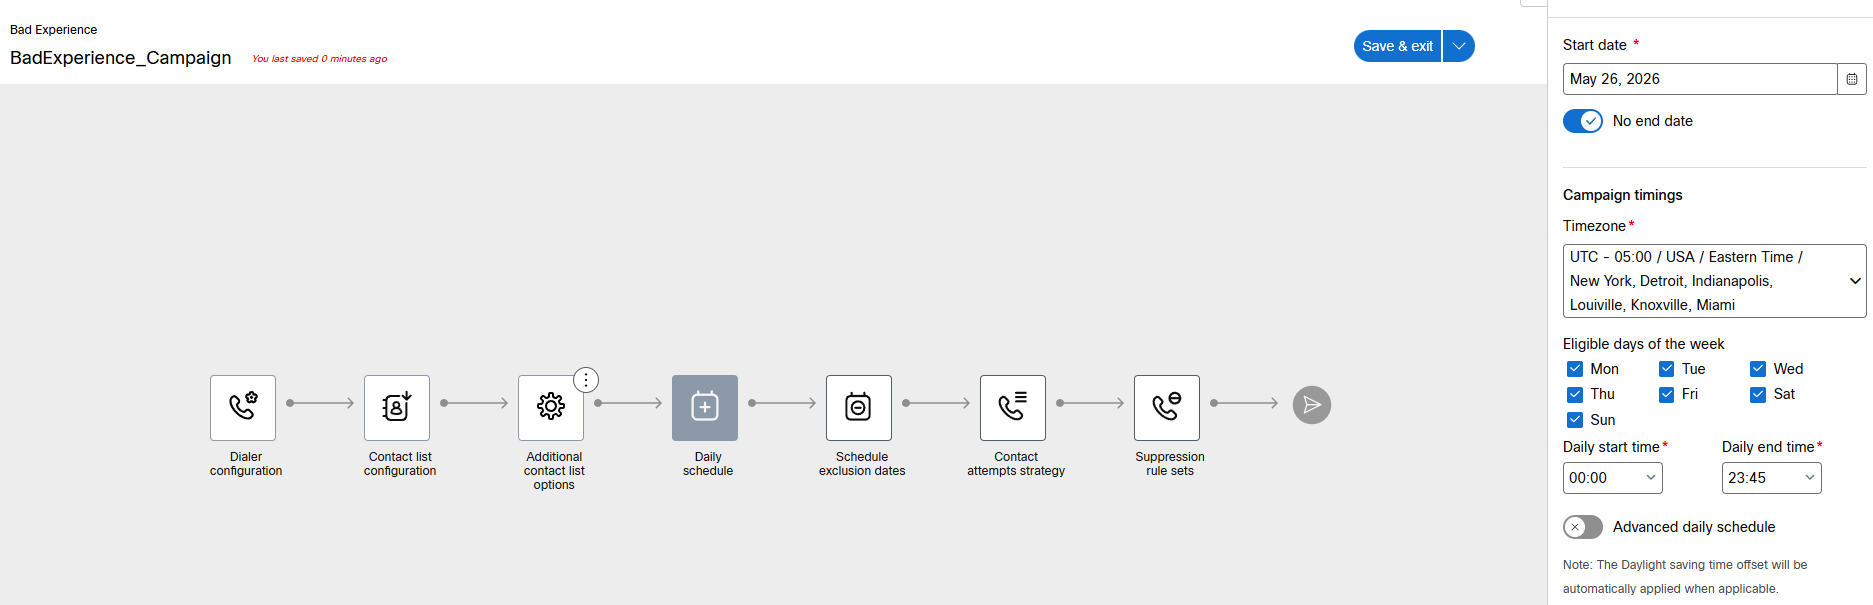
Node 3 — Daily schedule:
Configure Daily Schedule
- Click the Daily schedule node.
-
Configure the calling window using your local timezone:
Field Value Start time 09:00End time 21:00 -
Click Save changes.
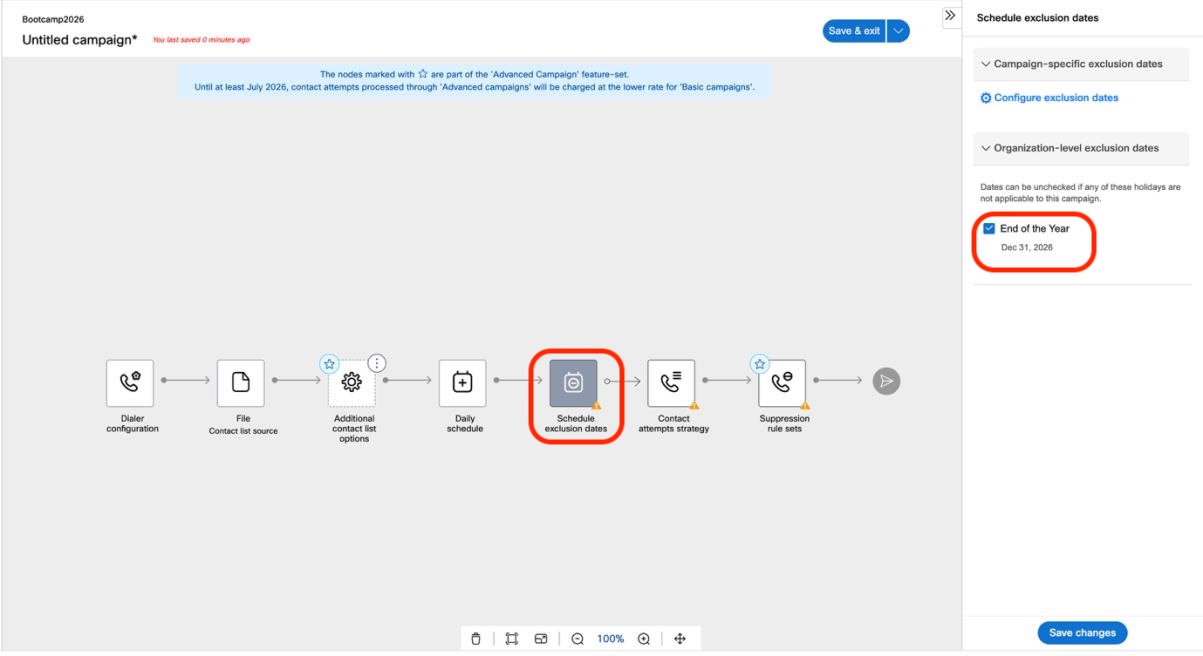
Node 4 — Schedule exclusion dates:
Configure Exclusion Dates
- Click the Schedule exclusion dates node.
- Under Organization-level exclusion dates, the
End of the Year (Dec 31, 2026)date you created earlier should appear automatically. - Leave it checked (enabled).
- Click Save changes.
Node 5 — Contact attempts strategy:
Configure Contact Attempt Strategy
- Click the Contact attempts strategy node, then click Configure.
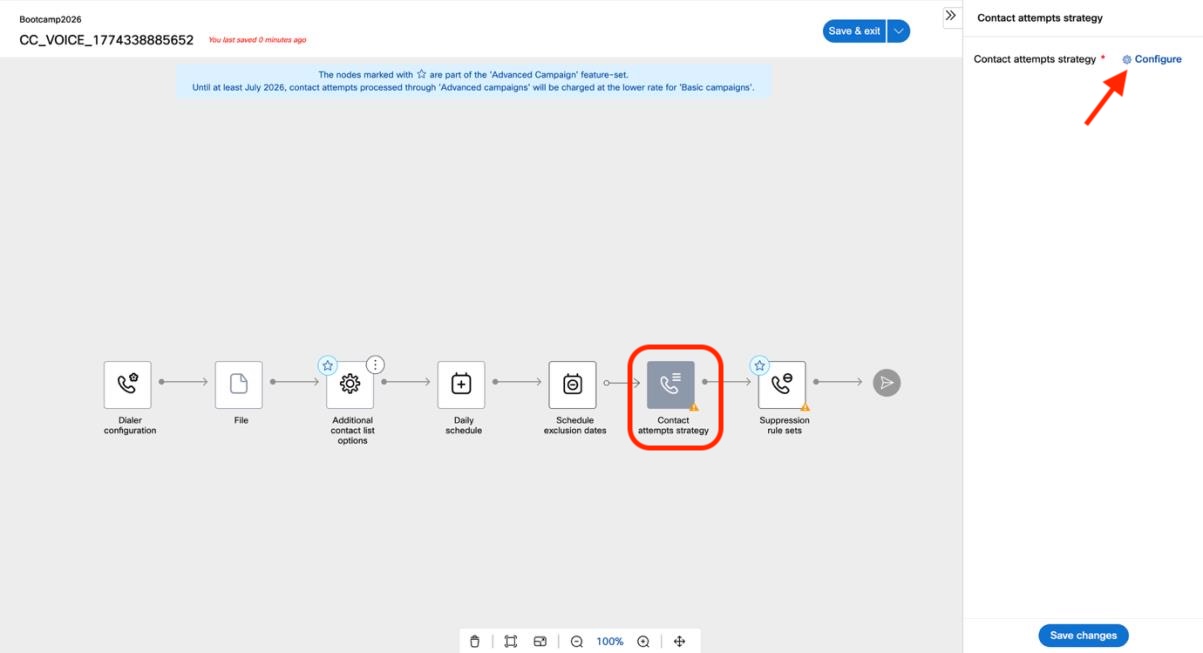
- Configure the following sections:
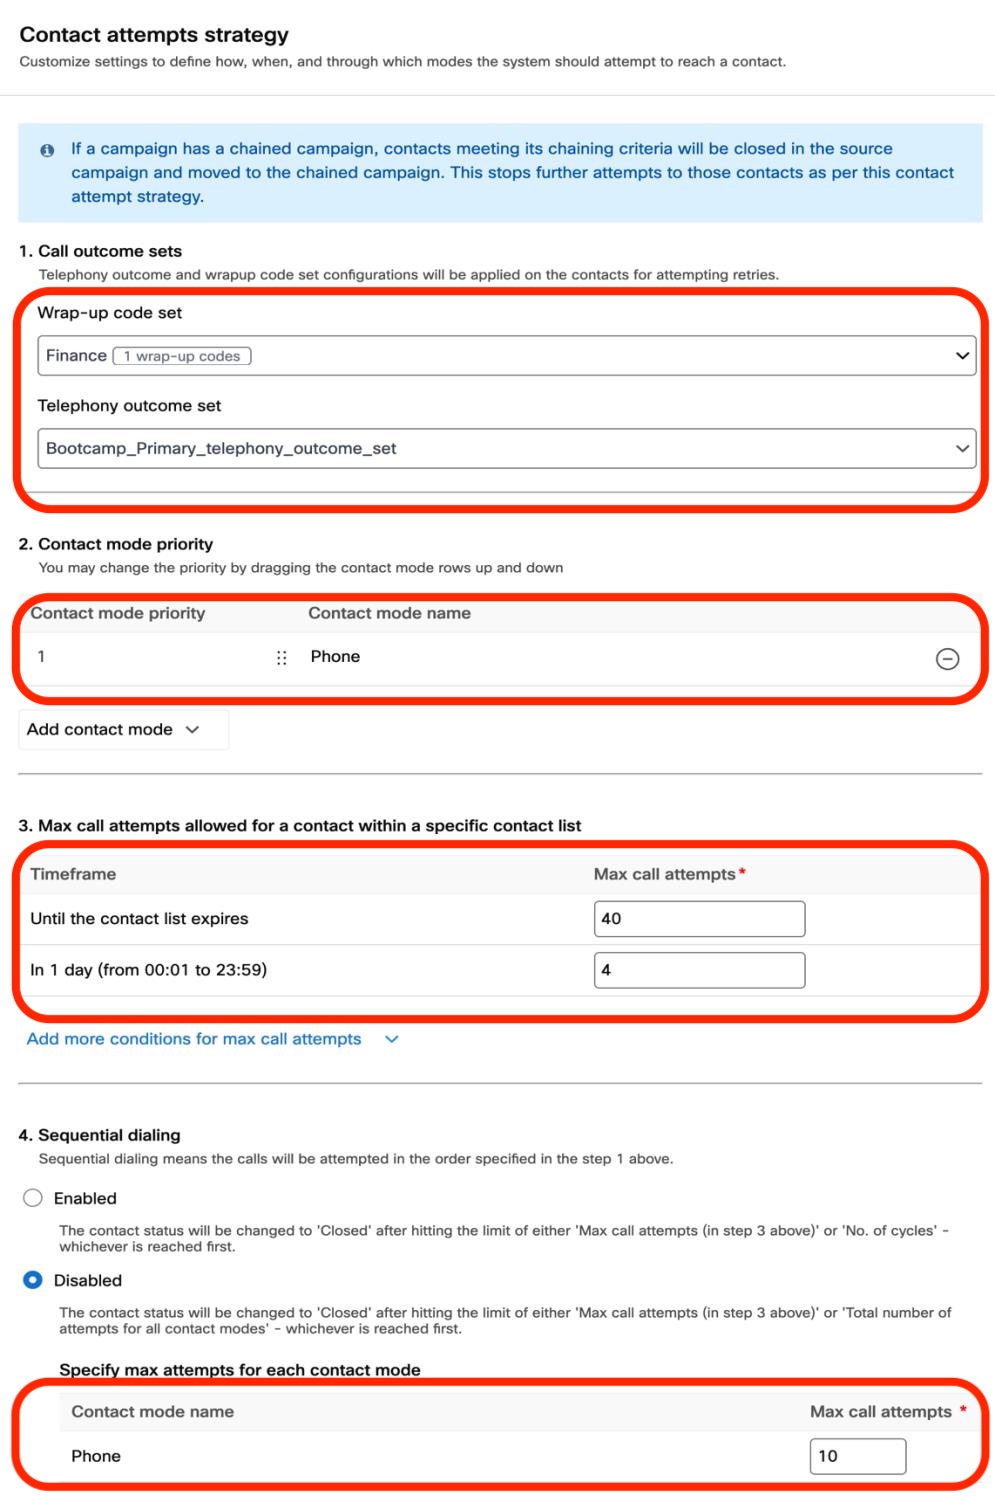
Section 1 — Call outcome sets:
| Field | Value |
|---|---|
| Wrap-up code set | BadExperience_wrapup_set |
| Telephony outcome set | Bootcamp_Primary_telephony_outcome_set |
Section 2 — Contact mode priority:
The phone contact mode should be pre-populated from your field mapping. Leave priority at 1.
Section 3 — Max call attempts:
| Timeframe | Max call attempts |
|---|---|
| Until the contact list expires | 40 |
| In 1 day (from 00:01 to 23:59) | 4 |
Section 4 — Sequential dialling:
Disable sequential dialling and set the amount of contacts to 10.
Click Save.
Back on the campaign flow canvas, click Save changes in the right panel.
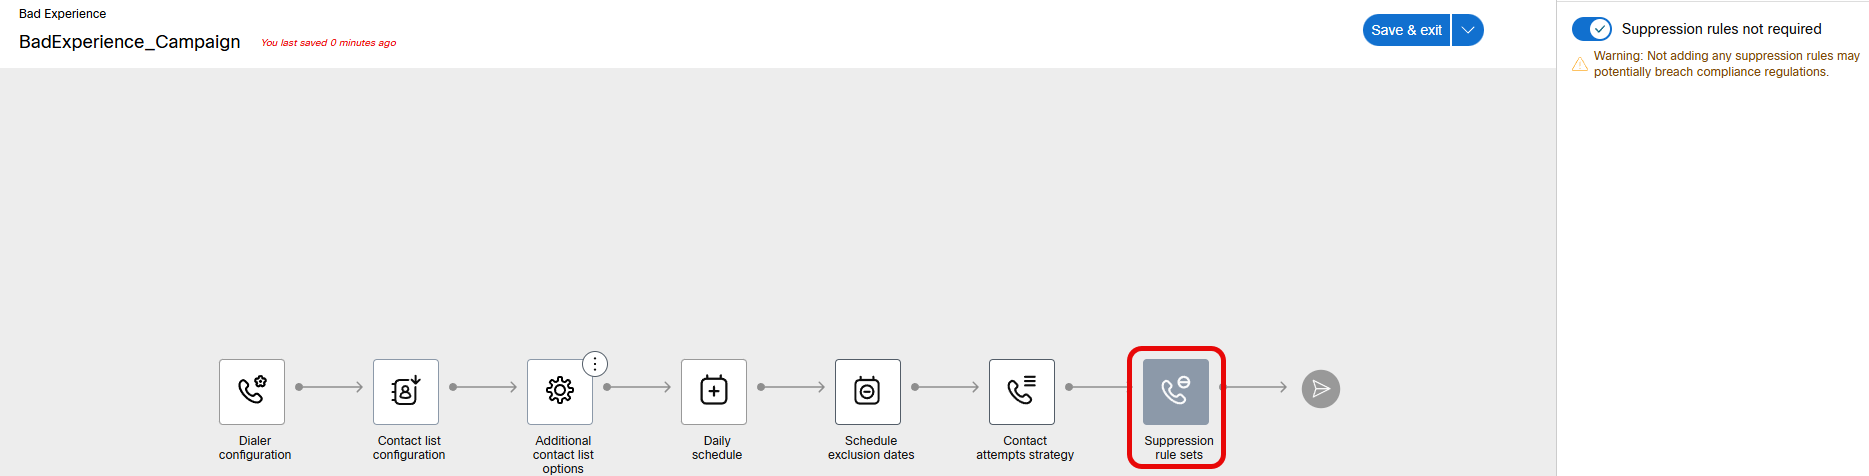
Node 6 — Suppression rule sets:
Configure Suppression Rules
- Click the Suppression rule sets node.
- Under Suppression rule sets, select
Suppression rules not required. - Click Save changes.
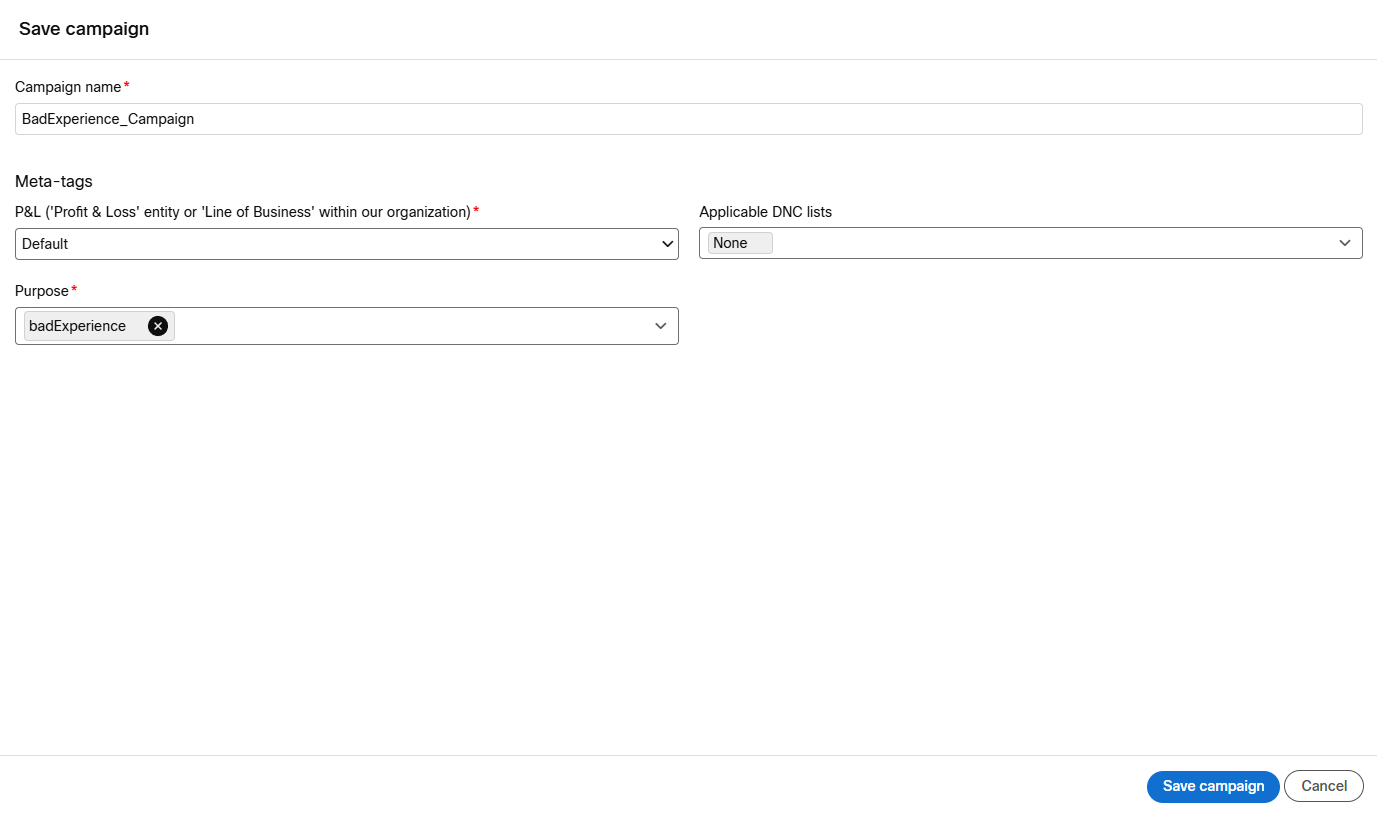
Save and Activate the Campaign
Save Campaign
- Click Save & exit in the top-right corner of the campaign flow canvas.
-
In the Save campaign dialog, fill in:
Field Value Campaign name BadExperience_CampaignP&L meta-tag badExperiencePurpose meta-tag badExperienceApplicable DNC lists None -
Click Save.
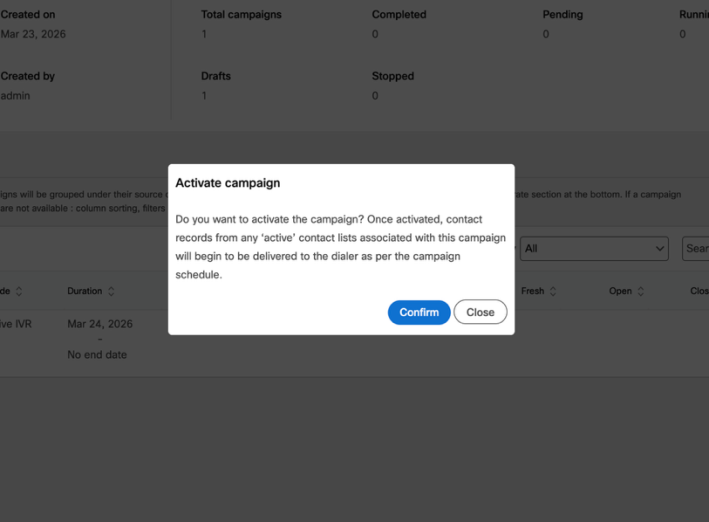
Activate Campaign
- Back in the campaign group list, locate BadExperience_Campaign (status: Draft).
- Click the ⋮ Actions menu and select Activate.
- In the confirmation dialog, click Confirm.
The campaign status will change to Pending and then Running.
Tip
Campaign status is not refreshed in real time — click the Refresh button to get the updated status.
Lab 5.8 - Upload Contact List and Test
Now that the campaign is active, you will perform a manual end-to-end validation by uploading a contact list CSV directly to the campaign. This confirms the full flow is working — from the dialler picking up the contact, through CPA detection, to the live voice routing and TTS message — before you move on to API-driven contact injection in Lab 5.9.
Info
In production, the Bad Experience detection system injects contacts automatically via the Campaign Manager API — no manual upload is required. This step exists purely to validate your campaign infrastructure is correctly configured before introducing the API layer.
Upload the Contact List
Upload Contact List
- In the campaign list, click the ⋮ Actions menu on BadExperience_Campaign and select Manage contact lists.
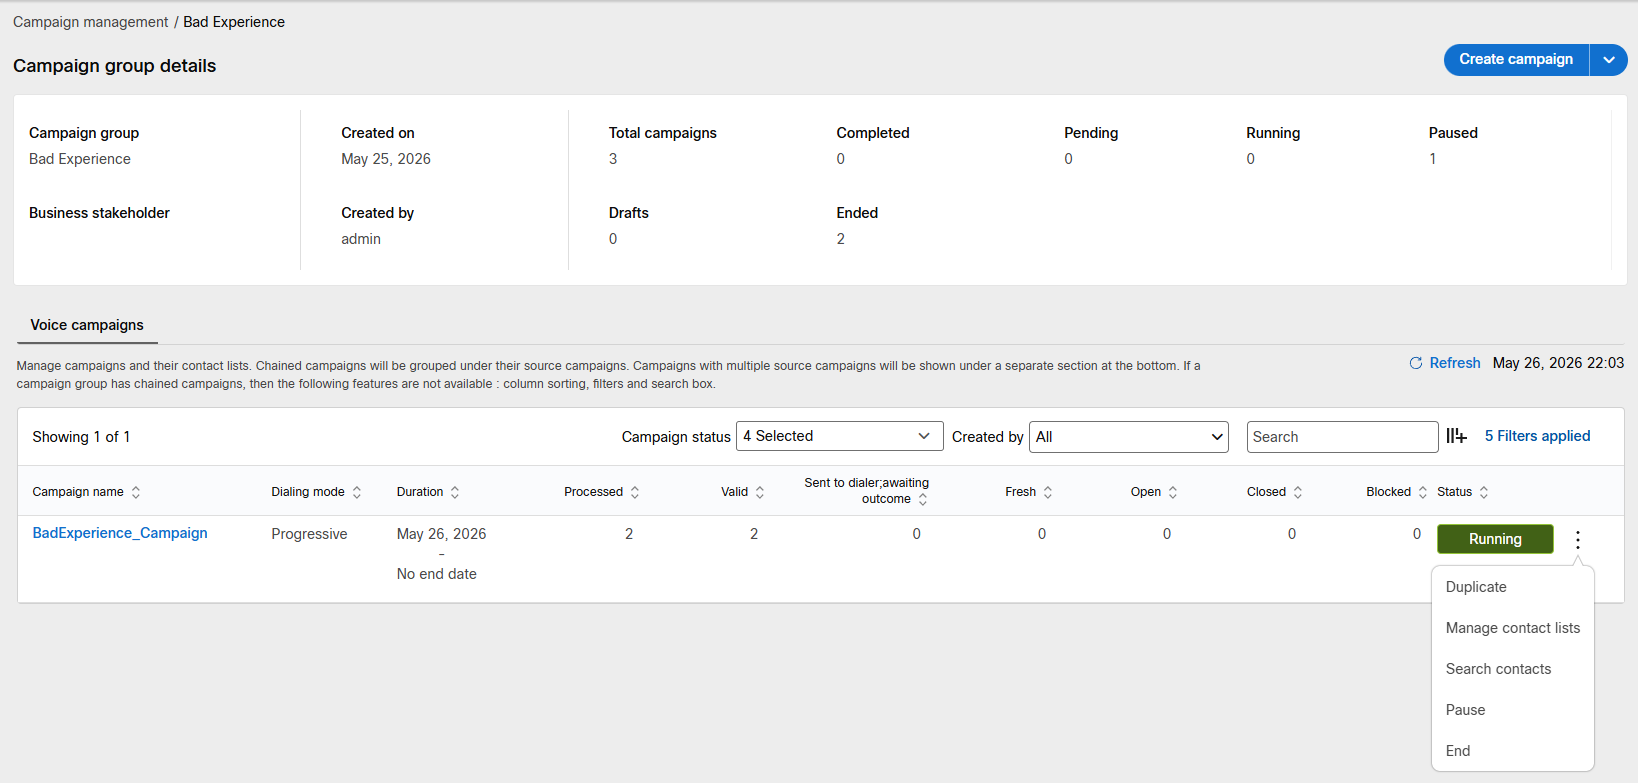
- Click Upload file to create contact list.
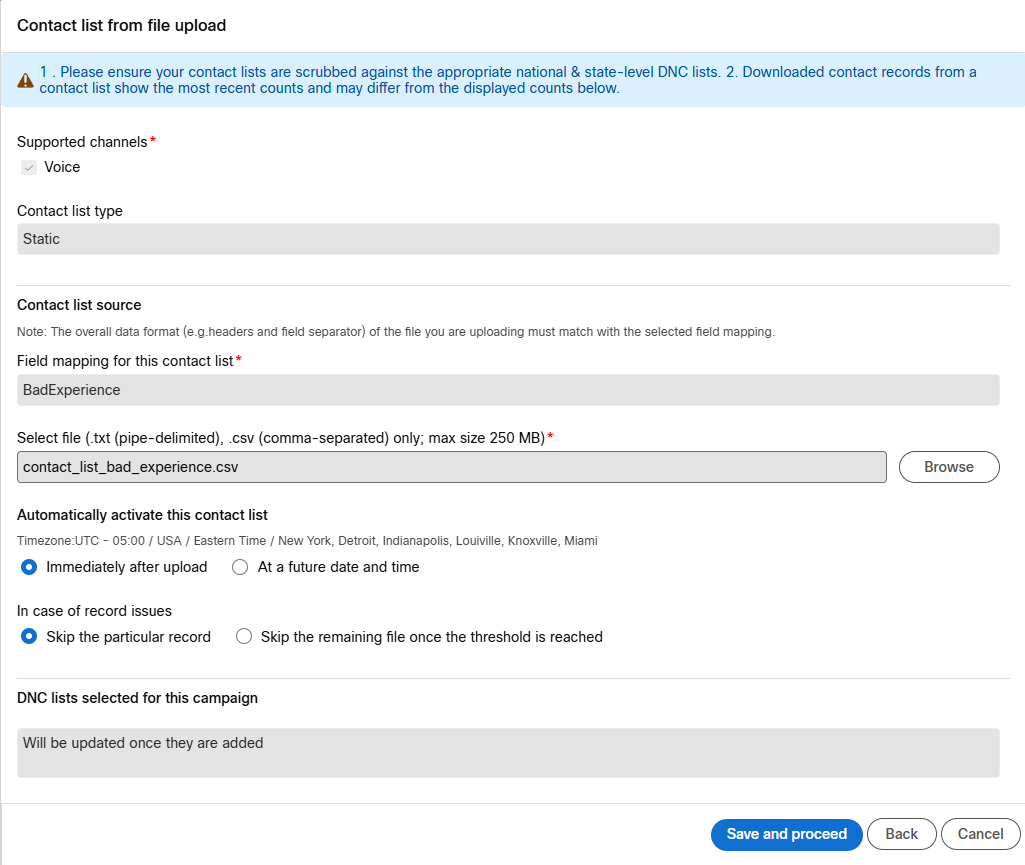
-
In the Contact list from file upload dialog, configure the following:
Field Value Supported channels Voice(pre-selected)Contact list type StaticField mapping BadExperience(pre-selected)Automatically activate Immediately after upload In case of record issues Skip the particular record -
Click Browse and select your
contact_list_bad_experience.csv. - Click Save and proceed.
Warning
If your contact list fails to upload, the most likely cause is a formatting issue with the CSV file. Check that:
- Column headers match exactly what was defined in the field mapping (
firstName,lastName,phoneNumber,Reason,Status,ID,Comments) - Phone numbers use E.164 format with the
+prefix (e.g.+12263762555) - All phone numbers in the file are from the same country
- No spaces, hyphens, or special characters appear in the phone number field
- The file is saved as a proper comma-separated CSV (not semicolon or tab-separated)
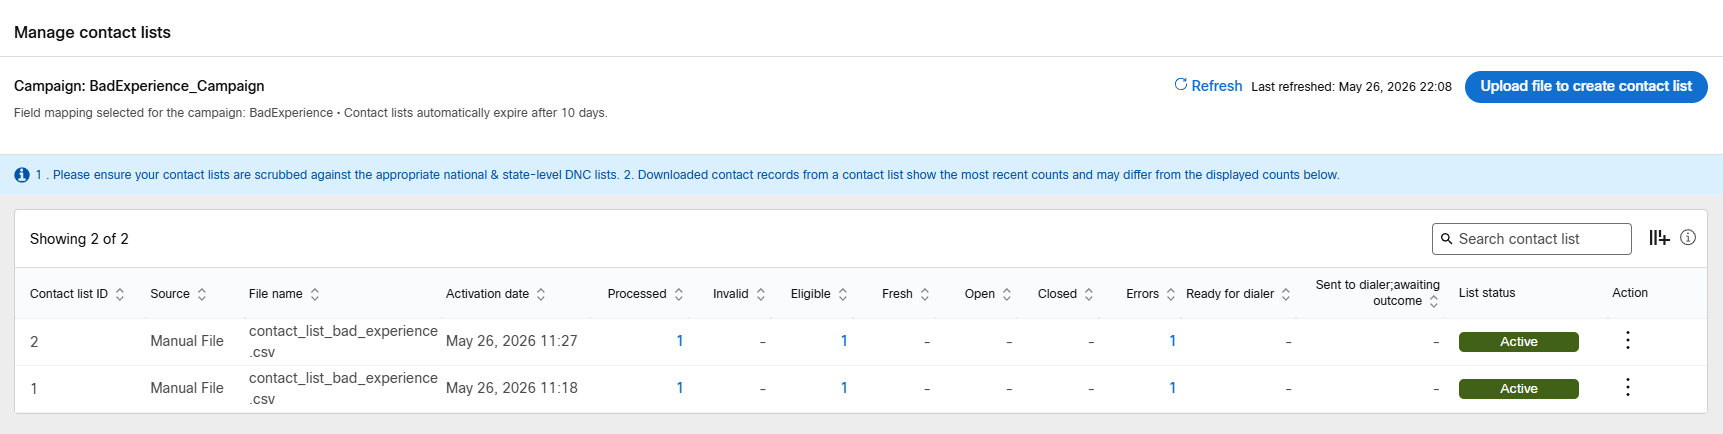
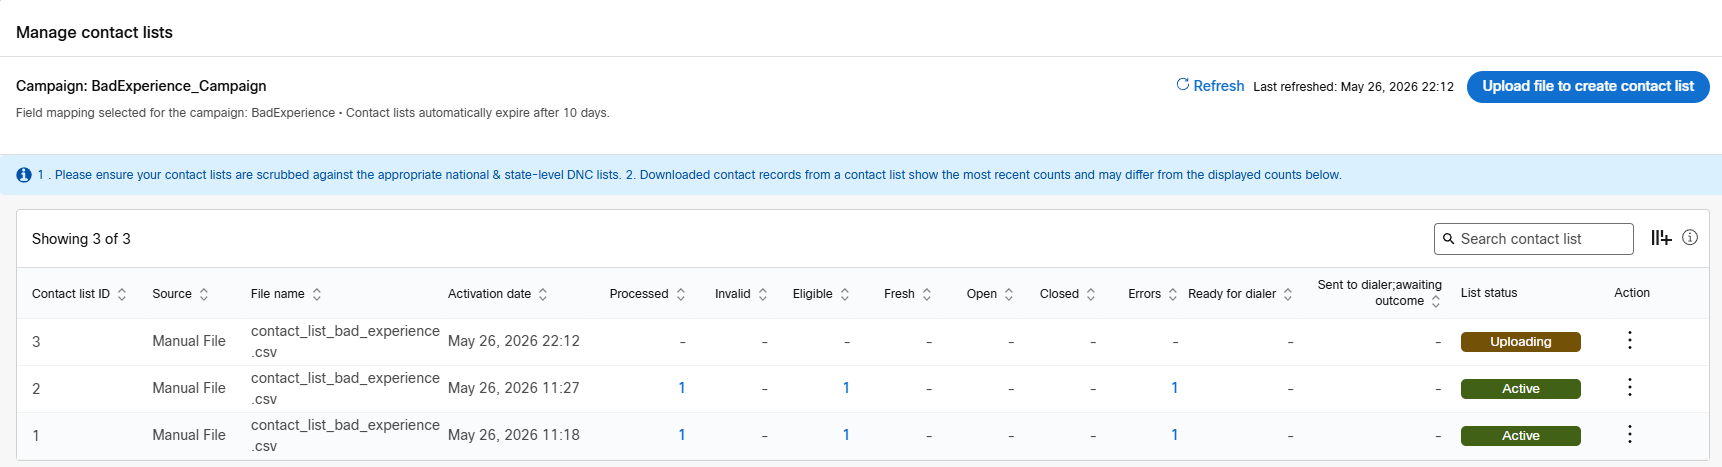
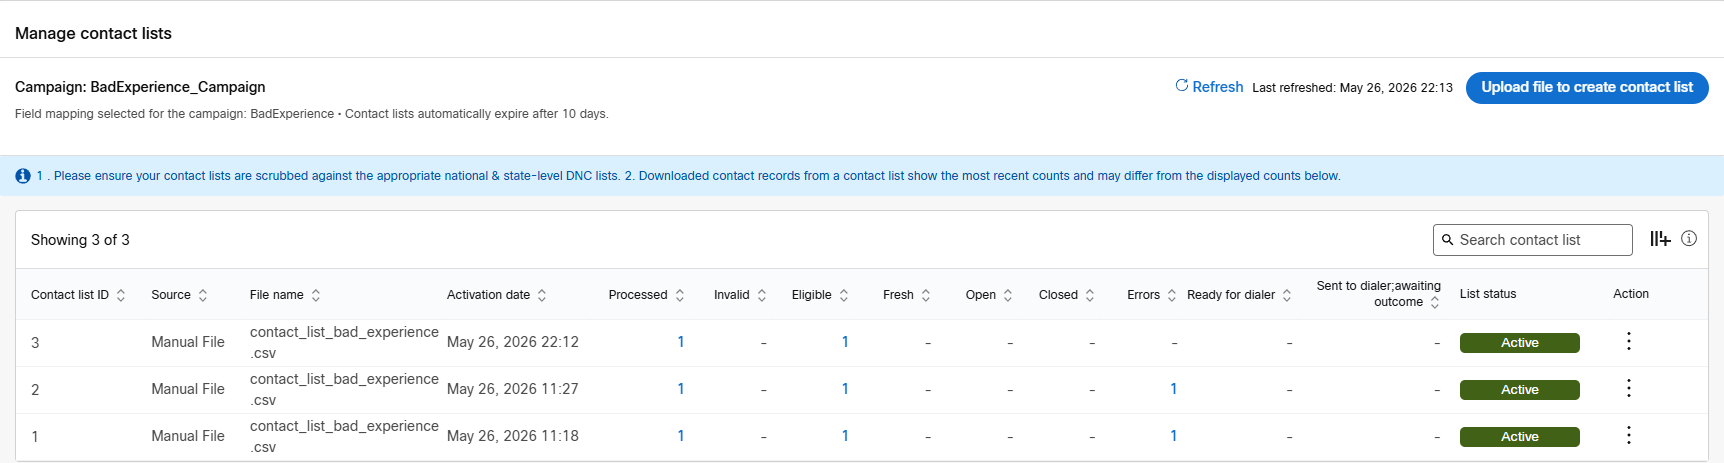
Monitor Upload Status
After uploading, the contact list will show a status of Uploading, then transition to Active once processed. You will see the status move through: Processed, Valid, Eligible. Click Refresh to see the latest status.
Verify the Campaign is Running
Once the contact list is active, the Campaign Manager will begin pushing contacts to the dialler. Allow 2–5 minutes for the first calls to be generated.
Log your agent into the desktop https://desktop.wxcc-us1.cisco.com/, make sure you are available and wait until you receive your first call.
If everything is configured correctly, you will receive a call on the phone number in your contact list. When you answer you will hear:
"Congratulations, You have received your FIRST Bad Experience Dialer call!"
This confirms the full end-to-end flow is working — Campaign Manager initiated the call, CPA detected a live voice!
Note
The End Flow node does not disconnect the call — you must hang up manually after testing. We have chosen End Flow over Disconnect Contact because the call will be routed to a queue in future labs.
Lab 5.9 - API Contact Injection with Bruno
In the previous lab you validated the campaign by manually uploading a contact list CSV. In this lab you will simulate exactly what the Bad Experience detection system does automatically in production — injecting a customer record directly into the campaign via the Campaign Manager REST API using Bruno.
Info
Bruno is a fast, lightweight API client that runs locally on your machine. If you don't have it installed, download it from https://www.usebruno.com/.
Understanding the API Flow
Before making any API calls, it is important to understand the three-step process the Bad Experience system follows every time it needs to trigger a proactive callback:
- Check for an active contact list — query the campaign for any currently active API-sourced contact lists. If one exists, reuse it.
- Create a contact list — if no active list exists, create a new one against the campaign.
- Inject the contact — add the customer record to the active contact list. The dialler picks it up within seconds and places the outbound call.
Configure Bruno Environment
Before running the API calls, set up a Bruno environment with your campaign variables.
Set Up Bruno Environment
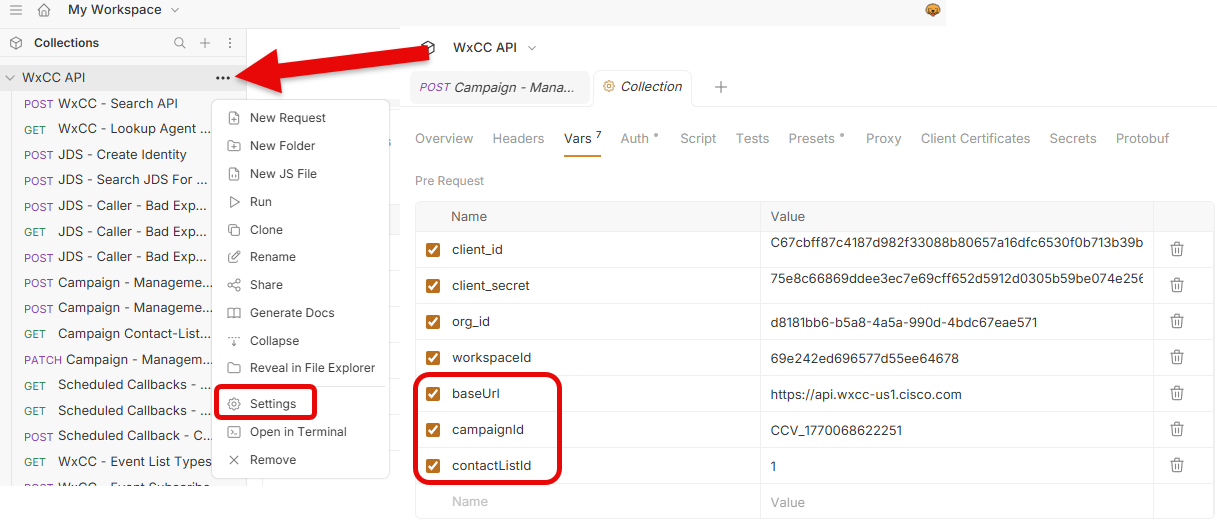
Collection should already be created
In your Bruno import, the collection should already exist. Click the ellipsis menu for the collection.
- Open Bruno and create a new collection named
Campaign Manager. -
Create a new environment named
Bootcampwith the following variables:Variable Value baseUrlCampaign Manager base URL provided for your POD campaignIdYour BadExperience_Campaigncampaign IDcontactListId(leave blank — populated after Step 2)
Tip
To find your campaignId, navigate to your BadExperience_Campaign in Campaign Manager, open the campaign, and copy the ID from the URL or campaign details panel.
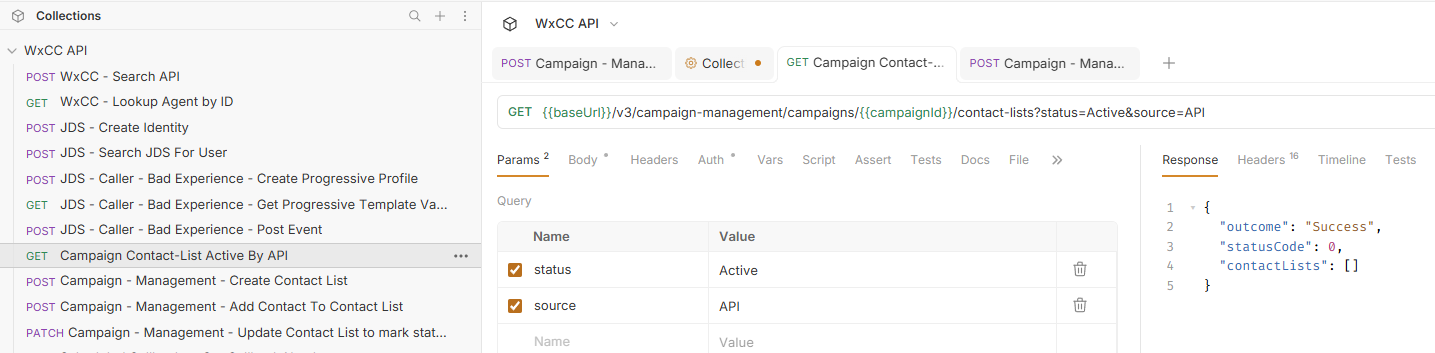
Step 1 — Check for an Active Contact List
First, query the campaign to determine whether an active API-sourced contact list already exists. If one does, you will skip Step 2 and proceed directly to Step 3.
GET Active Contact List
-
In Bruno, using existing request Campaign - Management - Create Contact List in the
WxCC APIcollection:Field Value Method GETURL {{baseUrl}}/v3/campaign-management/campaigns/{{campaignId}}/contact-lists?status=Active&source=API -
Click Send.
What you are looking for in the response:
- Empty array
[]— no active contact list exists. Proceed to Step 2 to create one. - Array with one or more objects — an active contact list exists. Copy the
idvalue from the first object, save it as yourcontactListIdenvironment variable, and skip to Step 3.
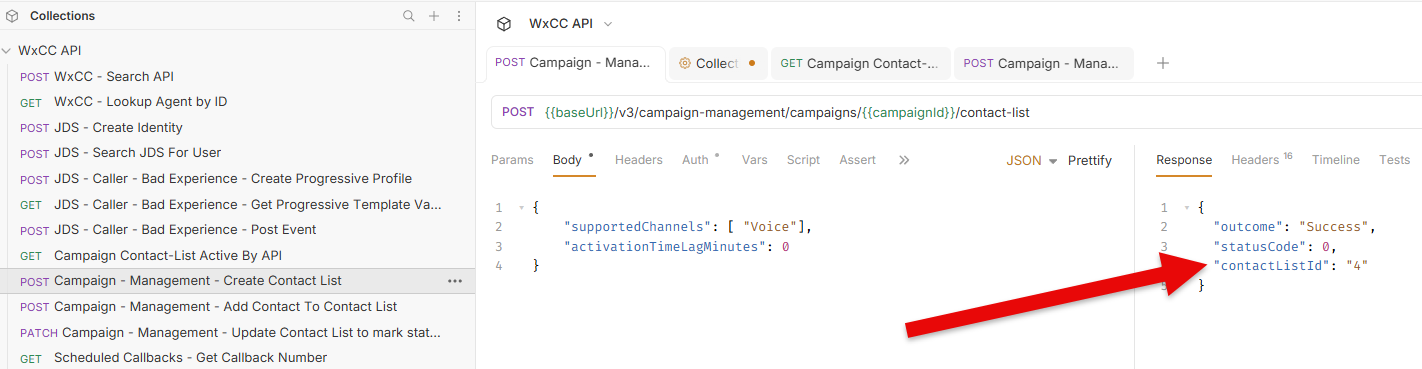
Step 2 — Create a Contact List
If no active contact list was returned in Step 1, create a new one against the campaign.
POST Create Contact List
-
In Bruno, using existing request Campaign - Management - Create Contact List in the
WxCC APIcollection:Field Value Method POSTURL {{baseUrl}}/v3/campaign-management/campaigns/{{campaignId}}/contact-list -
You will see existing BODY below:
{
    "supportedChannels": ["Voice"],
    "activationTimeLagMinutes": 0
}
- Click Send.
What you are looking for in the response:
- A
2xx Createdresponse containing the new contact list object. - Copy the
contactListIdvalue from the response and save it as yourcontactListIdenvironment variable — you will need it in Step 3.
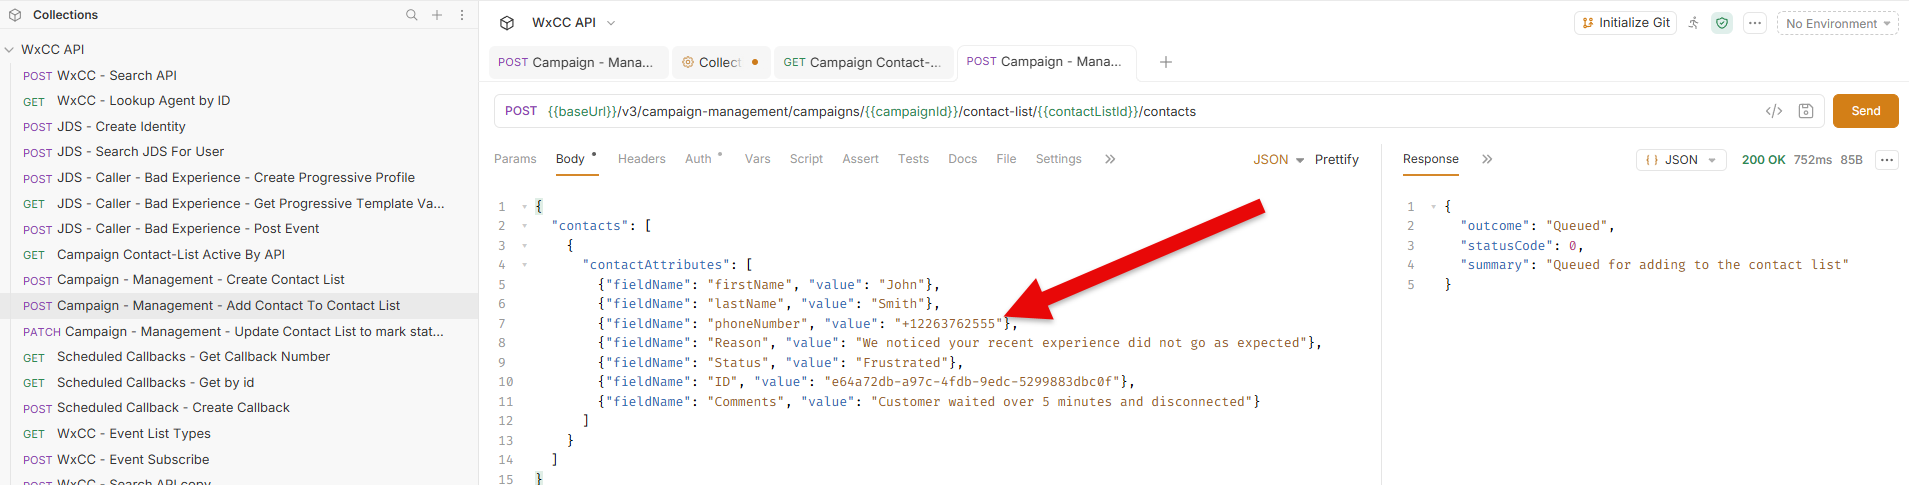
Step 3 — Inject the Contact
With an active contact list confirmed, inject the customer record into the campaign. The dialler will pick this up and place the outbound call within seconds.
POST Inject Contact
-
In Bruno, using existing request in the
WxCC APIcollection:Field Value Method POSTURL {{baseUrl}}/v3/campaign-management/campaigns/{{campaignId}}/contact-list/{{contactListId}}/contacts -
You will see existing BODY below:
{
    "contacts": [
        {
            "contactAttributes": [
                {"fieldName": "firstName", "value": "John"},
                {"fieldName": "lastName", "value": "Smith"},
                {"fieldName": "phoneNumber", "value": "+12263762555"},
                {"fieldName": "Reason", "value": "We noticed your recent experience did not go as expected"},
                {"fieldName": "Status", "value": "Frustrated"},
                {"fieldName": "ID", "value": "e64a72db-a97c-4fdb-9edc-5299883dbc0f"},
                {"fieldName": "Comments", "value": "Customer waited over 5 minutes and disconnected"}
            ]
        }
    ]
}
- Click Send.
What you are looking for in the response:
- A
200or201response confirming the contact was accepted. - The dialler will begin processing the record immediately.
Tip
Update the phoneNumber value to your own number so you receive the test call directly.
Verify the Call
Allow 2–5 minutes after injecting the contact for the dialler to process the record and place the call.
Log your agent into the desktop https://desktop.wxcc-us1.cisco.com/, make sure you are available and wait until you receive your first call.
If everything is configured correctly, you will receive a call on the phone number in your contact list. When you answer you will hear:
"Congratulations, You have received your FIRST Bad Experience Dialer call!"
This confirms that the API injection is working correctly — the Bad Experience system can now trigger proactive callbacks programmatically without any manual intervention.
Note
If you do not receive a call within 5 minutes, check the following:
- The campaign status is Running (not Pending or Paused)
- The contact list status is Active
- The phone number is in E.164 format with the
+prefix - The suppression rule is not blocking the call based on the current time in the recipient's timezone
Lab 5.10 - Webex Connect Integration
In this lab you will configure the Webex Connect integration that replicates the three API calls you tested manually in Bruno. Rather than building from scratch, you will modify the existing WxCC Integration node, clone the Search POST and modify the parameters for each method — authentication is already configured and does not need to be changed.
Info
The WxCC Integration node contains three methods, each mapping directly to one of the Bruno API calls from Lab 5.9. You are simply pointing each method at the correct Campaign Manager endpoint with the correct payload.
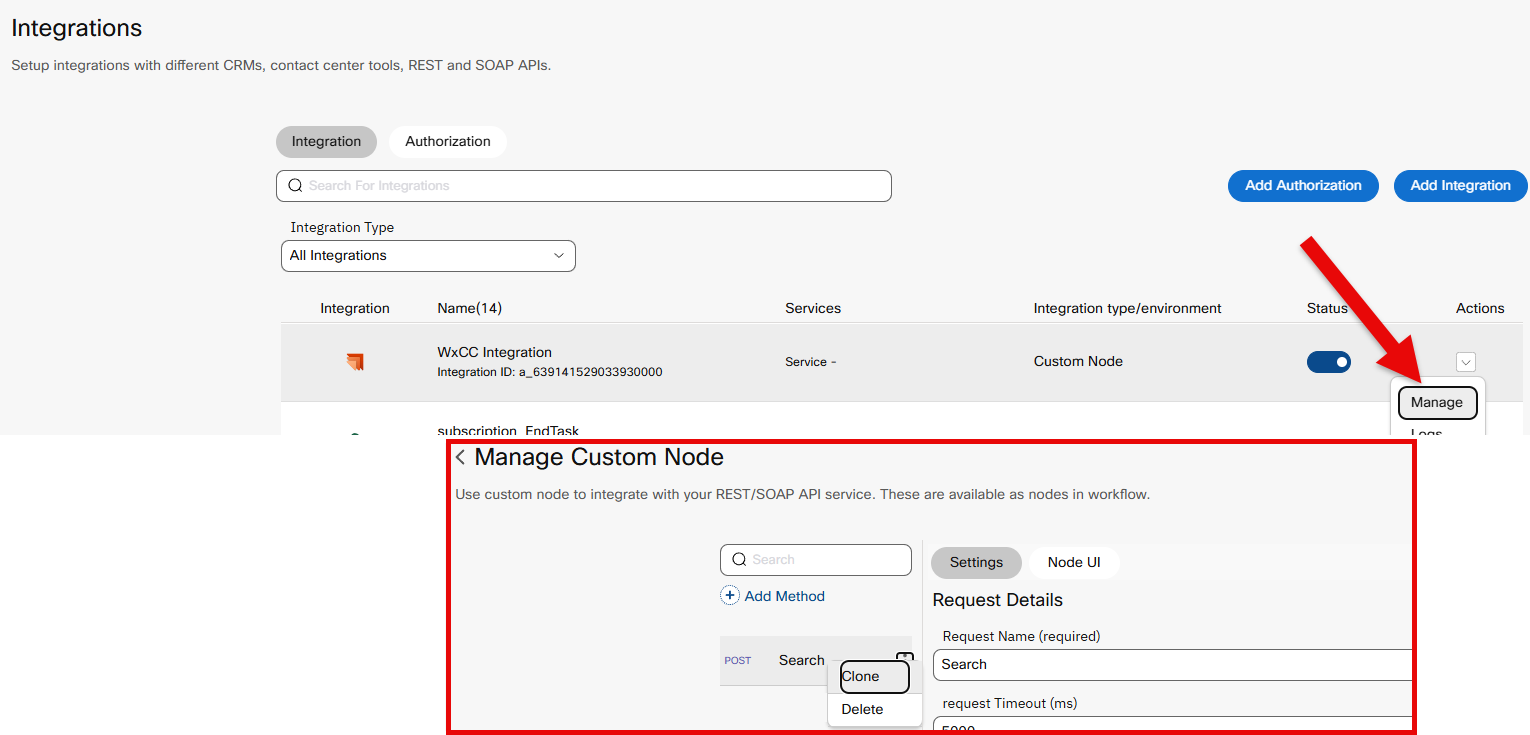
Clone the WxCC Integration Node
WxCC Integration Node
- In your Webex Connect tenant, navigate to the WxCC Integration node.
- Clone the node and name the new node:
Campaign Manager - You will configure three methods inside this node — one for each API call.
Method 1 — Get Active Campaigns By Source and Campaign ID
This method checks whether an active API-sourced contact list already exists for the campaign. It maps directly to the GET request you made in Bruno Step 1.
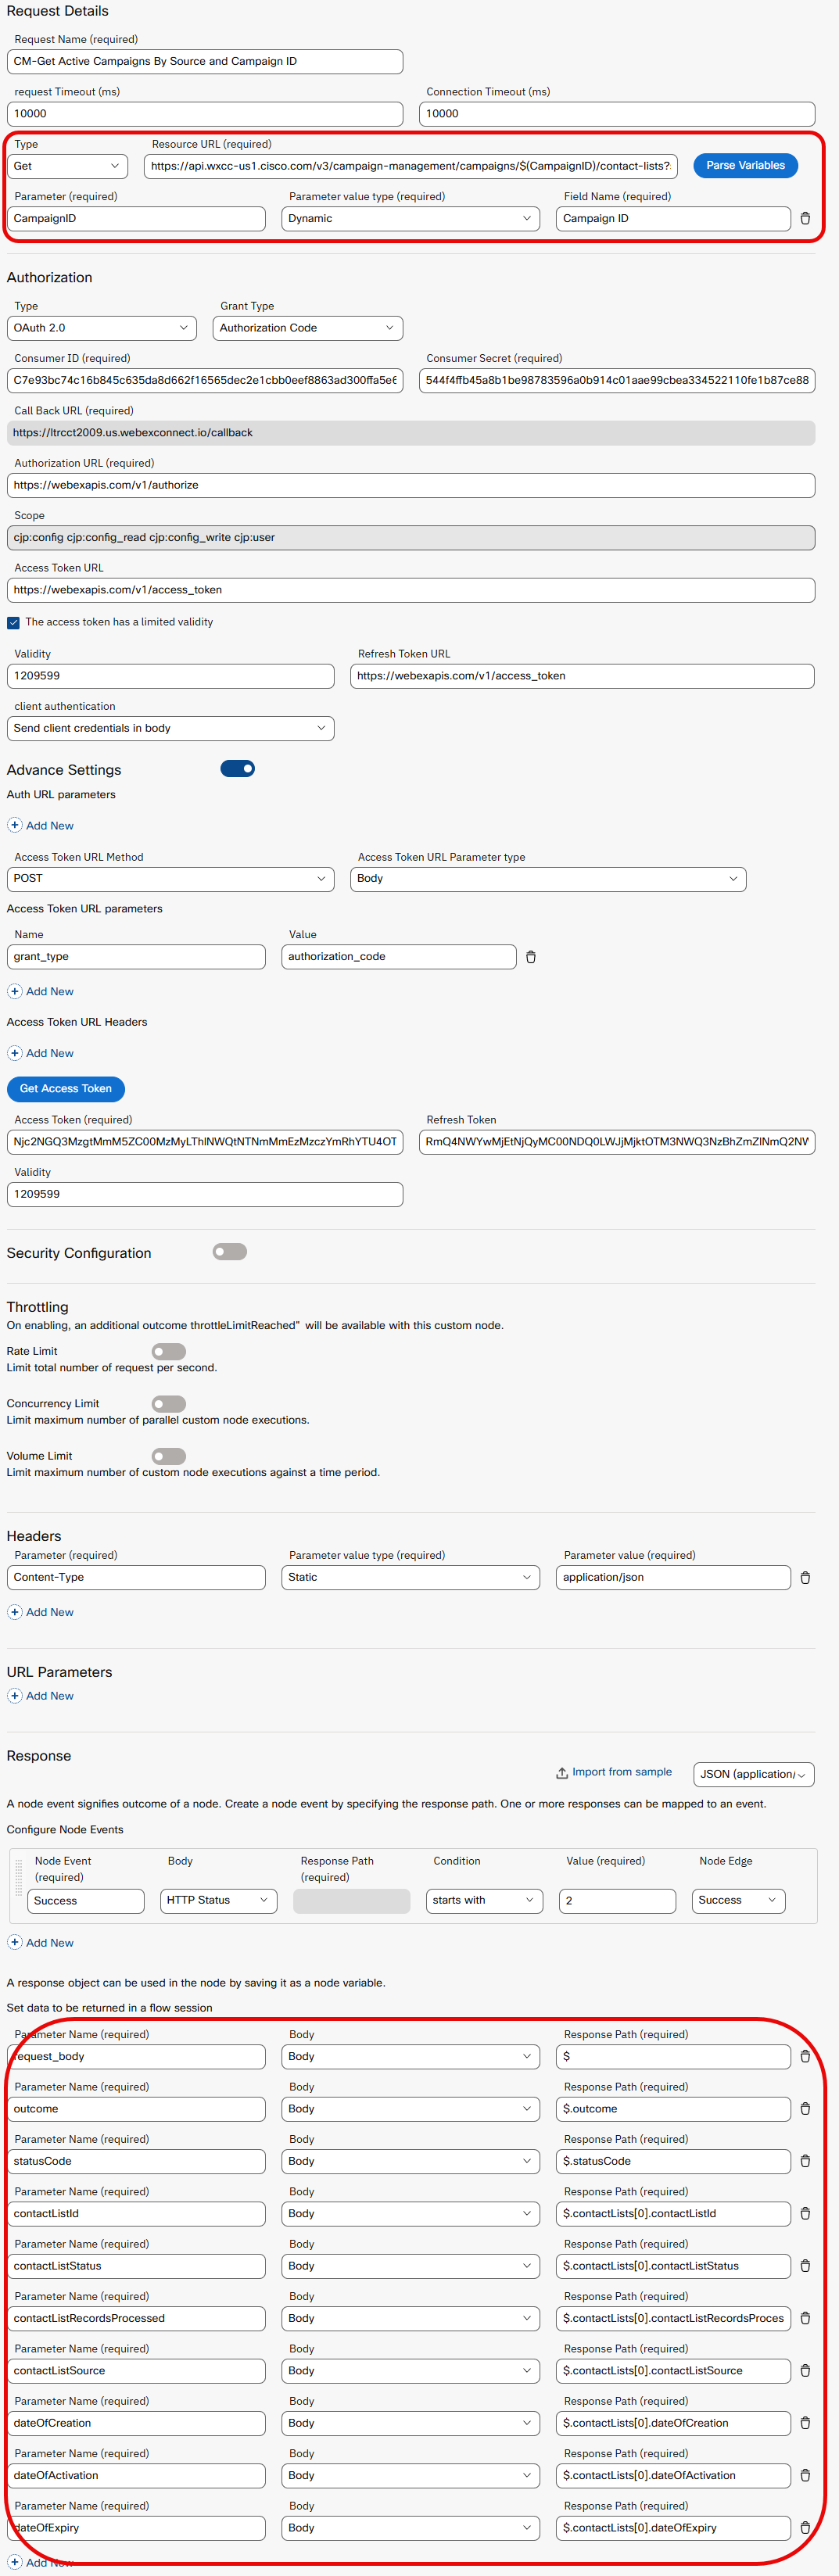
Configure Get Active Campaigns By Source and Campaign ID
- Inside the
WxCC Integrationnode, locate the method namedSearch, then click the kebab menu ⋮ and choose Clone. -
Update the following: Make sure you click on the method you just created
Field Value Name Get Active Campaigns By Source and Campaign IDMethod GETURL https://api.wxcc-us1.cisco.com/v3/campaign-management/campaigns/$(CampaignID)/contact-lists?status=Active&source=API -
Click Parse Variables, change Parameter value type to Dynamic and put in a Field Name
-
Leave all authentication settings as-is.
-
Scroll to the bottom and add the following response parameters:
Parameter Name Body Response Path request_bodyBody$outcomeBody$.outcomestatusCodeBody$.statusCodecontactListIdBody$.contactLists[0].contactListIdcontactListStatusBody$.contactLists[0].contactListStatuscontactListRecordsProcessedBody$.contactLists[0].contactListRecordsProcessedcontactListSourceBody$.contactLists[0].contactListSourcedateOfCreationBody$.contactLists[0].dateOfCreationdateOfActivationBody$.contactLists[0].dateOfActivationdateOfExpiryBody$.contactLists[0].dateOfExpiry -
Click Test, select the method name, and enter your Campaign ID to validate the response.
Method 2 — Create Contact List by Campaign ID
This method creates a new contact list against the campaign when no active list exists. It maps directly to the POST request you made in Bruno Step 2.
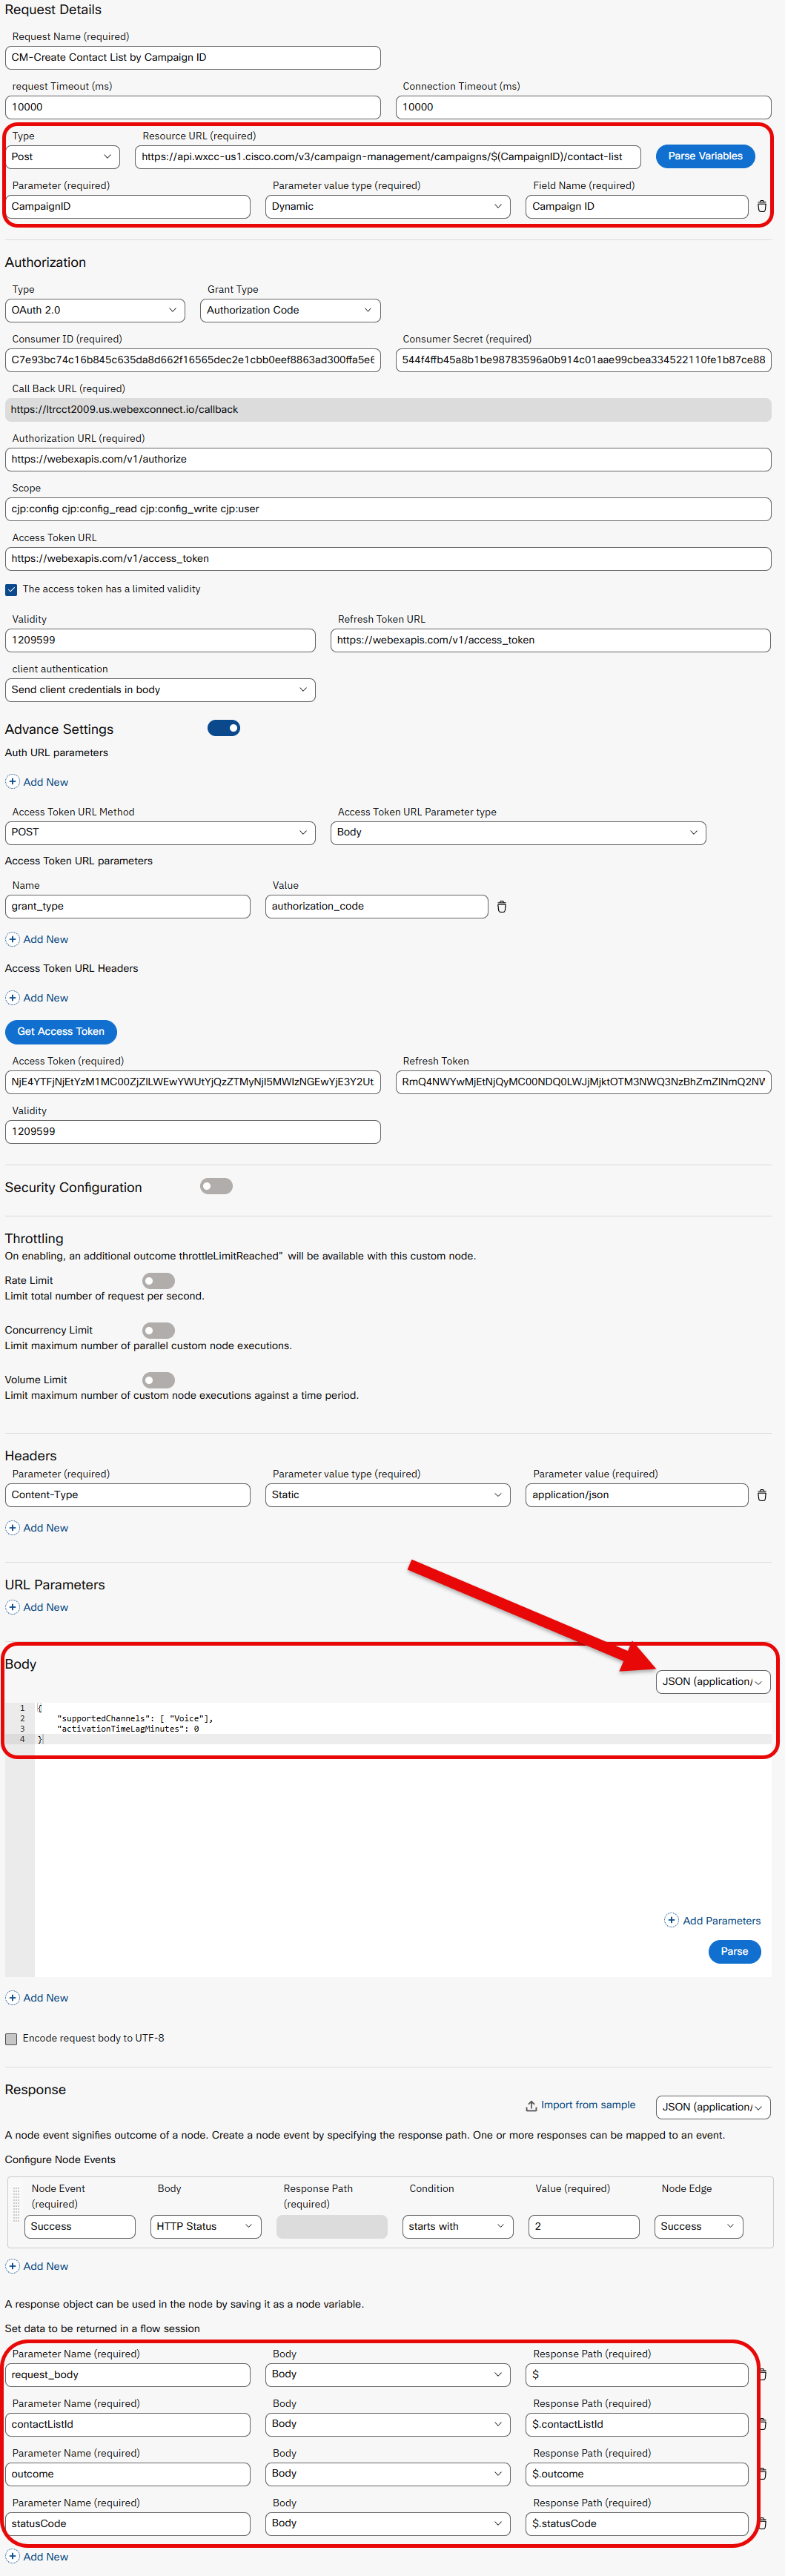
Configure Create Contact List by Campaign ID
- Inside the
WxCC Integrationnode, locate the method namedGet Active Campaigns By Source and Campaign ID, then click the kebab menu ⋮ and choose Clone. -
Update the following: Make sure you click on the method you just created
Field Value Name Create Contact List by Campaign IDMethod POSTURL https://api.wxcc-us1.cisco.com/v3/campaign-management/campaigns/$(CampaignID)/contact-list -
Click Parse Variables, change Parameter value type to Dynamic and put in a Field Name
- Set the request body to:
{
    "supportedChannels": ["Voice"],
    "activationTimeLagMinutes": 0
}
- Leave all authentication settings as-is.
-
Scroll to the bottom and add the following response parameters:
Parameter Name Body Response Path request_bodyBody$outcomeBody$.outcomestatusCodeBody$.statusCodecontactListIdBody$.contactLists[0].contactListId -
Save the method.
- Click Test, select the method name, and enter your Campaign ID to validate the response.
Method 3 — Add Contact to Contact List
This method injects the customer record into the active contact list, triggering the outbound call. It maps directly to the POST request you made in Bruno Step 3.
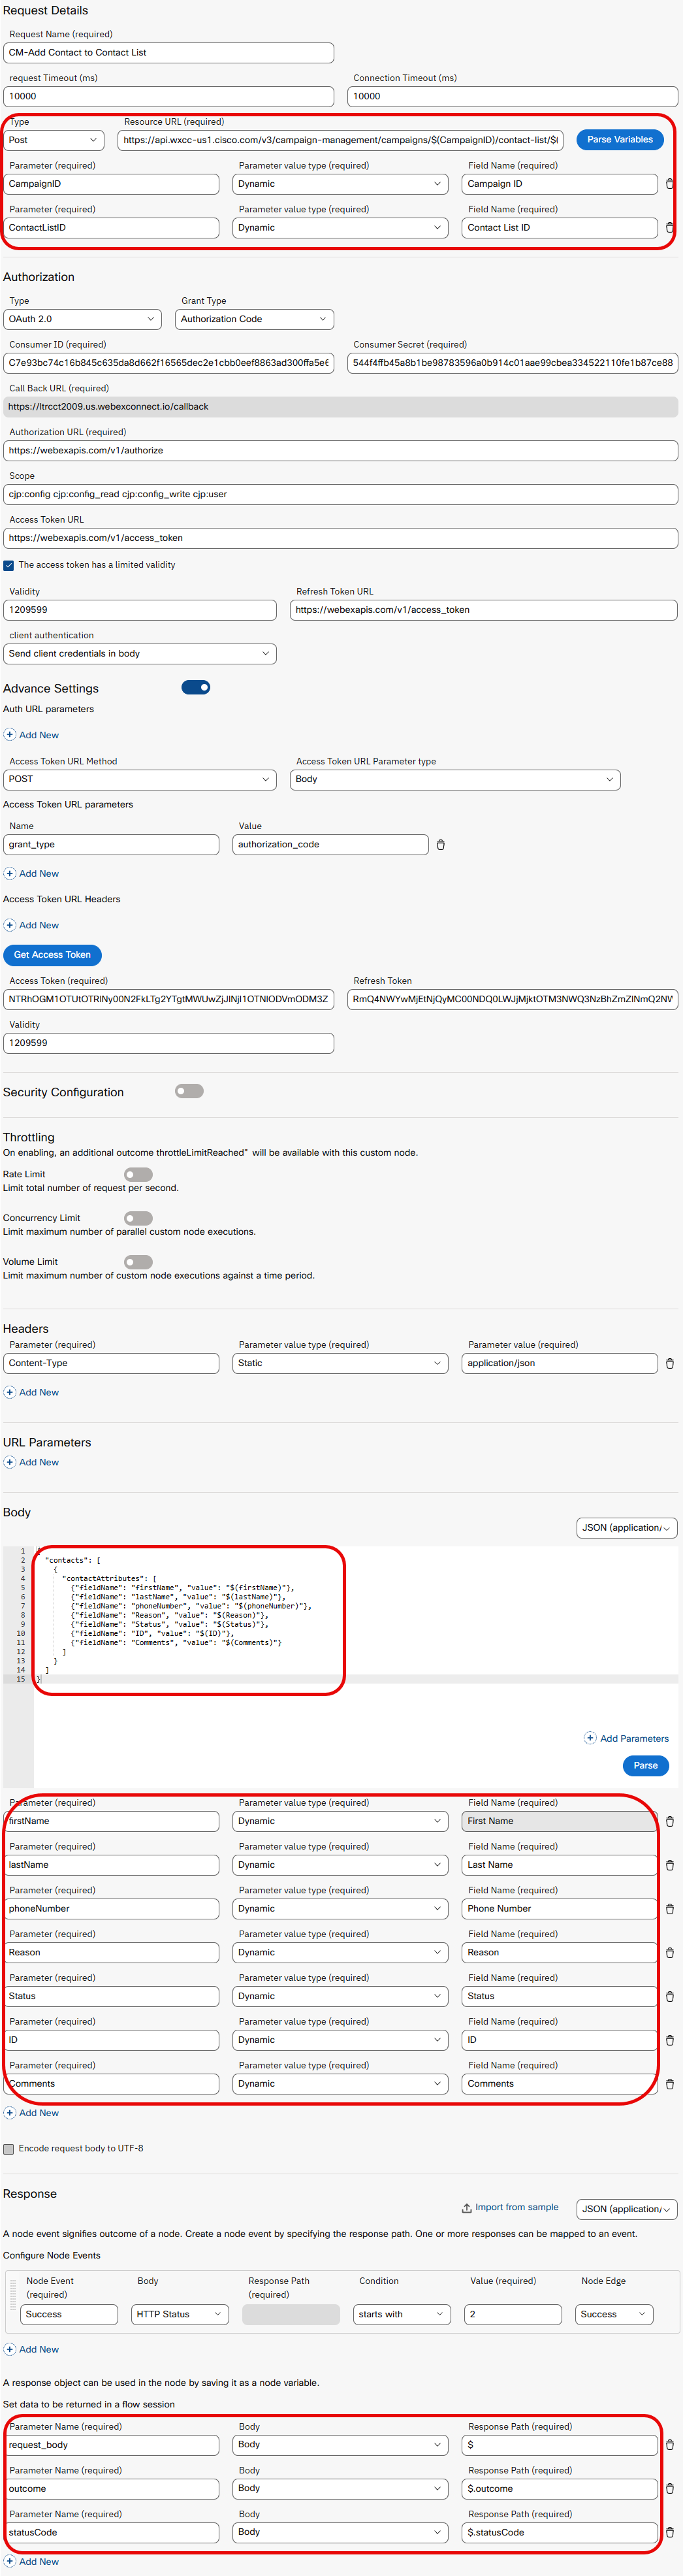
Configure Add Contact to Contact List - badExperience
- Inside the
WxCC Integrationnode, locate the method namedCreate Contact List by Campaign ID, then click the kebab menu ⋮ and choose Clone. -
Update the following: Make sure you click on the method you just created
Field Value Name Add Contact to Contact ListMethod POSTURL https://api.wxcc-us1.cisco.com/v3/campaign-management/campaigns/$(CampaignID)/contact-list/$(ContactListID)/contacts -
Leave all authentication settings as-is.
- Set the request body to:
    {
    "contacts": [
        {
        "contactAttributes": [
            {"fieldName": "firstName", "value": "$(firstName)"},
            {"fieldName": "lastName", "value": "$(lastName)"},
            {"fieldName": "phoneNumber", "value": "$(phoneNumber)"},
            {"fieldName": "Reason", "value": "$(Reason)"},
            {"fieldName": "Status", "value": "$(Status)"},
            {"fieldName": "ID", "value": "$(ID)"},
            {"fieldName": "Comments", "value": "$(Comments)"}
        ]
        }
    ]
    }
firstName | Dynamic | First Name |
| lastName | Dynamic | Last Name |
| phoneNumber | Dynamic | Phone Number |
| Reason | Dynamic | Reason |
| Status | Dynamic | Status |
| ID | Dynamic | ID |
| Comments | Dynamic | Comments |
-
Scroll to the bottom and add the following response parameters:
Parameter Name Body Response Path request_bodyBody$outcomeBody$.outcomestatusCodeBody$.statusCode -
Save the method.
- Click Test, select the method name, and enter your Campaign ID to validate the response.
Test the Integration
If you have not tested the integrations above, run a quick end-to-end test to confirm the Webex Connect node is reaching the Campaign Manager API correctly.
Test WxConnect Integration
- Trigger each method in sequence from the Webex Connect test console:
- Run Get Active Campaigns By Source and Campaign ID — confirm you receive a valid response
- If no active list exists, run Create Contact List by Campaign ID — confirm a
201response - Run Add Contact to Contact List - badExperience — use your own phone number in the payload
-
Confirm you receive a call on your phone and hear:
Log your agent into the desktop https://desktop.wxcc-us1.cisco.com/, make sure you are available and wait until you receive your first call.
5.11 — Implement in Bad Experience Event Flow
In this final step you will wire the Campaign Manager API call directly into the Bad Experience detection flow. When the system confirms a bad experience has been detected, Webex Connect will automatically inject the customer into the campaign — initiating the proactive callback without any manual intervention.
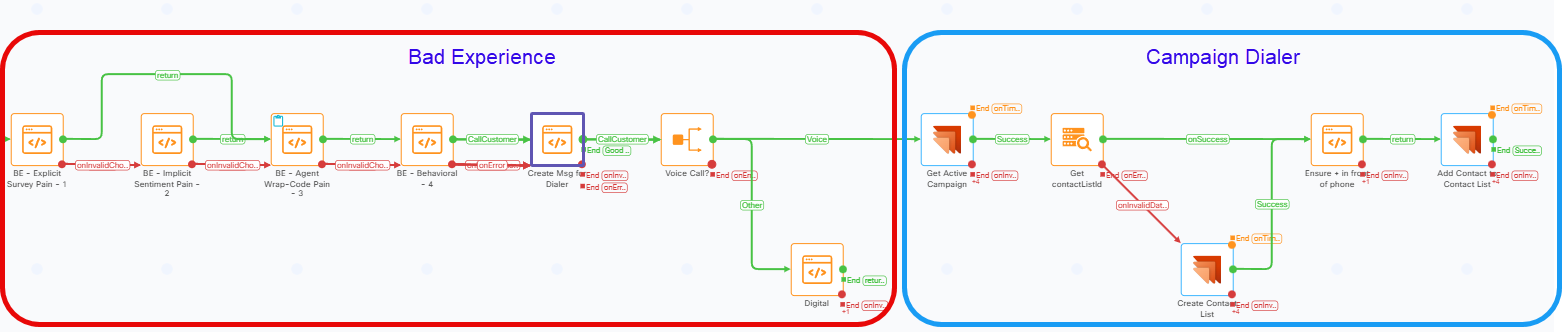
Flow Nodes Overview
The Bad Experience event flow is made up of six pre-provisioned nodes. Each node evaluates a different signal from the interaction and sets a ring variable that the final node uses to determine whether a callback should be triggered. The sections below describe what each node does and why it exists.
BE - Explicit Survey Pain - 1
Ring: bx_ring1
This node reads the customer's post-interaction survey score from the GV_SurveyResponse_value field. If the customer submitted a score of 1 or 2 out of 5, the ring fires. This is the strongest bad experience signal available — the customer explicitly told us they were unhappy.
BE - Implicit Survey Pain - 2
Ring: bx_ring2
When no survey was completed, this node falls back to the AI-predicted satisfaction score (autoCsat). If the predicted score is 2 or below and no survey score exists, the ring fires. This ensures customers who hung up before completing a survey are still caught by the detection system.
BE - Agent Wrap-Code Pain - 3
Ring: bx_ring3
This node checks the wrap-up code the agent selected at the end of the interaction. If the code matches a predefined list of negative dispositions — such as Complaint or Supervisor Escalation — the ring fires. This captures situations where the agent recognized the interaction went poorly even if the customer did not say so directly.
BE - Behavioral Pain - 4
Ring: bx_ring4
This node detects friction signals embedded in the interaction data itself. Any one of the following will fire the ring:
- Escalation events such as transfers, consults or conferences
- Rage disconnect — customer hung up within 60 seconds of connecting
- Hold abandonment — customer was placed on hold for more than 2 minutes and then disconnected
- Negative sentiment — NLP compound score below -0.3
- Queue or treatment abandon before reaching an agent
- Hold abandon detected by walking the activity node chain — a platform blind spot the node works around explicitly
When the ring fires, bx_behavioralPain is populated with a colon-separated string describing every signal that triggered, which is surfaced directly in the Reason field on the agent screen pop.
Msg for Dialer + verify rings
This node builds the three outbound campaign fields the agent sees on their screen pop — Reason, Status and Comments — using the ring globals and caller scoring set by the previous four nodes.
- Reason — appends a plain-English label for every ring that fired, separated by
: - Status — surfaces the caller's emotional state derived from
autoCsatandsentimentScore, along with which rings fired - Comments — delivers churn risk tier and recommended agent action based on emotional state
The node returns 1 if any ring fired, 0 if none did. The flow branches on this output.
Voice Call?
This node confirms the interaction is a voice call by checking channelType == telephony. If the condition is not met the flow exits without triggering a callback. This ensures the Campaign Manager API call is only made for telephony interactions.
Understanding the Trigger Point
Two conditions must be true before the flow proceeds to the Campaign Manager API call:
- Msg for Dialer + verify rings evaluates all four rings and returns
1if any have fired,0if none have - Voice Call? confirms the interaction is a voice call —
channelType == telephony
If either condition is not met the flow exits without triggering a callback.
Update the Bad Experience Event Flow
Add Get Active Campaign
-
Open the Bad Experience Event Flow in the WxCC Flow Builder.
Note
[Navigate to Service - Event Subscription and open Process Events with Search and Campaign ]
-
Locate Evaluate Node Get Active Campaign on the canvas.
- Delete the node and add in your new WxCC Integration node (note your svg image may be different)
- Open the node and rename it to: 'Get Active Campaign' (move your mouse near the end of the existing title and then click on the pencil [click checkmark when done])
- Click the Method Name dropdown and choose Get Active Campaigns By Source and Campaign ID
- In Campaign ID field, add the variable $(CampaignID)
- On the right of screen, click Custom Variables, find CampaignID, click the pencil and add your campaign ID. Click Save when complete
- Connect the WxCC Integration success (green) branch to the Get contactListId node
- Red invalid branch nodes do not need to be connected for this flow to work, however you can click and drag the branch lines and select 'Error'
Update Get contactListId
- Locate the Get contactListId node on the canvas.
- Open the node and click the Configuration tab.
-
Set the Input Data Form field to
$(<Get Active Campaign Node Number>.request_body)Note
To find the correct node number, click the Get Active Campaign node on the canvas. The node number is displayed in the bottom left of the node panel. Replace
<Get Active Campaign Node Number>with that value — for example$(n1567.request_body)or find the node in the input variables and click on request_body.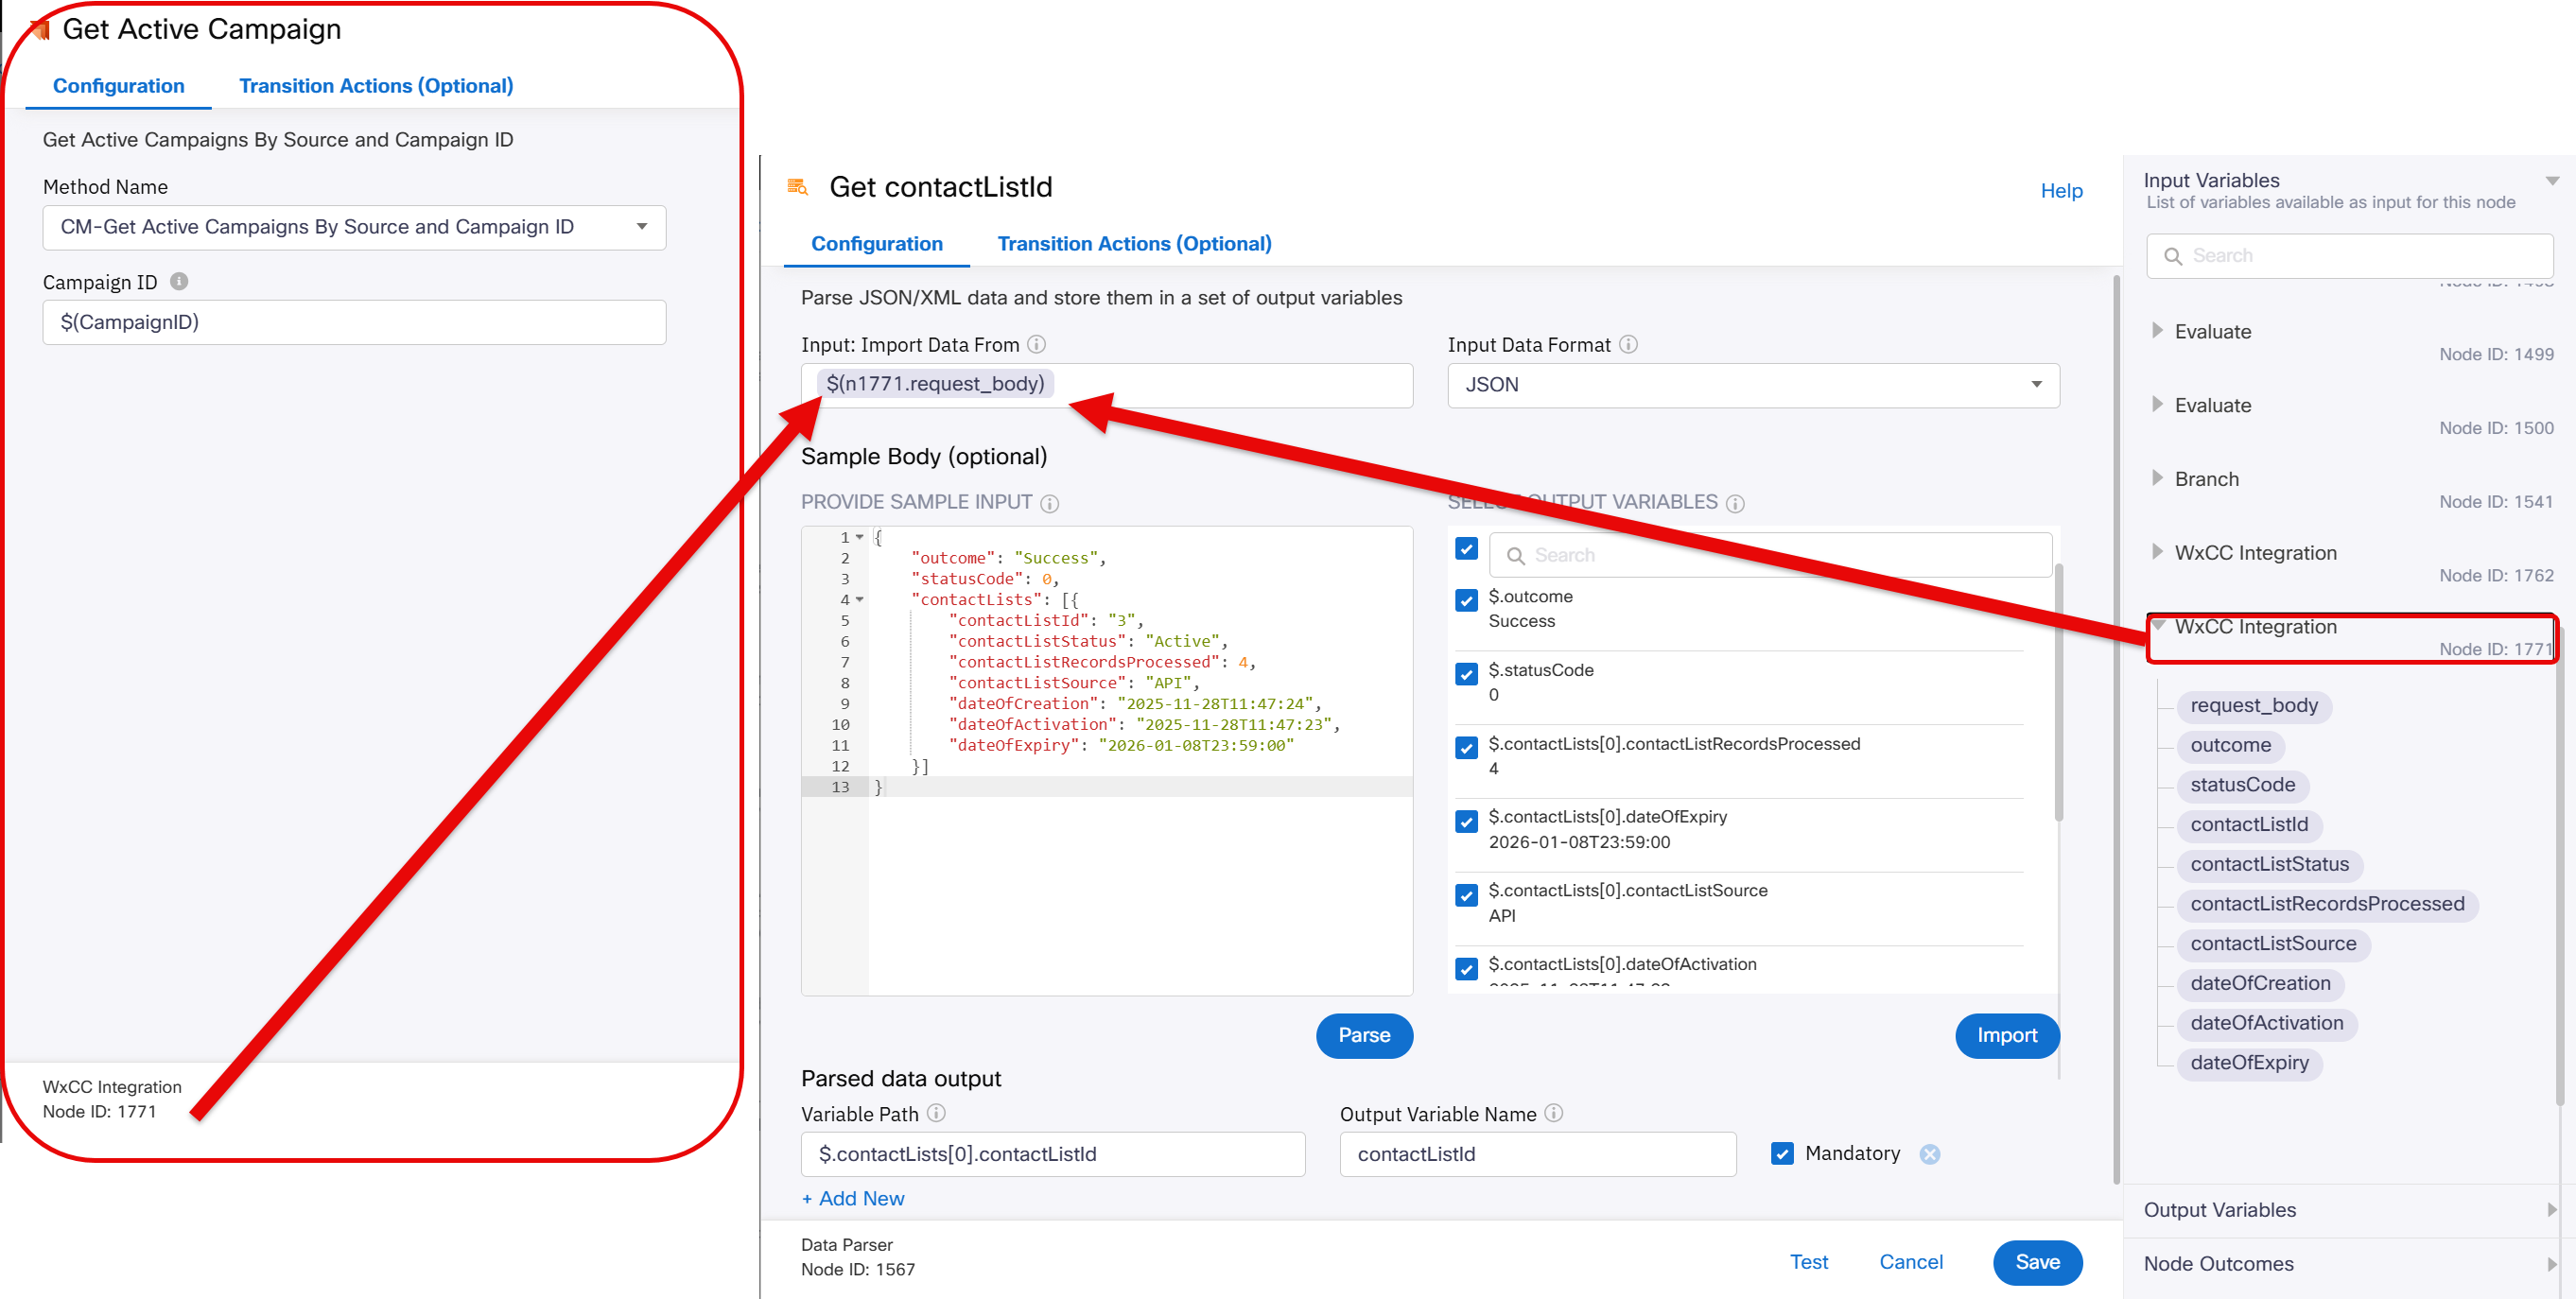
Get contactListId — Input Data Form configuration -
Click the Transition Actions tab.
-
In Action 1, update the Value field to match the same node number — for example
$(n1567.contactListId)Note
Use the same node number you identified in step 3.
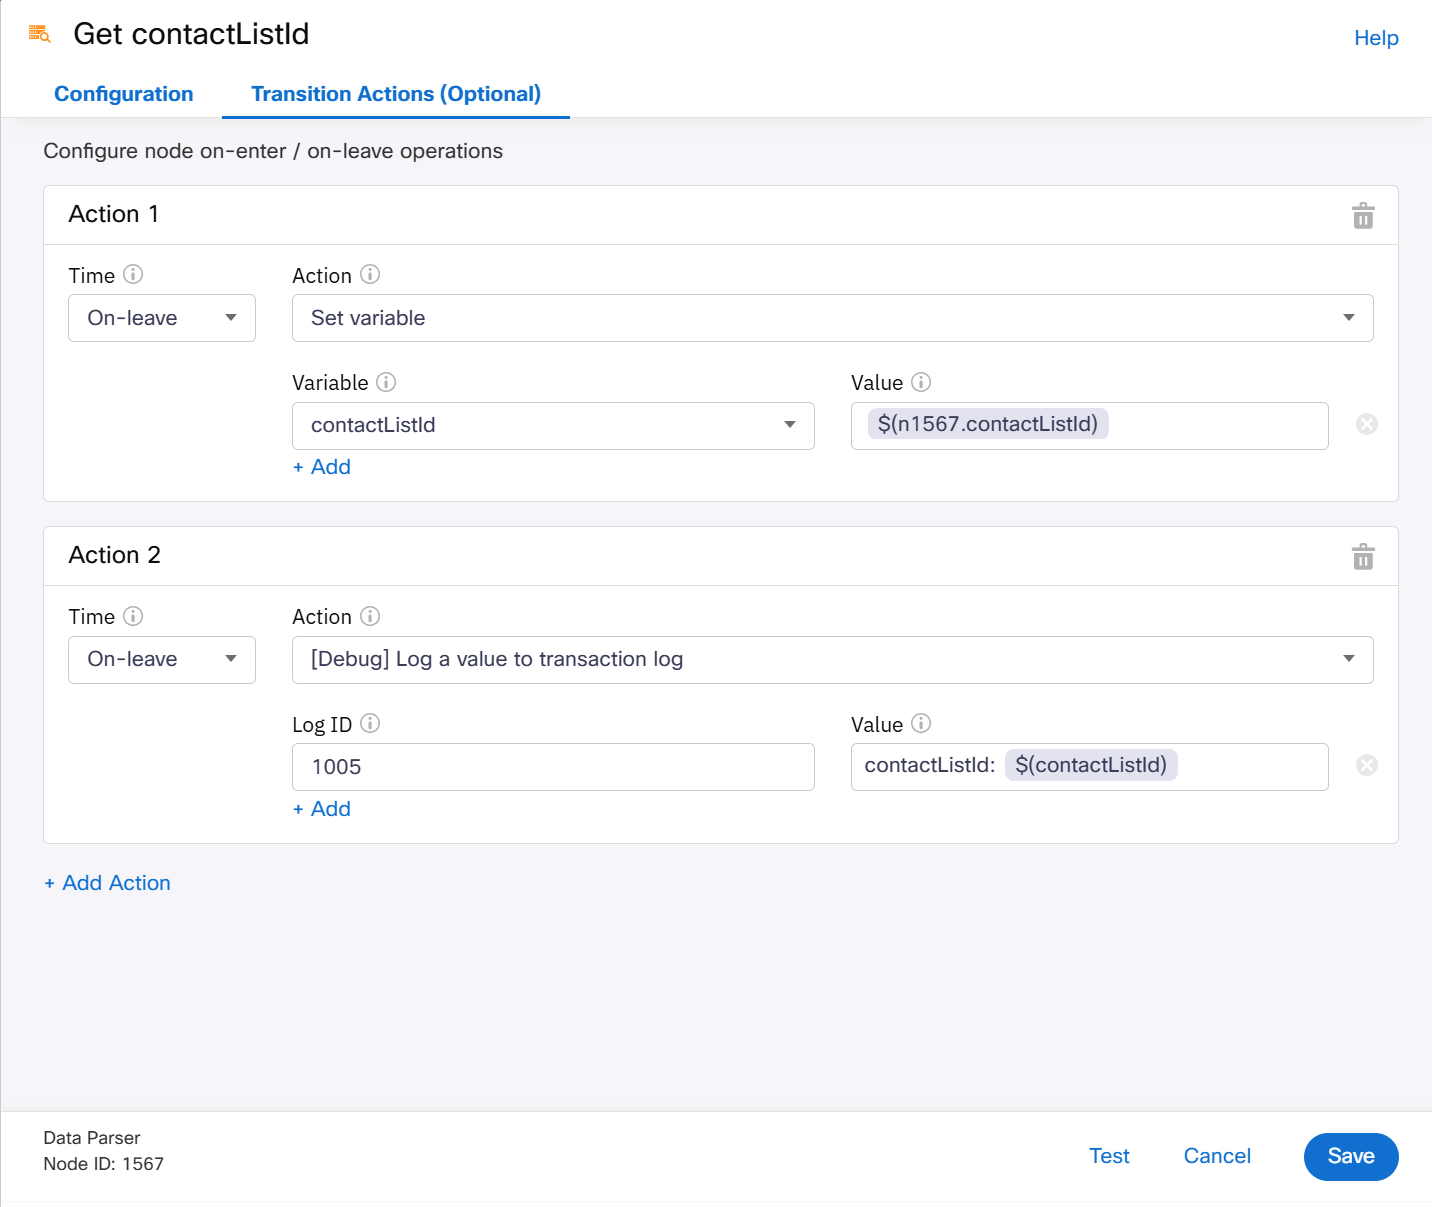
Get contactListId — Transition Actions configuration -
Click Save when complete.
Add Create Contact List
- Locate Evaluate Node Create Contact List by Campaign on the canvas.
- Delete the node and add in your new WxCC Integration node (note your svg image may be different) notice the onInvalidData Line was disconnected
- When you've moved over the new node, reconnect the deleted line from the get contactListId to the node you just moved
- Open the node and rename it to: 'Create Contact List by Campaign' (move your mouse near the end of the existing title and then click on the pencil [click checkmark when done])
- Click the Method Name dropdown and choose Create Contact List by Campaign ID
- In Campaign ID field, add the variable $(CampaignID)
- On the right of screen, click Custom Variables, find CampaignID, click the pencil and add your campaign ID. Click Save when complete
-
Click on Transition Actions to set the contactListId as a global variable
- Click + Add Action
- Set Time to
On-leave - Set Action to
Set variable - Set Variable to
contactListId - For Value, click Output Variables in the bottom right and select
contactListIdto populate the field - Click + Add Action again
- Set Time to
On-leave - Set Action to
[Debug] Log a value to transaction log - Set Log ID to
1005 - Set Value to
contactListId: $(contactListId)
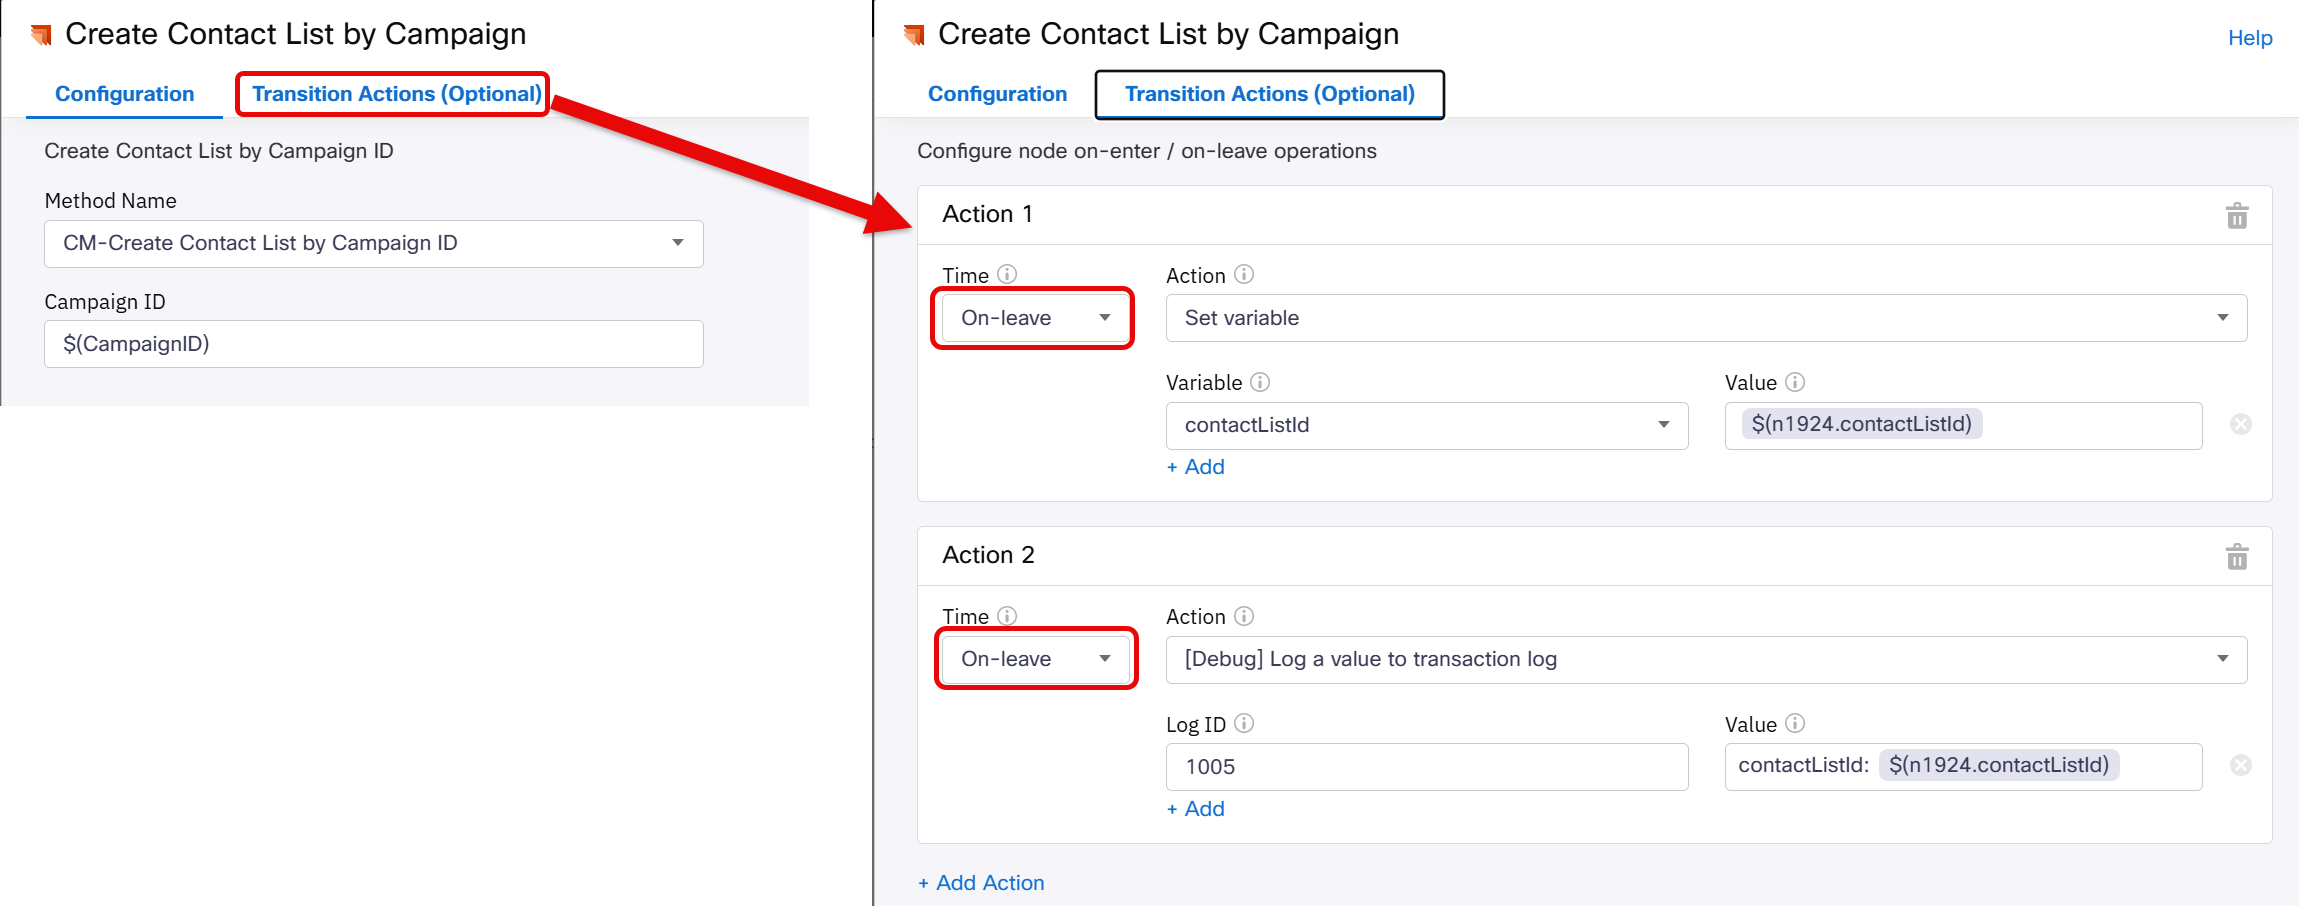
Create Contact List by Campaign — Transition Actions configuration -
Connect the WxCC Integration success (green) branch to the Ensure + in front of phone node
- Red invalid branch nodes do not need to be connected for this flow to work, however you can click and drag the branch lines and select Error
Add Contact to Contact List
- Locate Evaluate Node Add Contact to Contact List on the canvas.
- Delete the node and add in your new WxCC Integration node (note your svg image may be different)
- Open the node and rename it to:
Add Contact to Contact List(move your mouse near the end of the existing title and then click on the pencil icon, click the checkmark when done) - Click the Method Name dropdown and choose CM-Add Contact to Contact List
-
Complete the fields as follows:
Field Value Campaign ID $(CampaignID)Contact List ID $(contactListId)First Name $(firstName)Last Name $(lastName)Phone Number $(Phone)Reason $(Reason)Status $(Status)ID $(n2.inboundWebhook.data.taskId)Comments $(Comments)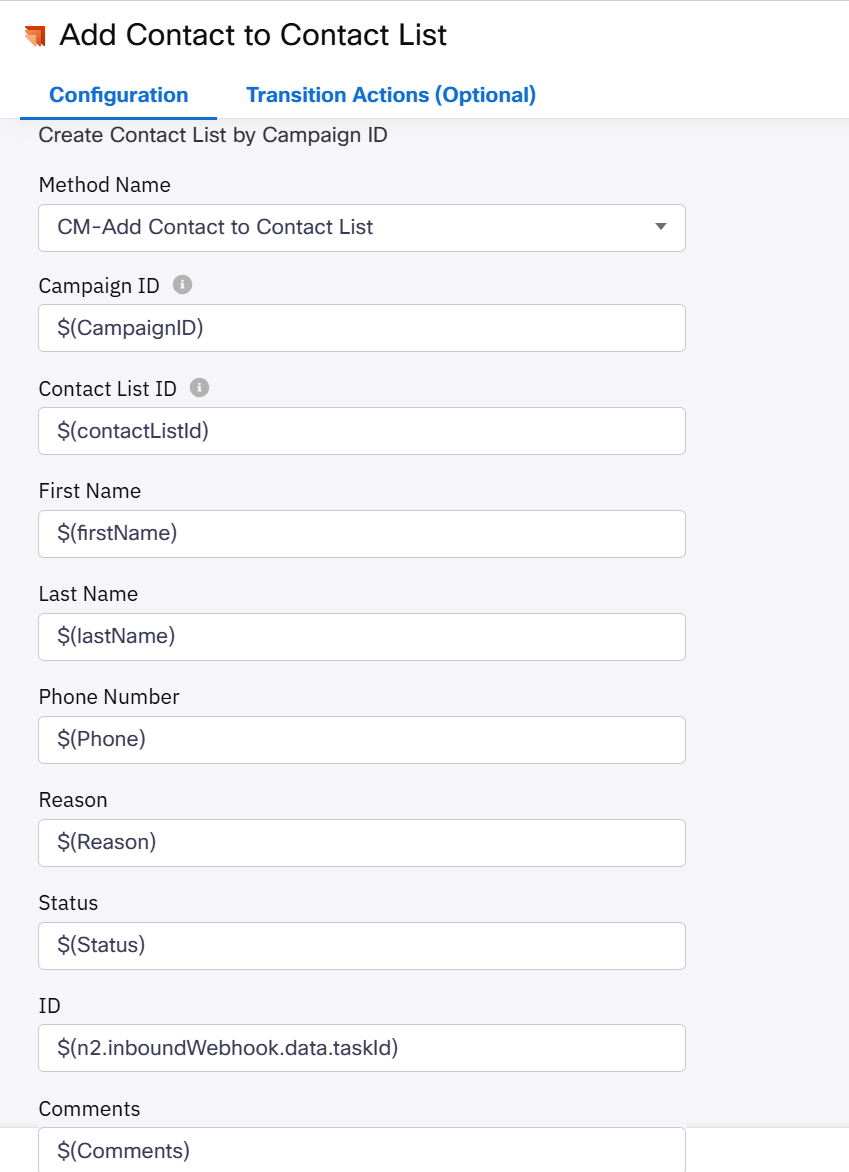
Add Contact to Contact List — field configuration -
Connect the Ensure + in front of phone node to this node
- Connect the success (green) branch to the next node in the flow
- Red invalid branch nodes do not need to be connected for this flow to work, however you can click and drag the branch lines and select Error
Test End-to-End
With the flow published, trigger a bad experience to confirm the full automated chain works end to end.
End-to-End Test
-
Place a call into your contact center and do any of the following to fire one or more rings:
- Submit a survey score of 1 or 2 when prompted after the call (fires ring 1)
- Have the agent wrap up the call with the Complaint wrap code (fires ring 3)
- Ask the agent to place you on hold, then hang up after 2 minutes (fires ring 4)
-
Confirm in the Campaign Manager portal that your contact record appears with status Eligible
- Wait for the callback — you should receive a proactive outbound call within 2–5 minutes.
- Answer the call and confirm the agent screen pop shows:
- Reason — reflecting the rings that fired
- Status — showing the caller's emotional state
- Comments — showing churn risk and recommended action
Tip
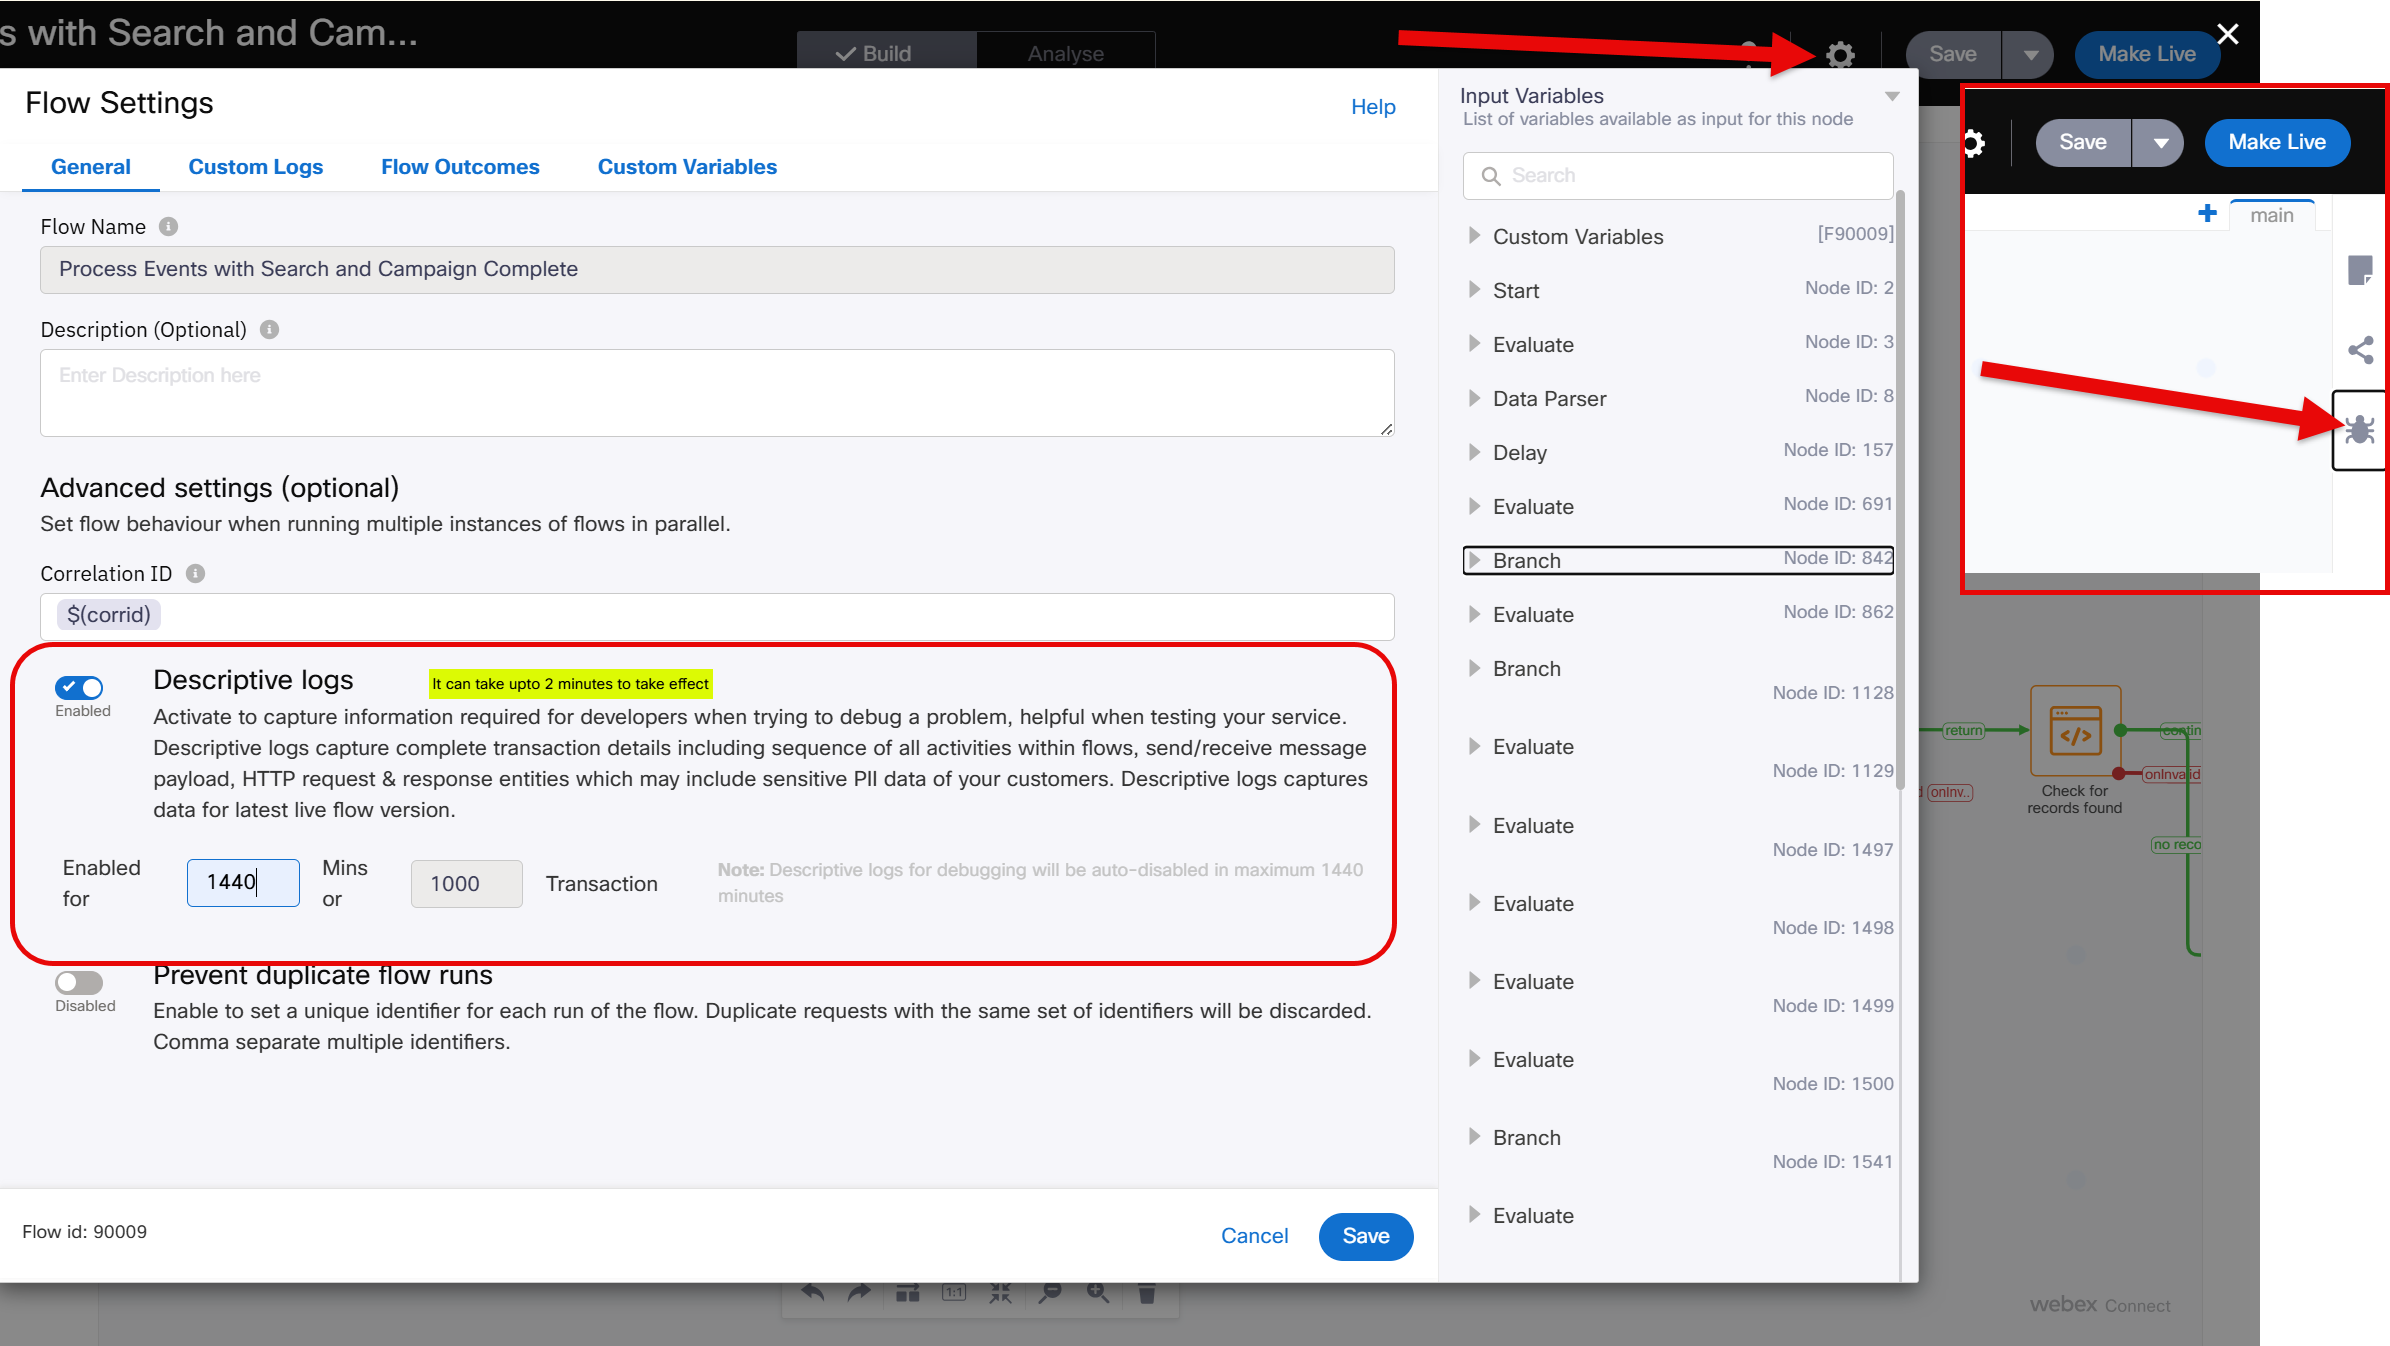
If the callback does not arrive, open turn on the debugger in WxConnect and review the flow results. Confirm Msg for Dialer + verify rings returned 1 and that Voice Call? branched to the success path.
Click on the sprocket, turn on debugging put in mins to stay on, click save (do another call), then click on the bug!
Lab Completion ✅
At this point you have successfully:
- ✅ Configured a team and outdial queue in Webex Contact Center
- ✅ Created all six Global Variables (
firstName,lastName,Reason,Status,ID,Comments) for Bad Experience context propagation - ✅ Built the
Bad_Experience_Campaignflow with CPA-based routing (AMD, Abandoned, Live Voice) - ✅ Configured the Outdial Entry Point and Outdial ANI
- ✅ Completed all Campaign Manager prerequisites (contact modes, field mappings, suppression rules, telephony outcomes, wrap-up codes, meta-tags)
- ✅ Created, configured, and activated the
BadExperience_CampaignProgressive IVR campaign - ✅ Validated the end-to-end flow with a manual CSV contact list upload
- ✅ Injected a contact via the Campaign Manager REST API using Bruno and received a live test call
- ✅ Configured the Webex Connect Campaign Manager integration node with all three methods
- ✅ Wired the Bad Experience detection flow — evaluating survey scores, auto-CSAT, agent wrap codes and behavioral signals across four detection rings
- ✅ Built the agent screen pop fields (
Reason,Status,Comments) surfacing churn risk, emotional state and trigger context - ✅ Connected the callback trigger into the Bad Experience Event Flow — fully automating the proactive outbound callback
Congratulations! The outbound campaign infrastructure is fully operational and the Bad Experience detection system is now connected end-to-end. When a customer has a bad experience, the system will automatically detect it, inject their record into the campaign, and trigger a proactive callback — all without manual intervention.